Well here it is, the promised tutorial on how to make my grunge background paper with Distress inks which is not nearly as messy as those involving water although I have to say, your fingers will still get a bit inky. One of the hazzards of DIY but a lot of fun anyway as when you get the hang of this, you can make the papers really quickly (I made 4 in 20 minutes) and it may get you addicted to doing your own decorated papers. I've been doing my own for 14 years now!
It helps with this technique if you use a very smooth card as a slightly rough surface will cause the ink to be absorbed almost at once and it won't move around as mine has done. This won't matter as the technique produces a very random effect and no 2 pieces will ever be exactly the same.
Step 1 - Take a craft sheet or a plastic clipboard and 2 colours of Distress Ink, a light and medium shade of the same colour. I have used Scattered Straw and Mustard Seed. Starting with the lighter colour, apply patches of ink to the craft sheet then repeat with the darker colour, adding a few patches on top.
Step 2 - Take a piece of card (mine is approx. 15cm square) in white or a pale colour - I used cream so that you can see it better. Place the card over the ink patches and press down all over with your fingers.
Step 3 - Turn the card over and on a craft mat, rub a sponge over to smudge and blend the inks a little. If there are any uncovered areas left, turn the card back over and pick up some ink left on the craft sheet, pressing down as before and repeating until you're happy with the result. If you like the colour at this point then stop here and jump to Step 6.
Step 4 - If you want to add some more colour, choose another light and dark version of the colour - I have used Spun Sugar and Victorian Velvet and repeat step 1 and 2 with these colours.
Step 5 - Rub with a sponge as before until you are happy with the colours.
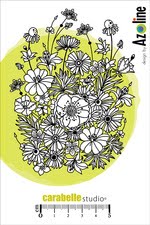
Step 6 - Stamp a design on your inked paper using the darkest of your colour choices which in this case is the Victorian Velvet. The flourish stamp is from a tiny clear stamp set by Prima, reference Go Green Concepts 850715. You may find that the darkest ink colour doesn't make enough of a contrast so if that happens just take the darkest colour of Distress Ink in your chosen shade.
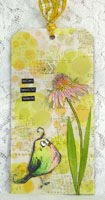
Here's the card I made with the above piece of paper. The image is a free one courtesy of Craft Stamper magazine and I've put her on a mat of pale aqua and deep rose pink paper. I made a border with the same papers, a Martha Stewart edge punch and scallop scissors and added a butterfly image and golden pearls to finish.
I hope you like this and decide to give it a try as it really is very easy. I've also got another sample here to show you the very different look you can get by using another colour card. If you scroll down to my previous post, you will see a background paper made using the technique on blue card. Here are exactly the same colours using white card.
This just goes to show that the variety of papers at your fingertips can be infinite if you have just a few colours of card, stamps and ink colours.
Enjoy!


.JPG)


3 comments:
Fliss this is fantastic, they are so beautiful, I really love the effect and i'm going to try it this week, fingers crossed it turns out ok. Thank you for sharing, i'm all for saving money as I craft on a very tight budget.
Happy crafting
Tracy x
oh fliss brilliant tutorial and one awesome card,at the end of it,thanks for sharing too hun hugs cheryl xxxxxxxx
Fliss, this is wonderful. I have made many backgrounds but I never thought to stamp a repeating design on them. What an eye-opener. Thanks for the tute.
Post a Comment