Hello everyone, a very quick post from me today as I'm quite determined to join in with Tim's Tags of 2016 having not managed the last couple of years as I've been so busy with work and things. I'll probably be last past the post too!
I didn't have quite a lot of the materials that Tim used so have had to improvise somewhat, although I do think this is one of the best things about the tags as it's such a creative jump start to come up with an alternative.
Here's what I made and it's not quite as good as Tim's of course which you can see HERE
For mine, the alternatives are an X Cut Tri Boss Clocks Embossing Folder, DecoArt Carbon Black Antiquing Cream, Kaisercraft and Kanban clock stamps.
See you again soon.
Fliss xx
Sunday, 31 January 2016
Friday, 29 January 2016
Flower Garden For That's Crafty!
Hello everyone and welcome to my only post this week which is because due to work I've had virtually no spare time so no blogging was possible. Really sorry about this and things will be back to normality next week!
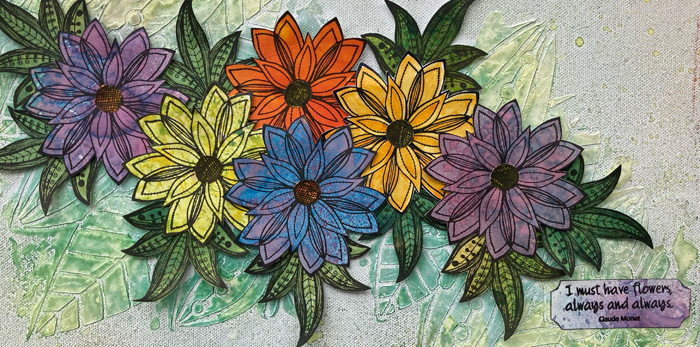
I have a tutorial over at That's Crafty today which is a nature themed art panel - you know how much I love creating anything involving that!
This was inspired by a photo I found on the internet which featured a large number of gaily coloured Echinacea (cone flowers) so I couldn't resist creating something with one of my favourite Flower Garden stamps.
You'll find all the details over at the blog if you'd like to hop over to see how my panel was made.
Have a great day and a lovely weekend and see you soon.
Fliss xx
Labels:
Deco Art,
Dinky Stencils,
Finnabair,
Prima,
That's Crafty,
Tim Holtz Products,
Wall Art
Friday, 22 January 2016
Artist Trading Cards At That's Crafty Challenge Blog
Hello again and welcome to my inspiration for our new challenge today over at That's Crafty Challenge Blog which has the theme this time of ATCs.
Who doesn't love those little creations which can be created so quickly and I really enjoyed making mine as it gave me the excuse to let my crazy birds out to play again!
Aren't they just adorable!
I've used 2 of the fab That's Crafty Surfaces MDF ATC blanks for my creations. I coloured the background by applying yellow and green fluid acrylic paints to my 3x5 Gelli plate and then pressed the atcs on to pick up the colour. For this technique, I didn't even have to use Gesso!
I then used 3 different That's Crafty Dinky stencils with red, magenta and black fluid acrylics to apply a pattern on the painted backgrounds. I knocked the colour back a little with white Gesso as it was rather bright! I stamped a butterfly pattern on one of the atcs in the spaces remaining.
I stamped my 2 favourite crazy birds on smooth card with black Archival ink and coloured them with watercolour pencils. I then used the matching dies to cut the images out. I glued them onto backgrounds and used a grey pencil to add definition round the outside of the birds.
I added black around the edges of one and finished off with some Chit Chat stickers.
I used:
Deco Art Fluid Acrylics - Carbon Black, Yellow Green Light, Hansa Yellow Medium, Pyrrole Red, Quinacridone Magenta.
Thats's Crafty Dinky Stencils -Circles Background, Chequerboard Background, Diamond Circles Background
Tim Holtz Bird Crazy Stamp Set and matching Sizzix Die Set
Watercolour Pencils
There's a fab prize if you enter with a voucher for the online shop up for grabs for the randomly drawn winner so do enter if you can.
Labels:
Deco Art,
Dinky Stencils,
That's Crafty,
Tim Holtz Products
I Heart Steampunk For That's Crafty
Hello everyone and apologies for my lack of visiting this week which is because I'm working full time due to the fast looming tax deadline and I'm so pooped in the evenings I haven't felt like doing any more than collapse in front of the TV!
Only a week to go now and hopefully normal service will then resume!
I have a post today over at That's Crafty which this week is a mixed media art panel on one of my favourite themes - steampunk if you haven't already guessed :D
I hope this will intrigue you enough to pop over to see the whole thing and I'd be so pleased if you did as I so enjoyed making this.
I'll be back in a bit as we have a new challenge over at That's Crafty Challenge Blog today and I can hardly wait to show you my inspiration!
Fliss xx
Monday, 18 January 2016
Stitching at Make My Monday
Hello everyone, I hope you all had a good weekend and stayed warm if you had snow which I have to say we did not! Snow only makes a very rare appearance this far south and all we had was grey skies and rain!
We have a new challenge for you today at Make My Monday with a theme which I chose as today is my younger daughter's birthday and as she's a print designer in fashion, I picked Stitching - Real or Faux.
Here's my inspiration which is a fairly simple card to show off my beautiful new Penny Black poppy stamp. Hope you like it!
I inked up the stamp with several shades of Memento ink - Bamboo Leaves, Pear Tart, Lilac Posies, Sweet Plum, Grape Jelly. I then stamped the image on smooth stamping card. I trimmed this to a panel and stamped on the sentiment with the bamboo ink.
I trimmed a panel of green textured card to form a mat just on either side as the stamp image is very large (around 14cm high). I used the Tim Holtz ruler to make rows of holes and then used a Sharpie fine white marker to make the faux stitching. It actually came out looking rather like my real stitching - somewhat wonky!
I glued the panels to a pearl card blank to finish.
Have a great day and a lovely week.
Fliss xx
Labels:
Make My Monday,
Penny Black
Friday, 15 January 2016
Tongue In Cheek At That's Crafty
Hello everyone, I hope you've all had a good week and not as busy as mine as I have so much work on at the moment I practically fall asleep in the middle of dinner!
I have a post at That's Crafty today to share a rather cheeky card I made with some bits from my experimental box.
You'll find all the details over at the blog if you'd like to see how it came about and there are quite a few progress pics to show how the background paper came about.
Have a great day and a lovely weekend.
Fliss xx
Friday, 8 January 2016
Winter But Not Christmas!
Hello again and welcome to my inspiration for our new challenge over at That's Crafty Challenge Blog where we would like to see your creations on the theme of Winter but definitely not Christmas! So it's time to get frosty!
I've taken this opportunity to ink up my newest cute stamp which is the adorable Katzelcraft grumpy penguins.
I've used a white/greyboard postcard as my starting point as these are really fab if you haven't got much crafting time available.
I applied some Paper Artsy Fresco Finish acrylic paint in Lavender and Vintage Lace, using my fingers which is rather messy but gives a soft grungy effect.
I then used the That's Crafty snowflake dinky stencil with the Ranger Emboss-It Dabber to make a pattern around the edges of the painted panel and heat embossed it with Ranger Weathered White Embossing Powder. I added some more embossing round the edges for an extra snowy look.
I stamped the penguins on stamping card with Archival Jet Black ink and added colour to the images with watercolour pencils. I then cut them out and rounded them out with a large embossing tool before adding to the panel with foam tape.
I finished off with a stamped sentiment, adding the exclamation mark with a fine black pen as I was trying for a little sarcasm to go with the general grumpiness!
Hope you can enter and the prize for the randomly drawn winner is a £20 voucher for the online shop.
Have a great day and a lovely weekend and see you next week.
Fliss xx
Labels:
Dinky Stencils,
Katzelcraft,
Paper Artsy,
That's Crafty
Dreaming Big At That's Crafty
Hello everyone from a rather tired Fliss! I'm back at work after the Christmas break and it's now official - I really don't like January!!! Being in accountancy it's our busiest time of year so all I can say is roll on February :D
I have a post today over at That's Crafty where I'm sharing a journal style art panel on one of the fab substrata surfaces, this time a white/greyboard panel.
Here's a sneak peek and hope you like it.
My round Gelli plate has come out to play along with one of my fave Dina Wakley positive ladies and you'll find the details and the whole project over at the blog. I'd be so pleased if you popped over for a visit.
I'll be back in a while with the details of our new challenge over at That's Crafty Challenge Blog.
Fliss xx
Labels:
Dina Wakley,
Dinky Stencils,
Gelli Plate,
Paper Artsy,
That's Crafty
Sunday, 3 January 2016
Brusho Play
Hello and welcome to today's post which has happened because I wanted to share a card I made with one of the bits from a demonstration I did last week for my sister in law who is a teaching assistant and runs an art club for the children.
We got talking on Boxing Day and I mentioned Brusho Crystals in connection with something I'm working on at the moment (can't tell you what as it's a secret at the moment :D) and she said they had those at school but what could she do with them!
I'm sure you know how much I love them so I did a demo with various ways using things I thought the children would like to use such as bubble wrap, jar lids, straws etc and I'll show you all the things I did another time.
I saw a couple of challenges that would fit the little meadow scene I made with my new Hunkydory Poppy Meadow clear stamp set which I couldn't resist as I love poppies. Hope you like it!
I started off with a piece of mixed media paper torn from an A5 size pad and decided to incorporate the torn section as it gives a rather rustic look which I thought fit what I wanted to do very well.
I sprinkled on some Lemon Brusho Crystals at the base of the paper then misted with water. I then used a straw to blow the paint about the paper and gained some streaks on the top half.
I then turned the paper up the other way and stamped the poppies on with Archival Watering Can ink. I stamped a butterfly from the set with the same ink. I painted the images with Brusho Crystals, sprinkling a little in a paint palette and adding water. I used Brilliant Red, Lime Green and Turquoise.
I made the grass by sprinkling lime green crystals on a ceramic plate and misting with water. I then used an old store card to pick up paint which I applied in streaks to resemble grass, pulling some paint sideways whilst the paint was wet.
I then sprinkled on a little Gamboge Brusho Crystals, concentrating on the torn edge and the bottom of the panel. I misted this with water and let the colour run a little. You can see where the water made the colours on the poppies and butterflies run a little and I think this gives a lovely free flowing effect.
I glued the panel to a white card blank and stamped on the Hobby Art text with the grey ink to finish.
Have a great day and see you again soon although not sure quite when as I have to go back to work tomorrow - eek!
Fliss xx
I'd like to enter the following challenges:
Allsorts Challenge - What's New (my stamp set and blowing the Brusho Crystals around with a straw!)
Inkspirational Challenges - Thank You With Something New (shown above)
Just Us Girls Challenge - Thank You
Labels:
Brusho Crystals,
Nature,
Scenic
Friday, 1 January 2016
Hello Flower For That's Crafty
Happy New Year everyone and wishing you all the very best for 2016.
Today's post is to let you know that I have the honour of starting off a brand new year of tutorials over at That's Crafty blog which is a wooden tag, one of the fab new substrata blanks now available in the online shop.
Here's a sneak peek and you can see the whole thing over at the blog.
As you can see, my favourite crazy bird has come out to play and to find out what he's peeking up at you'll need to hop on over.
Have a great day and I hope you can fit in some crafting as I'm aiming on doing just that - a very good start to the new year I think!
Bye for now,
Fliss x
Subscribe to:
Comments (Atom)


.JPG)


