Hello everyone, I hope you're all enjoying the somewhat unseasonal heatwave we seem to be having at the moment. I'm on the South coast so we do at least have a sea breeze to keep it a little cooler.
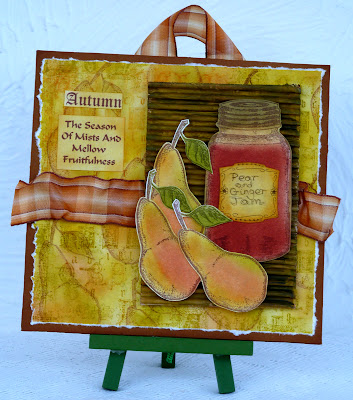
I have a collage to show you that is in my favourite warm, glowing Autumn colours and will be hanging in my kitchen as it has a fruit theme.
Supplies used:
Pear stamp (unknown as I've had this one for over 10 years)
Script stamp - Anna Griffin
Jar stamp - Inspiration Jars from The Artistic Stamper
Distress Inks - Scattered Straw, Wild Honey, Mustard Seed, Crushed Olive, Peeled Paint, Worn Lipstick, Aged Mahogany, Old Paper, Frayed Burlap, Rusty Hinge
VersaFine Inks - Spanish Moss, Toffee, Vintage Sepia
Brown Fineliner
Corrugated packaging and cardboard packaging
Beige Parchment Paper
Checked Wired Ribbon
Acrylic Paints - Olive Green and Golden Green
I've used the parchment paper for the inked and stamped background as well as the jar and pears which were stamped and sponged with ink to colour. This paper is very good for inking as the inks move around well.
The edges of the packaging were inked and the torn edged paper added. The corrugated card was painted with the acrylics and the collage assembled as you see. The text is computer generated and was inked. The jar label is cut out with a small Nestabilties label die and was hand doodled and written on.
I'm entering my collage in the following challenges:
The Stamp Man - Pears or Pairs
Sir Stampalot Challenge - Food Glorious Food
The Artistic Stamper Challenge - Autumn Colours
Hope you all enjoy the rest of the weekend.
Fliss xx
Showing posts with label Artistic Stamper. Show all posts
Showing posts with label Artistic Stamper. Show all posts
Saturday, 1 October 2011
Monday, 26 September 2011
Steampunk Garden
As promised, I'm back and this is where you might need your sunglasses as my artwork will surely brighten up a dull day!
Today we have the final Steampunk Challenge for you over at Make My Monday and this week we would like to see Anything But A Card with a Steampunk Theme.
My creation started life as a piece of cardboard packaging which I decided to recycle and when I painted it with several shades of olive green the underlying corrugated cardboard bobbled up and came through to give a rather interesting (or at least I thought so!) textured effect.
I then went a little mad and OTT with my collection of Artistic Stamper steampunk stamps - this is the bit where you need the sunglasses as here it is! Also if you click on the pic to enlarge it, it's not quite such a shock - honest lol
I stamped the flowers with black, crimson red and habanero VersaFine inks and embossed them with clear powder. I then sponged them with Distress Inks in Spiced Marmalade, Barn Door, Fired Brick, Victorian Velvet and Worn Lipstick.
I stamped the leaves with black, spanish moss and olympia green VersaFine inks and again embossed with clear powder. I then sponged these with Crushed Olive and Peeled Paint.
I cut them all out (a bit of a labour of love here as it took ages lol) and glued the flowers to some glitzy copper wire. I then added these to my painted background as you see.
I then stamped the glamorous lady (Time To Stamp), coloured her with Promarkers and stamped the plain butterfly, also coloured with a Promarker to turn her into a fairy.
I added the cute little steampunk snail (so sweet with his top hat) coloured with Vintage Photo DI as a finishing touch.
I'm entering my little piece of artwork in the following challenges:
Crafty Emma's Challenge - Recycle
Mark's Finest Papers - Things With Wings
Hanna & Friends - Anything Goes
Little Miss Muffet - Things With Wings
The Sunday Stamper - Simply Irresistable
Thanks for looking and once again, have a great week.
Fliss xx
Labels:
Artistic Stamper,
Distress Inks,
Make My Monday,
Steampunk
Monday, 19 September 2011
Up Up And Away
Hello and welcome to this week's challenge at Make My Monday. We're continuing with the September theme of Steampunk chosen by Cath and this week the added extra is to use some Metal on your creation.
Although I do have a few metal embellishments, I don't have any metal sheet in my stash so I decided to improvise and here's the result:
My collage started off as a frame mount which I stamped all over in black with the Artistic Stamper cogs stamp. I then inked over the top with Wild Honey, Vintage Photo and Spiced Marmalade Distress inks and I have to admit I added a little too much of the orange - my only excuse for this is that I was shouting at the TV in annoyance at the time as I was watching the X Factor auditions!!!
I then embossed a piece of aluminium foil backed with card with the Cuttlebug clockworks folder and coloured this with Olive Green, Midnight Blue, Timber Brown and Jet Black StazOn inks.
The glamorous lady is by The Graphics Fairy and her fabulous top hat is from the Steampunk 3 Collage Set by the lovely June of Dezinaworld. I cut these out, rounded them out with a large embossing ball tool and added them with foam tape.
The gorgeous hot air balloon that you see here started off as a fabulous pencil drawing by my daughter Sarah (studying a Fashion degree) which she drew to make a bookmark and matching card for her Dad for Fathers Day. I altered the size a little to fit my collage then added colour with Distress inks, cut it out and embossed it with clear powder to add some definition.
The finishing touch is a Dymo text label.
I can't wait to see what everyone comes up with for this challenge as the entries for the monochrome challenge were just fabulous. For inspiration, look no further than the challenge blog as the other DT ladies have come up with some stunning creations!
I'm entering my collage in the following challenges:
Creatalicious - Anything Goes
Papercraft Star - Anything Goes
Simon Says Stamp - Song or Film Title Inspired (Up Up and Away)
Gingerloft - Vintage or Distressed
Quirky Crafts - Anything But A Card
Scrappy Frogs - Vintage
Linking to The Graphics Fairy Brag Monday too.
I'll be back on Wednesday with a tutorial for Make My Monday for the current theme of metal.
See you then!
Fliss xx
Monday, 12 September 2011
Monochrome Steampunk Collage
Hello everyone on a very wild, windy and wet Monday, I think the hurricane leftovers have now reached Sussex so I don't think I'll be going far today!
Being Monday, we have a new challenge for you over at Make My Monday. Continuing with the September theme of Steampunk, this week we would like you to create a Monochrome project which I think suits steampunk very well.
I'm definitely addicted to this type of artwork now so expect lots more over the next few weeks! The piece I made for this challenge is a favourite with my hubby who loves the airship in particular. I shall be raiding his books soon as he has quite a lot with vintage engineering diagrams.
Here's my effort:
You may need to click on the pic to see the full detail as I couldn't fit a very large photo on without cropping part of the collage.
Ingredients Used:
Airship - Creative Expressions
Buildings - Crafty Individuals
Cogs and Gears - The Artistic Stamper
Elaborate Clock - B Line Designs
Victorian Gentleman - The Graphics Fairy
Pocket Watch - Vintage Feedsacks
Inks - VersaFine Vintage Sepia, Distress Inks in Vintage Photo, Frayed Burlap, VersaColor Umber, Sand Beige
Promarkers in brown shades
Using the Vintage Sepia ink, I stamped a row of the buildings on white card and then stamped the airship at the top left. I coloured the images with a mix of Distress inks and VersaColor inks then added detail with Promarkers. I stamped the cogs and gears at the top right corner, stamping with the Vintage Sepia ink, stamping a second time without re-inking the stamp.
I stamped the B Line Designs Time stamp with the sepia ink, coloured with inks, cut this out and fixed in the top right corner before trimming the excess.
I printed out the gentleman and pocket watch images having first altered the colours a little in Photoshop to give them a sepia tone. I coloured them with Distress inks and cut them out.
I added some detail to the sky by cutting a cloud style paper template with 2 sizes of scallop scissors and sponged on some clouds with the Sand Beige ink.
I finished off as you see, adding a little propeller to the gentleman's hat made by stamping part of the airship and cutting it out.
I can't tell you how much I enjoyed making this and I'll also enjoy looking at your creations. Do pop over to the challenge blog to see the other DT samples as they're fabulous.
I'm entering my collage in the following challenges:
Simon Says Stamp And Show Some Steampunk (How about that for timing!)
The Stamp Man - Monchrome
Just For Fun - Timeless Vintage
Paper Play - Use 2 Or More Stamped Images
I'd also like to say hello and welcome to Julia and all the new ladies from the Fashionable Stamping Challenges who have all joined my blog.
Have a great week.
Fliss xx
Friday, 10 December 2010
Tim Holtz's 12 Days Tags - Days 8 and 9
Hello everyone, I've now got days 8 and 9 of the tags to show you both of which have a lot of improvising, especially Day 9 as all I had for that one were the inks.
Here's Day 8:
All I had for this one was the mask so I followed Tim's fabulous tachnique for this and then stamped on the music score from before and snowflakes from the Reindeer Flight stamp set in black. I inked up the tag and then stamped on the flourish design from the same stamp set.
As I don't have the little houses border die, I drew my own, cut them out with a craft knift, painted them with Bottle Paint Dabber and added white for snow.
I made decorate corners from a square of harlequin patterned grungeboard cut in half diagonally, painted with Pearl Paint Dabber and embossed with silver ep. I did the clock element in a similar way with a Maya Road cog which I stuck a black musical clock face on.
Here's Day 9:
This is all improvised and most of the work went into the rosette flower as I haven't yet been able to get the die which is forever out of stock everywhere. Having made the rosette by hand, I can see why!
I watched Tim's video before attempting this and can reccommend it as it does help if you have to DIY as I did.
I cut a strip of 12x12 paper and stamped on the music score. I then trimmed one long edge with my pinking shears. I next used a small embossing tool to score lines down the paper at the bottom of each v on the pinked edge. When I'd finished that, I folded up the concertina exactly as Tim does although it's much harder without the magic perforations the die makes. I then did as Tim does in the video and steps following. A definite labour of love here!!!
I used the Vintage Market strip die for the alphabet letters and distressed the brads with the embossing ball tool. I made the crown and heart using plain grungeboard elements embossed with the Cuttlebug fancy corner and dots folders, painted and embossed as for the previous tag.
I managed to find a scrap of tulle (a leftover from years of making fairy style costumes for my daughters) and used decorative brads instead of Adornments. I finished off with some braid and bling from an old earring.
I'm linking again to Artyjen's Splinter Group and also to The Artistic Stamper It's Christmas Time Challenge.
I'm also going to enter this in Hels Sheridan's Sunday Stampers Wonderful Christmastime Challenge.
Thanks for looking and hope you all have a lovely weekend.
Subscribe to:
Posts (Atom)


.JPG)


