Showing posts with label Floral. Show all posts

Friday, 11 March 2022

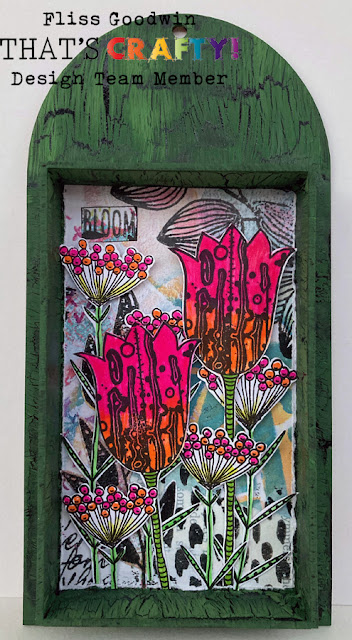
Bright and Funky Floral Art for That's Crafty!

 Hello on a rather wet and dismal evening. I luckily went out for my walk today quite early and managed to get home before the deluge started thank goodness!

I have my usual Friday post up over at That's Crafty! blog today and this week it's something bright and cheery, much needed in these very uncertain times. 

I've actually had to stop watching the 10 o'clock news as it's so distressing that I have trouble sleeping after seeing the devastation in Ukraine and it's so heartbreaking seeing the people struggling to leave.


If you'd like to see how this was created then please click HERE

I hope you have a lovely and hopefully crafty weekend (I know I will as I have birthday cards to make!) and will see you soon.

Fliss x


Friday, 9 April 2021

Back After A Long Blogging Break

 Hello! I'm finally back after rather a long break from blogging as due to family and work commitments there haven't been enough hours in the day to cope with all the social media stuff I should be doing so I'm hoping to gently get back into the swing of things.

I'm over at That's Crafty! blog today with a mixed media piece of artwork that was inspired by the photos I took last summer of the patches of wildflowers along our local coast. It was so lovely to see them with beach huts in the background and I'm eagerly awaiting this year's crop in a couple of months, not to mention the warmer weather too as it's been cold for so long.


You'll find all the details of how I created this by clicking HERE

Here are a couple of pics so that you can see where my inspiration came from 😀


I hope you're all well and managing to cope with the lockdown and will be round to visit as soon as I get a few spare moments.

Fliss xx

Sunday, 5 April 2020

IndigoBlu Stamp Play

Hello!

I hope you're managing to have a good weekend in spite of not being able to go anywhere, in fact such lovely weather today, going in the garden if you have one is what I would recommend as a spot of weeding and digging is a really good way to get some much needed fresh air.

I have been doing that but also fitted in a bit of crafting to finish off some of my works in progress as I have quite a few on the go which haven't quite got there yet! These were made with the stamps I got when I attended the IndigoBlu weekend in Brighton last November/December and I've only just managed to get them inked up!


The tag uses up quite a few bits from my scraps box that were all in shades of spring green, some stencilled and some ink spray overflow and so on. I stamped the dog rose spray and coloured it with flat matte sprays, using rose, basil and saffron then cut it out. I brushed 3D gloss gel over the top after shaping the flowers and leaves with a large embossing ball tool.

I added some die cut pieces created with pink and dark green card and a Kaisercraft grungy lattice die together with a scrap of green dyed old crochet lace and the text from another IndigoBlu set which was stamped on an ink spray overflow scrap in shades of pink and green.

The card contains the stamped image I originally intended for the tag but turned out too pale - it was stamped with VersaFine Clair Shady Lane ink and coloured with Zig markers. I tried out lots of different backgrounds from my box but this one seemed to work the best. It's just another overflow piece that has flat matte sprays on in rose, lilac, aqua, bluebell and a tiny bit of walnut. The text is from the same stamp set and is on a further scrap of overflow paper.

I hope you like these and there will be more to follow once I finish them off!
Stay safe and see you soon.

Fliss xx

Wednesday, 22 January 2020

Creating Grungy Background Papers

Hello! It's been ages since I've done some creating just for me so over the last week or so I've snatched a bit of time and managed to make some rather grungy mixed media backing papers so that I had some to put some cards together for those occasions when time is short - most of the time in my case!
I took some photos of the process as it was kind of one layer a day so thought I would share here how I created them as if you do several at once it's much quicker.


 The first step was to cut an A3 sheet of smooth cartridge paper into 6 pieces as these happily fit card blanks 15cm square, my size of choice.
I took some pastel shades of That's Crafty! multi surface paints - Apricot, Lavender, Light Blue and Teal and put a small amount of each on my glass craft mat. I misted them with a little water to dilute them a bit, then used an old store card to scrape the colours on to the paper squares. You can see the results above, sort of rough stripes.
Once they were dry, I got out the Distress Oxide inks and Melina's new Just Doodlin' background stamps which I know will get inked up an awful lot as they're so versatile. 
You can see below the shades I used and I've put a link to the stamps at the end of each photo.


That's Crafty! Just Doodlin' Clear Stamp Set 2 by Melina Dahl


That's Crafty! Just Doodlin' Clear Stamp Set 2 by Melina Dahl


That's Crafty! Just Doodlin' Clear Stamp Set 3 by Melina Dahl

As you can see from the photos, quite a bit of overstamping and second generation stamping came into play here as I was aiming for a grungy textured look rather than an obvious pattern.

I then made a few cards so that you can see what you can do with the papers once you've made them. The colours were kept fairly quiet so that the images on top could be much stronger shades and stand out well.


That's Crafty! Grunge Flowers Set 1 Clear Stamp Set by Melina Dahl


That's Crafty! Grunge Flowers Set 2 Clear Stamp Set by Melina Dahl


That's Crafty! Flowers Collection Set 6 Clear Stamp Set by Melina Dahl
That's Crafty! Grunge Flowers Set 4 Clear Stamp Set by Melina Dahl (for the text)
That's Crafty! 6 x 6ins Mask - Leaf Circle by Melina Dahl


Hopefully I'll have some cards to share soon using the remaining papers and hope you like what I've done so far.
Enjoy the rest of the week!

Fliss xx

Friday, 31 May 2019

Gone Totally Floral!

Hello on a rather dull Friday. I hope you've all had a good week. I've been busy with accounting stuff although managed to squeeze in a bit of crafting which I'll share soon.
In the meantime, I have the perfect card to share on a dull day which is my post for this week over at That's Crafty! Blog where you'll find all the details on how I created this. The card showcases one of Melina's gorgeous new flower collection stamps which I've turned into a poppy as there's nothing that says summer to me more than a field of poppies - in fact, if you read on you'll see my desktop photo which I love so much I can't change it.


Here's my desktop photo


I also forgot to post my That's Crafty! make for last week so here they are - a trio of floral artist trading cards.


Have a great day and a lovely weekend and see you soon.

Fliss xx

Friday, 5 April 2019

Floral Bouquet Mixed Media Collage

Hello again, I've finally finished a mixed media piece of artwork started a couple of weeks ago which is on a floral theme and I hope you like the results.


The finished piece is above and there are pics below showing how it all came together with a short bit of what I did to get the effects.


My substrate for this is one of the MDF uprights by That's Crafty! and I love the shaped top of this one. I first gave the surface a coat of gesso then scraped on both texture paste and sand texture paste. I followed this with texture paste through the 7 x 7 allsorts stencil, mostly just down the central area. I then mixed gritty bitz with texture paste and scraped this on roughly in the corners and a little down the centre. I left it to dry thoroughly.


I then went to town with ink sprays, using sage and blackberry flat matte sprays, followed by lilac and lime lustre sprays. When dry, I brushed on a small amount of rose gold metallic multi surface paint and interference lilac. I glued the top to the base and then treated the base in the same way with the texture pastes, gritty bitz and sprays. I painted all the edges rose gold. There are close-ups below of the top and base.


For my floral bouquet, I stamped the rose image from the textures collection stamp set 3 on cartridge paper with VersaFine Imperial Purple ink, stamping 6 times. I coloured the flowers with sprays and markers and when dry, cut out 3 whole flowers and 3 centres then sprizted the back with water (so the front colour didn't run) and crumpled them up, pulling them out and gluing them together to make lovely 3D shabby roses.

I stamped the leaf from the same set on ink spray overflow paper (happily green) with VersaFine Spanish Moss ink and heat embossed them with clear powder. I also stamped one of the flowers from the flowers collection set 2 several times with the purple ink and again heat embossed. This particular one is rather like lavender so I coloured it as such and cut them out.

I assembled my bouquet as you see, adding the elements with silicone glue for dimension and finished off with my chosen text from my fanciful flowers set 2 which I separated out into pieces like plant tags after stamping on lilac spray overflow paper with the purple ink.

I'd like to enter this in the current Craft Stamper Take Make It Challenge for April as I finished my bouquet at just the right time!

Back again soon.
Fliss xx

Saturday, 28 April 2018

Floral Hello Card

Hello all, I've a card to share today as it was rather wet yesterday after a good start and today has been dull and cold so what better tonic than a bit of crafting (and sketching though can't yet show you).
This one is a little different and the colours are slightly off too as my camera seems to struggle with plummy tones and the doily is actually a shade of rose and not quite as strong as it appears here.


As you can see, I've included the background before embellishing and it was actually the leftover result from making my floral wishes card as the stencil was covered in the Distress oxides that I used and it was a shame to waste it so I misted on some water and pressed on a sheet of card. The above background was the end result and it's so pretty I just had to use it.

I stamped my fanciful flower twice on mixed media paper with VersaFine Spanish Moss ink. I then coloured it with Distress markers, using Spun Sugar, Crushed Olive and Wild Honey. I then cut out the whole flower once and just the petal part on the second. I shaped them with a large embossing ball tool and layered them up with 3D glue.

I assembled my card using a couple of pretty doilies, adding a gold pearl to the flower and stamping on the hello text (a free stamp from Making Cards magazine) with Archival Plum ink.

I'd like to enter the following challenges with my card:

Everybody Art Challenge - Flower
Simon Says Stamp Monday Challenge - Flowers

Hope the weather is better where you are and enjoy the rest of your weekend.
Fliss xx

Monday, 23 April 2018

Floral Wishes Card

Hello everyone, I hope you've all had a lovely weekend with sunshine as we did and it actually felt like summer down here on the South Coast as it was so warm. Not quite so warm today but we still had a sunny start so hopefully the week will be good.
I have another card to share today made from my stack of flowers from my recent marathon stamping and cutting out session. This one is for a friend who's going through a bit of a tough time at the moment with health issues and I wanted to send her something to let her know I'm thinking of her.
Happily the colours fit the April colour challenge at Rubber Dance so although I haven't used their stamps this time, I hope that's OK (between you and me, I have to work out where I put them as I had a tidy up and now can't find things!)


I made my background paper by swiping card through some Distress Oxides (Squeezed Lemonade, Twisted Citron and Worn Lipstick) spritzed with water on my craft mat. I then used the That's Crafty! TC8024 Flourish stencil with the same inks used neat to add a shabby chic pattern as I wasn't too bothered about getting the pattern perfect.
I cut a piece to fit my square kraft card blank and glued it on. I stamped the sentiment (a stamp free with Making Cards magazine) with black ink and then added some layered up flowers assembled with dimensional glue.
I finished off with an offcut of my stencilled paper which I die cut with an old scallop lace border die and inked with Worn Lipstick, tucking a couple of pieces under the flowers for added interest.

I'd like to enter this in the current Rubber Dance Challenge having used the colours although not the altered bit this time:


Have a great week and see you soon.
Fliss xx