Showing posts with label Kaisercraft. Show all posts

Wednesday, 23 November 2016

Note to self

Hello everyone, today I have an art journal page to share that is the first thing in an absolute age that I've been able to create just because I wanted to - yippee! Or not yippee as in fact the reason I did this particular page is that as some of you already know via Facebook is that last Saturday I was diagnosed with cataracts in both eyes so I'm feeling rather miserable at the moment, even though everyone says it's easy to fix the problem (it doesn't stop me worrying about the actual "procedure" as it's called).

I decided to try and cheer myself up a little by creating some art and what better place to do that than my art journal!


This is a very inky layered page and I'll show a couple of the steps so that you can see how the page came together.


I began by sponging the page with Squeezed Lemonade and Fossilised Amber Distress inks and then used the Visible Image Universal clear stamp set with Fossilised Amber, Picked Raspberry and Iced Spruce Distress inks to add a circular pattern all over the inked surface.
When this was dry, i dry brushed some white gesso over the top to tone it down a little and blur the pattern a bit.


I then took a couple of Carabelle Studio mini stamps - Chevrons and Abc, stamping the chevron pattern with Ranger Wild Orchid Dye ink and the paperclip image with Watering Can Archival ink. These went all over, stamping some images twice before re-inking until I was happy with the effect.

I then stamped 3 butterflies (Carabelle Studio) on cartridge paper with Jet Black Archival ink and painted them with Picked Raspberry and Ripe Persimmon Distress inks. I cut these out and added them on the left side of the page.

To finish, I stamped the Kaisercraft text (Way of Life) on black card with VersaMark ink and heat embossed it with white detail powder. I then cut the words up and glued them to the page.

Hope you like my page and I'll be back soon with some rather exciting That's Crafty! news.
Fliss xx

Friday, 14 October 2016

Dream a Little Dream at That's Crafty!

Hello everyone, I hope you've all had a good week. Mine has sadly been very busy with work yet again with little time for crafting so at That's Crafty! Blog today I'm sharing the dreamcatcher I made for last week's Hochanda shows.

Here's a sneak peek and you'll find all the details over at the blog as usual along with quite a lot of pics on the process.


As you can see, I've gone for bright colours here but my dreamcatcher is actually double sided and the other side is quite different. You'll have to wait until next week for that though!

I'll be back in a while as we have a new challenge today over at That's Crafty! Challenge Blog and I was really glad when I saw the theme I can tell you!

See you in a bit.
Fliss xx

Friday, 2 September 2016

The Poppy Field For That's Crafty!

Hi there, I hope you've all had a good week and welcome to my first post of the day which is to let you know that I have my usual Friday project over at That's Crafty! and this week it's the second part of my triptych as I'm sharing the other side which continues the nature theme.


This is the middle panel and you'll find the whole triptych with full instructions on how I made it over at the blog as usual if you'd like to hop over.

I'll be back in a while as we have a new challenge today over at That's Crafty! Challenge Blog which goes live at 8am and I can't wait to share my inspiration!

Back soon,
Fliss xx

Monday, 1 August 2016

Fun In The Sun At Make My Monday

Hello everyone, I hope you all had a lovely weekend. I'm here today with my inspiration for our new challenge at Make My Monday which for the next fortnight has the theme of Fun in the Sun.

I have to admit to a bit of a struggle with this one as I don't really have anything that fits and in the end had to do a bit of recycling which I hope you like. The theme brought holidays to mind which is the reason for this card.


The background was made with Distress inks and then stamped on the weathered wood background by Kaisercraft which I stamped repeatedly.
I stamped the Crafty Individuals collage image on smooth card and coloured with Distress inks and Promarkers.
I tore out a piece of corrugated card and distressed it with Frantage Aged Bronze Embossing Enamel.
I then stamped the tickets from a Crafty Individuals set on card and coloured them with pink Distress ink then cut them out.
I made the bunting by colouring some card with bright shades of Distress inks and cut out triangles. I stamped the text with alphabet stamps and then assembled all the elements on a kraft card blank.

Have a good week and see you soon.
Fliss xx

Friday, 27 May 2016

Universal Grunge For That's Crafty!

Hello everyone and welcome to my first post of the day which is to let you know that I have a tutorial today over at That's Crafty! blog sharing how I created a card for one of my nephews with my new Visible Image stamps.


As you can see it's rather bright and zingy so I hope you like it! You'll find all the details over at the blog as usual.

I'll be back in a while as we have a new challenge today over at That's Crafty! Challenge Blog and I have some inspiration to share with you.

See you in a bit.
Fliss xx

Monday, 28 December 2015

New Year

Hello everyone, hoping you all had a very lovely Christmas and that Santa brought you some lovely pressies too. Apologies for my lack of visiting which is because I've been really busy with family stuff and had to work right up to Christmas so didn't have much time for blogging.
I also hope that none of you have been flooded out in the North but my sympathies are with anyone affected as I felt so sorry for all those poor folk whose Christmas was completely ruined this year.

We have a new challenge for you today over at Make My Monday which with the new year fast approaching has the theme of New Year or Calendar.


I've made a simple one layer card which started off with the clock from the Kaisercraft Time Machine set being stamped with Archival Watering Can Ink.
I then stamped the Carabelle Studio Journal du Jour image twice with Mustard Seed Distress ink followed by the star background stamp also by Carabelle Studio with Cracked Pistachio Distress ink.
I finished off with some orange and blue letters and numbers die cut with the Tim Holtz Vintage Market alphabet strip set.

I'll be back on Friday if not before as this week I have the honour of starting off a whole new year of tutorials at That's Crafty and if you haven't yet signed up to follow I can recommend it as 2016 has some very exciting things happening!

Fliss xx

Friday, 6 November 2015

Nature's Bouquet For That's Crafty

Hello and welcome to my first post of the day which is to let you know I have my weekly tutorial over at That's Crafty which this time is a very simple card involving some colouring therapy.
You'll find all the details over at the blog and hope you like it!


This is made with one of my new Carabelle Studio stamps and I know this one will be featuring quite a bit as it's such a versatile image.

Back in a bit with news of our next challenge over at That's Crafty Challenge Blog.

Fliss xx

Monday, 21 September 2015

Nature At Make My Monday

Hello everyone, I hope you all had a lovely weekend. It's been really lovely here, warm and sunny the whole time for once!
We have a new challenge today over at Make My Monday and this week I picked the theme and I chose a favourite of mine, NATURE. I hope you like my inspiration.


I made my background paper first with a square of thick watercolour paper which I sprayed with water and then swiped on Distress Stains in Crushed Olive, Shabby Shutters, Squeezed Lemonade, Mustard Seed and Dried Marigold. I dried this off and then stamped on the large fern leaf sprig from the Hero Arts Fern stamp and die set with VersaFine Spanish Moss. I stamped some on scrap paper first for a faded effect.
I cut a slightly larger square of recycled greyboard and inked round the edges with Distress Embossing Ink then heat embossed with Fran-tage Aged Green Embossing Enamel. I distressed the edges of my background paper with an emery board and added this to the greyboard panel.
I stamped the kingfisher on thick smooth cartridge paper with Memories black ink and then coloured him with Tombow markers and pastel pencils. I cut him out to leave a narrow off white border.
I made the distressed panel by applying Tumbled Glass Distress ink to a rectangle of the cartridge paper direct from the pad and then stamped on the Kaisercraft Wood Panel stamp with Weathered Wood DI and embossed with the Cuttlebug distressed stripes folder and swiped the ink on the raised areas.
The embellishments were made by  stamping the fern with the moss ink and the dragonflies with VersaFine Deep Lagoon. I then coloured the 2 dragonflies with Tombow markers then cut them out with the die and sponged with VersaMark ink and heat embossed with sparkly powder. The fern was die cut and because of the large white areas left, I sponged on some Crushed Olive DI to make them blend in.
I assembled the panel as you see with a mix of double sided and foam tape. I finished off with some twisted green chiffon ribbon.

I hope you can join in as we'd love to see your interpretation of the theme.

Have a great week,
Fliss xx

Friday, 4 September 2015

Finding Time Art Journal Page For That's Crafty

Hello there, this is a scheduled post as I'm currently on my hols in Italy so I'm hoping Mr Blogger doesn't let me down.

I have my usual Friday post over at That's Crafty and I hope you'll pop over to see the whole thing as this is just a sneak peek. Hope you like it!


I'll be back at the weekend and will hopefully have some pics to share as we're at Lake Garda and lakes and mountains are one of my favourite things (apart from cable cars that is!!!)

See you soon.

Fliss xx

Friday, 31 July 2015

All You Need Is Love (And Stencils)

Hello everyone and welcome to today's first post which is to let you know I have a project to share over at That's Crafty.
This week it's a fairly simple graphic type card in bright colours which is really quite easy to make. You'll find all the details over at the blog.


I'll be round to visit over the weekend if I haven't yet got to you - sorry, but things are still busy and tomorrow I have yet another trip to the opticians to look forward to - not!

See you in a bit with news of the new challenge at That's Crafty Challenge Blog.

Fliss xx

Monday, 22 June 2015

On The Beach or Wish You Were Here!

Hello everyone, I'm a tad late with some inspiration for today's new challenge at Make My Monday after an exceedingly busy weekend and have had to cheat a bit as I haven't got the energy to make anything at the moment so I hope you'll all forgive me if you remember this one!


The main image is Crafty Individuals and the background paper was made by applying ink to an acrylic block, misting with water and then stamping onto a square of white card.
I then over stamped it with a Kaisercraft stamp called vintage fence which repeat stamps really well.
I heat embossed part of a torn piece of corrugated card with Frantage Aged Bronze embossing enamel and knotted some twine round it. I then coloured the seagull panel with Promarkers and ink before trimming down. I attached the panel to the corrugated card.
I stamped the tickets (also Crafty Individuals) with Archival cobalt ink and coloured them with Distress ink before cutting them out. I stamped the words with Hero Arts alphabet stamps and the blue ink and cut these out separately.
I made the bunting by drawing it on card, colouring it with Promarkers and then cut it out and assembled the card as you see.

Sorry it's a repeat and hoping for time to play soon!

We also have a DT call for several new team members as we have plans for the future. Please enter a challenge and let us know if you're interested.

Fliss xx

Friday, 29 May 2015

Dreaming In layers For That's Crafty

Hello everyone, I hope you've had a good week and also less busy than mine as work this week has been rather tricky with me trying to fit in too many things that all needed doing at once!
My post today is to let you know I have my usual Friday project over at That's Crafty which is all about stamping in layers to achieve a dimensional effect.
Here's a very little sneak peek and hope you can pop on over to visit and view the whole thing.


Have a great day and a lovely weekend.

Fliss xx

Friday, 8 May 2015

French Fashion

Hello folks and welcome to my first post of today which is to let you know I have my Friday tutorial over at That's Crafty Blog and this week I have a card to share which was inspired by my daughter's job in fashion together with my love for Paris (an as yet unfulfilled dream - sigh!)
I've got my inky mitts on the Tim Holtz Runway stamp set which was a definite must have as it brings back happy memories of the graduate fashion show a couple of years ago when my daughter's degree collection strutted down the catwalk on some rather superior looking models.


As you see, a little bit of ooh la la! You'll find the details over at the blog as usual if you'd like to hop over to see.
I'll be back in a while with my second post which will be my inspiration for the new challenge at That's Crafty Challenge Blog and I can't tell you how much I loved this one - it's one of my favourites!

See you later!
Fliss xx

Friday, 10 April 2015

Grunge, Grunge, Grunge!

Hello again, as you can see now from my post title I just loved this challenge theme as I'm a big fan of grunge which is what we'd like to see at That's Crafty Challenge Blog for the next fortnight.
I've made a wall hanging creation as my inspiration and my Julie Nutting Prima doll has come out to play again.


I made the background first by applying vintage music score to a piece of mixed media paper with matte gel and adding torn pieces of book text over the top. I then lightly brushed on some white gesso to bring all the pieces together, following up with Vintage Lace and Lavender Paper Artsy Fresco Finish acrylic paint applied with baby wipes. This gives a soft mottled look which is very grungy in style.


I next stamped on Carabelle Studios Texture Chevrons with Bundled Sage Distress Ink followed by the star border from the Etoiles, Tache et Background Stamp Set with Picked Raspberry Distress ink, stamping once on scra paper to soften the colour a little.

I stamped the Prima doll on smooth stamping card and on book text with Archival Watering Can ink then coloured just the dress on the plain surface with pencils and Picked Raspberry DI. I just coloured the flesh and hair on the book text image then cut out the doll, gluing the coloured dress on top.

I added lace in places (very useful if you have any bubbles in the background as I did despite a good application of gel and using a brayer for smoothing!)

I stamped some Kaisercraft butterflies with the grey ink onto a scrap of gelli plate paper from my bits box (I always save them as you never know when they'll come in useful) and cut them out. I stamped the Dylusions text with the same ink on a scrap of stamping card and coloured it with Picked Raspberry DI after trimming it to a panel.


I finished off by applying some embossing ink to the top corners and the base of the panel and heat embossed it with Stampendous Frantage Shabby Pink Embossing Enamel. I swiped on a little Creative Expressions Gold Gilding Wax and a little more blue paint to pull everything together.

The challenge is open for the next fortnight and the prize for the randomly drawn winner is a £20 voucher for the online shop where you'll be truly spoilt for choice.

Good luck!
Fliss xx

Live The Dream For That's Crafty

Hello all, this is my first post of 2 today which I hope appears as scheduled as I'm currently down in Kent on a few days break.
It's just a quick one to let you know that I have my Friday That's Crafty project over at the blog if you want to pop on over and see how it came about. It's a Carabelle Studio creation again and hope you like it.


As you can see the lovely Helena has popped up again as I just love the rather sultry look she has which is perfect for all sorts of creations.

See you in a bit for my second post today as we have a new challenge at That's Crafty Challenge Blog going live at 8am and I just loved this one!

Fliss xx

Friday, 20 February 2015

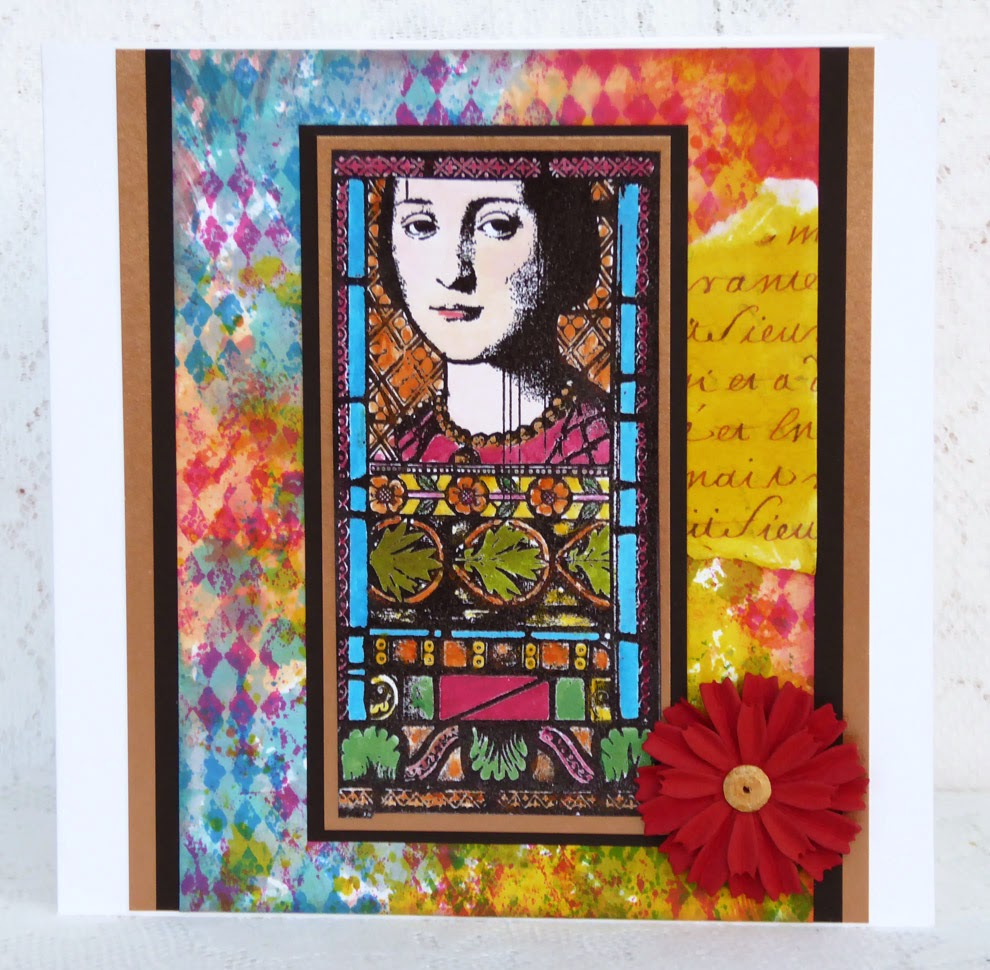
Contemplating With Lynne Perrella

Hello there, I hope you've all had a good week. I'm here today with my weekly project for That's Crafty which is a colourful creation featuring my new and first Lynne Perrella stamps from Paper Artsy.
I was totally unable to resist these gorgeous medieval style beauties done stained glass style and I suspect they'll be making an appearance quite a lot.


You'll find all the details over at the blog and some pics to show how the background came about. Hoping you can visit.

Have a great day and a lovely weekend.
Hugs,
Fliss xx

Monday, 16 February 2015

Two Favourite Colours

Hi there, I hope you all had a lovely weekend. It was sunny yesterday and despite it being February our sunlounge was warm enough to eat lunch in and I managed to get washing out on the line too!
I did have time for some crafting too and here's something I created for our new challenge today at Make My Monday. This week Suzi has challenged us to make something with our Two Favourite Colours which I found a little difficult as I try create with as many colours as I can so in the end I picked my favourite 2 shades of Distress inks for inspiration - Crushed Olive and Victorian Velvet, otherwise known as Pink and Green!


I've also used some of my favourite stamps here too.

I made the background paper by painting watercolour paper with dusky rose and olive green acylic paints which I watered down to make a wash. I then stamped on the Stampendous Love Paris image with Archival Olive ink. I then stamped on Hero Arts Old French Writing with VersaMagic Pink Grapefruit ink.
I stamped the Rubber Stampede Tip Your Hat (she looks so French!) image with the olive ink on smooth cartridge paper. I painted the image and also the flowers on the Eiffel Tower image with Aquamarkers in shades of pink and green.
I then stamped the Kaisercraft butterfly on a scrap of pink painted watercolour paper with the olive ink and cut this out.
I assembled the card as you see, adding some pale pink lace trim and a green flower and leaves to embellish.

Have a great day and a good week.
Fliss xx

Friday, 13 February 2015

Be My Valentine

Hello again, I'm back with details of the new challenge today over at That's Crafty Challenge Blog and as it's a certain day tomorrow, our challenge theme is of course Be My Valentine.
I've actually got 2 cards to share as I've had a bit of creative trouble over the last couple of weeks and my second card is the one I actually started first and couldn't finish right away though as soon as I'd sent the other one off to Laura, inspiration struck and I finished it off.
You'll have to let me know what you think as the design is the same but the cards are not quite!


As you see, the design is simple and for this one I used the Carabelle Studio Jeu de Fleches mask with Barn Door Distress ink on smooth white card.
The heart is hand cut from some paper from my stash that I made with Gelatos then stamped with the Stampendous NK Studio Wired stamp set and added dots with a mini dot stencil.
The finishing touch was to stamp on the Kaisercraft sentiment with VersaFine Satin Red ink.

And now for my original card:


As you can see, I used the arrow stencil here too only this one was done with Studio Calico Mr Huey's Mist in a red shade. As the spray was quite wet and ended up all over the stencil, I pressed another piece of card on top and it gave a negative image.
I made the heart shape using the negative printed paper, scribbling on the design with a black Sharpie pen until I was happy with the shape. I then cut it out.
The finishing touch was the same text stamped this time with VersaFine Crimson Red ink.

It's good to enter the challenge (although you do need to be a UK resident) as the prize is a £20 voucher to the online shop and if you haven't yet seen the huge range of goodies available, it's worth a browse.
Good luck!

Have a great day and a lovely weekend.
Fliss xx

Friday, 16 January 2015

A Sequence of Moments

Hi there everyone and hope you're surviving the current gales and nasty wet weather if you have that where you are. Not that I've seen much of it as I've been working full time the last couple of weeks so haven't been outside that much!
I also haven't had very much time for crafting having had to work last weekend to finish off something for my hubby. I just managed to squeeze in a bit of time to make my journal page which is my project today over at That's Crafty as I've made the decision to start a loose leaf art journal the size of my Gelli Plate so that I can hopefully make some quick background with inks and paint.
You might need your sunglasses for this as it's very bright! I thought the dark and dreary weather needed a pick me up!


You'll find the ingredients and the recipe over at the blog as usual if you'd like to see how it cam about.

I'll be back a bit later as we have a new challenge today over at the That's Crafty Challenge which goes live at 8am so will see you soon.

Fliss x

Friday, 2 January 2015

Blue Is The Colour

Hello and welcome to my second post of the day and Happy New Year if you missed the last one.

Today sees the start of our first challenge over at That's Crafty Challenge Blog and for the next fortnight our theme is Blue Is The Colour as you probably guessed from my title :)

Here's my inspiration which is a little bird themed wall hanging creation. Hope you like it. You'll have to excuse the pics too as my camera made some of the blue look decidedly purple!


The first step is to cut some strips of smooth paper or you could use scraps if you have some as I did. As the paper was smooth, it took the inks very well. I used a mix of Color Box Chalk Inks and VersaMagic Chalk Inks. I then added a dot pattern to some with the Crafters Workshop Mini Halftone Borders stencil and stamped the others with the Kaisercraft Script and Diamonds stamps in contrasting darker shades.


I then cut a piece of the smooth paper to 3x5 inches and then applied cobalt and white Brusho Crystals to the 3x5 Gelli Plate which I had sprizted with water. I picked up the colour with the paper, dried it off and stamped on the birds with Archival Cobalt ink. I was just able to stamp 2 birds so look out for the second which will be making an appearance very soon!


I cut a panel of the smooth paper to fit across an A5 piece of thick chipboard and colour with light blue ink. Stamp on diamonds with a slightly darker shade.
Cut pieces of the stamped and stencilled strips to fit at the top and bottom of the chipboard (you'll have some left over for another project) and glue these on. Glue on the central panel and add the cut out bird on the right side. Stamp the bird text with the cobalt ink on the left side.
Add some ribbon to finish.

There's a great prize of a £20 voucher for the online shop for the randomly drawn winner but don't forget to check the rules.
Good luck!
Fliss xx