Showing posts with label Hero Arts. Show all posts

Monday, 28 September 2015

Autumn Colours at Make My Monday

Hello everyone, hope you're all well and had a lovely weekend. Mine was rather busy as I had yet another optician visit as they're still trying to get my glasses right (at the moment I can just about see to do the washing up!!!) as I can only wear them indoors. There was a lot of tutting this time as I saw a different optometrist who got rather cross as she said my prescription was completely wrong (well duh!) and the glasses have now gone for replacement lens. All fingers and toes crossed that they get it right this time as it's been going on for 4 months now and I'm rather fed up!

Anyway, enough whinging and on to the new challenge at Make My Monday. Joan has chosen a favourite of mine, Autumn Colours, which I love as I'm an Autumn girl by birth and in fact have a birthday I'd rather forget coming up soon - aargh!


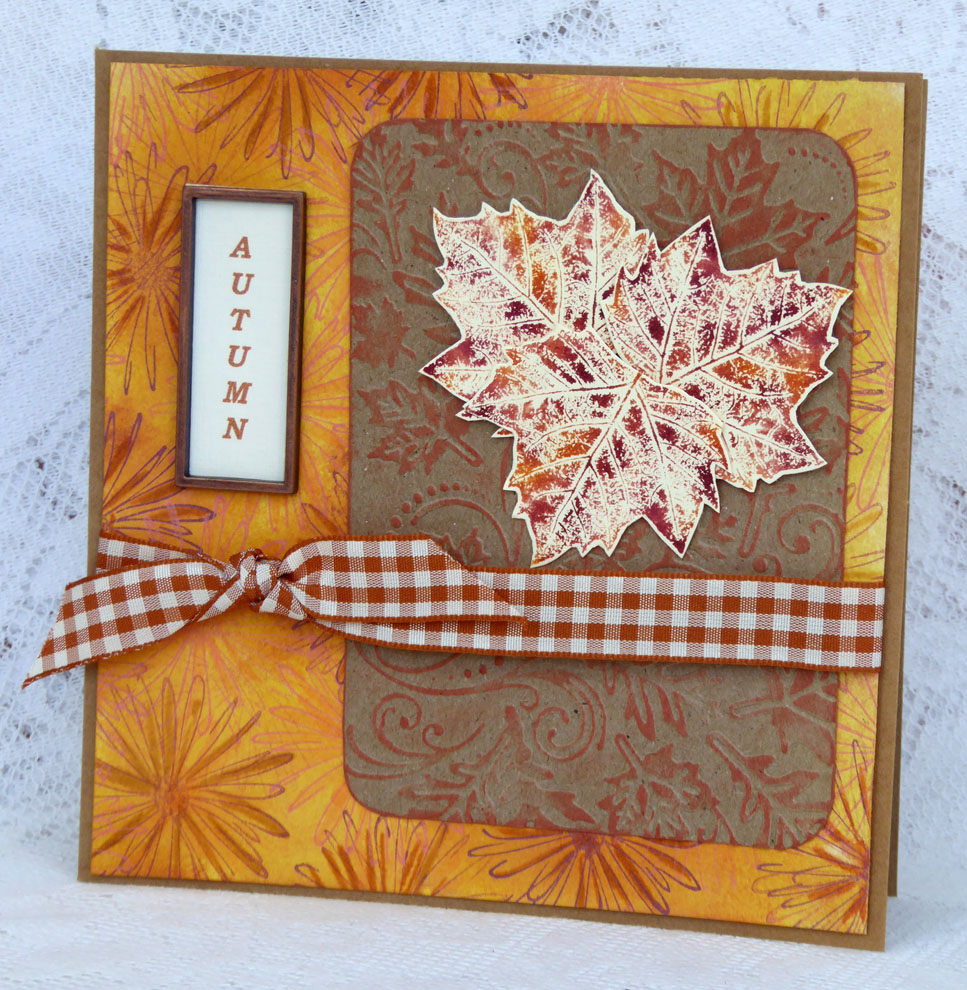
I hope you like my inspiration which is the result of a hunt through my bits and pieces box where I came across a piece of watercolour paper stamped with a Hero Arts flower using Spiced Marmalade, Rusty Hinge and Aged Mahogany Distress inks. As it was cream, I sponged on Mustard Seed and Wild Honey DIs for a lovely warm glow.
I then embossed a panel of kraft card with a Darice Autumn leaves folder and swiped Versacolor Paprika over the raised areas. I added this to the paper panel then tied round some rusty gingham ribbon before sticking to the card.
I added some leaves (a very old Rubber Stampede image) which had been stamped by adding Distress re-inkers to a paper towel to make an ink pad. I cut these out to leave a narrow border and added them with foam tape for dimension.
I finished off with some text in a metal frame I've had for rather a long time! A Junkitz Tim Holtz set in antique copper.

 Have a great week and see you soon.
Fliss xx

Some challenges I'd like to enter:
Classy Cards n Such - Feeling Fall-ish
One Stitch At A Time - Anything Goes With Leaves
A Gem of a Challenge - Autumn
Catch The Bug - Colour Challenge


Monday, 21 September 2015

Nature At Make My Monday

Hello everyone, I hope you all had a lovely weekend. It's been really lovely here, warm and sunny the whole time for once!
We have a new challenge today over at Make My Monday and this week I picked the theme and I chose a favourite of mine, NATURE. I hope you like my inspiration.


I made my background paper first with a square of thick watercolour paper which I sprayed with water and then swiped on Distress Stains in Crushed Olive, Shabby Shutters, Squeezed Lemonade, Mustard Seed and Dried Marigold. I dried this off and then stamped on the large fern leaf sprig from the Hero Arts Fern stamp and die set with VersaFine Spanish Moss. I stamped some on scrap paper first for a faded effect.
I cut a slightly larger square of recycled greyboard and inked round the edges with Distress Embossing Ink then heat embossed with Fran-tage Aged Green Embossing Enamel. I distressed the edges of my background paper with an emery board and added this to the greyboard panel.
I stamped the kingfisher on thick smooth cartridge paper with Memories black ink and then coloured him with Tombow markers and pastel pencils. I cut him out to leave a narrow off white border.
I made the distressed panel by applying Tumbled Glass Distress ink to a rectangle of the cartridge paper direct from the pad and then stamped on the Kaisercraft Wood Panel stamp with Weathered Wood DI and embossed with the Cuttlebug distressed stripes folder and swiped the ink on the raised areas.
The embellishments were made by  stamping the fern with the moss ink and the dragonflies with VersaFine Deep Lagoon. I then coloured the 2 dragonflies with Tombow markers then cut them out with the die and sponged with VersaMark ink and heat embossed with sparkly powder. The fern was die cut and because of the large white areas left, I sponged on some Crushed Olive DI to make them blend in.
I assembled the panel as you see with a mix of double sided and foam tape. I finished off with some twisted green chiffon ribbon.

I hope you can join in as we'd love to see your interpretation of the theme.

Have a great week,
Fliss xx

Monday, 16 February 2015

Two Favourite Colours

Hi there, I hope you all had a lovely weekend. It was sunny yesterday and despite it being February our sunlounge was warm enough to eat lunch in and I managed to get washing out on the line too!
I did have time for some crafting too and here's something I created for our new challenge today at Make My Monday. This week Suzi has challenged us to make something with our Two Favourite Colours which I found a little difficult as I try create with as many colours as I can so in the end I picked my favourite 2 shades of Distress inks for inspiration - Crushed Olive and Victorian Velvet, otherwise known as Pink and Green!


I've also used some of my favourite stamps here too.

I made the background paper by painting watercolour paper with dusky rose and olive green acylic paints which I watered down to make a wash. I then stamped on the Stampendous Love Paris image with Archival Olive ink. I then stamped on Hero Arts Old French Writing with VersaMagic Pink Grapefruit ink.
I stamped the Rubber Stampede Tip Your Hat (she looks so French!) image with the olive ink on smooth cartridge paper. I painted the image and also the flowers on the Eiffel Tower image with Aquamarkers in shades of pink and green.
I then stamped the Kaisercraft butterfly on a scrap of pink painted watercolour paper with the olive ink and cut this out.
I assembled the card as you see, adding some pale pink lace trim and a green flower and leaves to embellish.

Have a great day and a good week.
Fliss xx

Monday, 14 July 2014

New Challenge At Make My Monday

Hello everyone, this is rather a sad post from me today as I've just had the most traumatic weekend in a very long time which started on Friday when I got home from work to find that my stepfather was in hospital extremely poorly having suffered a very bad brain haemorrage and we spent some time at his bedside that evening.
Sadly he passed away in the early hours of Saturday morning having never regained consciousness. I did think that might happen as the very kind nurses did say that all they could do was try and keep him comfortable but it was still a shock as I'm sure you can imagine.

I'm keeping going by keeping busy and managed a small bit of crafting yesterday for our new challenge today at Make My Monday with the theme of End Of Term chosen by Marina.
I've been a bit creative with the theme as I chose to see it as the start of something new which does hopefully happen after graduation.

 
I made the background paper by inking a scarp of card by swiping it through Distress Ink Re-inkers sprayed with water. I used Scattered Straw, Mustard Seed, Tattered Rose and Victorian Velvet.
I then stamped with some Crafty Fairy images starting with circles stamped with Spiced Marmalade, then flowers stamped with Picked Raspberry and dotted circles stamped with Salty Ocean.
I trimmed this to size and added it to a pink mat. I then stamped the B Line Designs butterfly on the piece I trimmed off with black ink and cut it out. I brightened the colour a little with Mustard Seed ink.
I die cut the Tim Holtz weathered clock and inked it with Peacock Feathers and Salty Ocean then glued it to the card. I stamped the text with Hero Arts alphabet stamps and VersaFine Deep Lagoon ink. I added this to the card with the butterfly.

Have a good week.
Hugs,
Fliss xx

Monday, 7 July 2014

Postcard From Paris

Good morning folks and welcome to my post today especially my new follower Annie - so lovely to have you on board.
We have a new challenge today over at Make My Monday which has the theme of Mail Art chosen by Suzi B who would like to see creations involving postcards, envelopes and so on.
I decided on a postcard featuring a real wish of mine which is to travel to Paris as I've never been there - my younger daughter is going there for the weekend in a couple of weeks as a friend of hers has been an au pair for the last year and as you can imagine I'm rather green!
My postcard has a rather vintage feel to it as you'll see.


I cut my piece of thick cartridge paper slightly smaller than 4x6 as I wanted to add it to a card backing for strength.
I then used sponge applicators to apply Distress inks - I used Spun Sugar, Shabby Shutters, Victorian Velvet and Crushed Olive. I then stamped on a rose from a Glitz Design set with the darker Distress inks and added Hero Arts Old French Writing with Crushed Olive.
I then stamped on the Stampendous Paris image with Memories Creamy Coffee and added the post marks from an Inkylicious stamp with the same ink. When the ink was dry, I added colour to the flowers with Polychromos.
I stamped the Lost Coast Designs Rose Boy with the brown ink and added a little colour with the pencils. I cut the image out and swiped it with embossing ink and heat embossed with clear powder. I did this because the image needed a little something to pop agains the background.
To finish off I stuck the panel to a 4x6 piece of kraft card.

Bye for now and have a great week.
Hugs, Fliss xx

Some challenges for my postcard:
Anything But A Card Challenge - Anything Goes
Paper Crafting Challenges - Anything Goes
Paper Creator's Crafts Challenge - Anything Goes

Sunday, 1 June 2014

A Little Sophistication

Hello folks from a rather sorry for herself Fliss. I've finally managed to start wearing my left contact lens again although not all day yet as after 2 weeks without, I have to build up again over a few days as my lenses are gas permeable due to my being blind as a bat without :)
I've now put my back out somehow so am currently hobbling about and have to be careful not to make any sudden moves in the wrong direction - sigh!
Anyhow, enough of my whingeing and on to a card I made the elements for a while back and only just got to assemble. This is for the birthday of one of my nieces and as the title says is quite richly coloured and I think fairly sophisticated.


The rather sassy lady is another of Mitzi at Aurora Wings's beautiful digital images and apologies to Mitzi here if my interpretation is not quite as she intended as I couldn't quite decide if she was wearing a head-dress but decided that she was - artistic license! I printed her on to smooth cartridge paper and coloured her with Aquamarkers, adding detail with Prismacolor pencils. I trimmed the image to a panel and heat embossed the edges with Cosmic Shimmer tarmished gold embossing powder. I added some gems to the dangling part of the head-dress.
I then made some embossed panels - a gold one embossed with an Anna Griffin folder and some red textured paper embossed with a floral Darice strip folder. I then rounded opposite corners with a corner rounder punch.
I made some embellishments - a corner using a Tonic corner die and bronze card, a a butterfly from the same card used a Cheery Lynn die, a trellis cut from mauve card using a Cheery Lynn die and a round bronze card doily shape.
I assembled the card as you see, adding a metal medallion, some gems and a stamped, matted sentiment (Hero Arts) to finish.

Enjoy the rest of your weekend.
Fliss xx

I'd like to enter my card in the following challenges:
Aurora Wings Challenge 3 - Butterflies
My Time To Craft Challenge - No Designer Paper
Suzy Bee's Bloomin' Challenge - Layer It Up
Chocolate, Coffee and Cards Challenge - Embossing

Monday, 28 April 2014

A Nice Cup Of Tea

Good morning everyone and welcome to my post for our new challenge over at Make My Monday today which has a theme chosen by Jacqueline who would like to see your creations involving Food and Drink.
I decided on my favourite daytime tipple, a lovely cuppa as I need about 2 mugs full to get me going in the morning!
Here's what I made although it's a little more dainty than a mug!


I turned to my Kanban damask tea and coffee stamp set and stamped the cup on blue card with VersaFine Majestic Blue ink. I then cut the cup and saucer out.
I then stamped a Hero Arts flourish image on white card with VesaColor Sky Blue ink and die cut into a frilly panel with an X Cut die.
I embossed a panel of blue card with the Cuttlebug Victoria folder and stuck this to my square card blank.
I stamped the tea text from the stamp set directly on the die cut panel and added the cup then stuck this to the card to finish.

As you see, quite a simple creation for me and I hope you like it.
Have a great week.
Hugs,
Fliss xx

Monday, 17 March 2014

Fluttering By

Hello everyone and welcome to my post for today which I've done on my brand new laptop yippee! I can't tell you how glad I am to to back up and running again and can now come round and visit really soon.
We have a new challenge for you today over at Make My Monday and the theme is one I love as it's Beautiful Butterflies so thanks go to Jan for picking this.
I have a very simple card for you as my inspiration as I wanted my favourite butterfly stamp to be the star of my creation.


I made the background strip by inking the card with Scattered Straw and Wild Honey Distress inks and then stamped on my old favourite Hero Arts Old French Writing background with black ink.
I then stamped the B Line Designs butterfly on a scrap of my background paper made by stamping Distress inks with a cork.
I cut the butterfly out and assembled the card as you see - simples!

Have a great day.
Hugs,
Fliss xx

Monday, 2 December 2013

Christmas Flowers and Foliage

Good evening folks, I'm feeling a bit like a certain white rabbit here! A late post again for the new challenge today over at Make My Monday with your hostess with the mostest being Jacqueline with the theme of
CHRISTMAS FLOWERS AND FOLIAGE

I hope you all had a better weekend than I did as we had a rather traumatic Saturday after a frantic phone call in the early evening from my mother in law as my father in law had collapsed and couldn't get up. My hubby rushed there and to cut a long story involving paramedics and A & E short, my hubby picked him up again after tests just gone midnight and he seems OK although was told to visit his GP today as they couldn't find anything wrong.
Anyway, enough of my troubles and here's my DT inspiration:


Some stamps I've had for ages came out to play here as the background paper was made with a Papermania holly stampinked up on the leaves with Brilliance Pearlescent Olive ink and the berries coloured with a Cranberry Adirondack marker. I stamped this all over and then inked over the top with Crushed Olive Distress ink.
The main poinsettia image is a Hero Arts stamp and was inked with Brilliance Pearlescent Poppy and Olive and stamped on cream paper. I added this to a deep red mat and wrapped some checked ribbon from The Craft Fairy round.
I stamped the Hero Arts sentiment on the same cream paper with Archival Coffee ink (which for some reason looks red here?!) and added it to a deep red mat. I assembled all the elements on a kraft card blank adding a scrap of red poinsettia paper from the Polka Doodles Studio 12 Gingerbread Twist CD as a contrast.

Hoping you all have a good week.
Fliss xx

Monday, 29 July 2013

Paper Piecing Nature

Good morning folks, I hope you've all had a good weekend and better than mine as I spent Saturday morning going back and forth to the opticians after a problem on Friday which looked like a scratch on my left contact lens (meaning I could only see out of one eye all day!) turned out to be a tear which when you know I have gas permeable rather than soft lenses is not good.
In its place I have a continuous wear lens which I have for the next few days until after my check up on Saturday. I've never had soft lenses and although I could get a daily one in, I couldn't get it out again!!!
Anyway, enough waffle and on to this weeks challenge over at Make My Monday which was chosen by me and is the theme of
Paper Piecing

I'm still into doing altered vintage book pages having picked up a rather interesting book in a charity shop when we went to Bournemouth which is all about village life through the seasons.


I tore the edges of the paper making it the size to fit my kraft card blank then sponged on gesso to soften the text but allow it to show through a little.
I then stamped on a leafy sprig from my favourite Hero Arts set with Crushed Olive and Forest Moss Distress inks, smudging a little round the base for a misty effect.
I stamped the large butterfly from the set on to more book page with Memories Art Print Brown ink for my paper pieced element and cut this out. I then sponged on a little Dried Marigold and Spiced Marmalade Distress ink to add contrast colour.
I assembled the card as you see, adding some die cut meadow type flowers by Marianne Design, cut from apricot card and sponged with Spiced Marmalade.

The team mates have risen to the challenge magnificently so do hop over to be inspired.
Have a great week.
Hugs,

Fliss  xx

Some challenges for my card:
Creative Inspirations Paint - Anything Goes
Time For Scrap - Walk In The Countryside
Crafts For Eternity Challenge - Anything Goes
Sister Act Card Challenge - Anything Goes

Tuesday, 14 May 2013

Time To Fly

Hello everyone on a very soggy and windy day. I hope it's better where you are although it is rather good crafting weather!
I'm here today with a little wall hanging I've made for my younger daughter and sent it off to her today along with some fabulous chunky hand carved wooden toggles that her friend's husband made for one of her creations. You may not know that she's currently making her final collection for the end of her fashion degree and only has just over a week to go. She's under the most terrible pressure at the moment and has a bad cold to cope with as well due to working too hard.
It makes us feel very helpless as we can't do much to help her out (apart from sending out now alarming handouts of money!). I made the little piece of artwork to hopefully cheer her up using  one of my favourite dies, the Tim Holtz dress form.
There are several pics so that you can see the detail on my stamped background.


I made the base with a piece of recycled greyboard which I painted with 2 coats of Golden Titan Buff fluid acrylic and I then stamped the floral flourish from the Artistic Outpost Serenity plate with Palette Lavender Sachet permanent ink (necessary to dry on the acrylic paint which has a slight sheen).
I die cut the dress form from kraft card and embossed it with the Cuttlebug textile folder. I made the lace skirt by dyeing some frilled lace trim with Seedless Preserves Distress Stain and added 2 layers to the dress form with tape at the back.
I made the wings with the B Line Designs large butterfly, stamped with Memories Art Print brown and painted with the Seedless Preserves stain. I cut this out, cut it in half and added to the dress form.
I trimmed the base of the wall hanging with pinking sheers and added a couple of layers of lace and ribbon (the pinkish trim is linen ribbon from The Range and is a steal at £1 for a roll - they have lots of styles and colours too!).
I added a die cut lace corners (Anja by Marianne Design) cut from beige parchment card and stamped the text with Hero Arts alphabet stamps and Memento Sweet Plum ink. I cut the words out and inked the edges. I attached the dress form with foam tape and glue.
I added some of the linen trim at the top to create a hanger, taping it to the back and covering it with lilac felt trimmed to size.

Enjoy the rest of your day.
Hugs, Fliss xx

Some challenges for my wall hanging:
The Craft Room Challenge - Stamp Your Own Background
Fashionista Challenge - Shabby or Vintage - mine is vintage
Get Inky - Die Cuts
Pretty Little Ribbon - Lace

Monday, 18 March 2013

William Morris Style

Hello again folks, I'm back as I managed to finish off my creation that I just had to do when I saw the theme at Frilly and Funkie for the fortnight chosen by Jenny (aka Buttons) was William Morris Style and I only just about got it made in time as a spare hour or so appeared yesterday and I decided to get exceedingly inky.
I absolutely love William Morris' designs and spent some of the time browsing the gorgeous images on Google trying to decide what to do. Having noticed that a lot of the designs feature acanthus leaves, I hit upon the idea of using my Kaisercraft Twig and Berry Flourish clear stamp set as the flourish is a little like the leaves.
The paper was supposed to be in shades of green but the first step I used with Versamark as resist didn't quite work so I had to overstamp it and this is the result - a bit Christmassy I admit but I like it!


The resist that didn't quite work used Versamark ink with the flourish and I then sponged on Shabby Shutters Distress ink followed by Bundled Sage and Crushed Olive while attempting to make the flourish design stand out but it refused to play! Might be that the card was too absorbent or something.
It did give a good background colour for the layered stamping though and I stamped the flourish first with Forest Moss then Wild Honey. I then added the leafy berry sprig with Aged Mahogany (this came out quite red for some reason!) and the berries with Pine Needles. What do you think - is it William Morris style enough?

My next dilemma was what to do with the paper as I didn't want to cover it up! An A5 size card turned out to be the answer and I made my own from a piece of olive green mottled card (my last of this colour - sigh). Here's the card and you'll have to let me know what you think.


I stamped down the right side with the flourish stamp and VersaFine Spanish Moss ink and the attached a square of pearly red swirl patterned card distressed round the edges.
I cut a panel from my background paper (as it's 21cm square I have enough to make a couple more things with it or I might just keep it to look at lol) and distressed the edges before attaching to the card.
I stamped the Hero Arts bird collage on white card with VersaFine Deep Lagoon ink and embossed this with clear powder. I then coloured the panel with Distress inks and trimmed down. I added this to a deep teal panel leaving a wide border under the image panel and knotting some deep pink wired ribbon round it.
I haven't yet added a sentiment as I prefer to wait until the right occasion appears.

After a rainy start we now have sunshine so I hope you do too!
Hugs, Fliss xx

Monday, 11 March 2013

Heat It Up!

Morning folks, we certainly need a bit of heating up this morning as Spring has decided to hide away and I woke up this morning to thick frost, -5 and it's now snowing! Eek! I shall be staying in the warm today I think.
I hope you all had a great weekend. I'm a big fan of Dancing On Ice and was thrilled to bits when Beth won as I've been so fed up with Jason's negative comments about her and I thought her version of Bolero with the lovely Dan so full of emotion (I have to confess it brought tears to my eyes).
Anyway, enough waffle and on to the reason for my post which is to tell you about the new challenge today at Make My Monday which has the theme of Heat Embossing. I have to say I struggled a bit with this one as I couldn't make up my mind what to do and have half done bits all over the place. In the end, I created something quite simple which I hope you like.
We also some some lovely new Design Team members and would like to welcome Jan, Laura and Rosie. You'll need to hop over to the challenge blog to see their gorgeous first creations.


I made the butterfly first by stamping the Hero Arts image on deep red crinkle card with black ink and heat embossing it with clear powder. I then cut it out leaving a narrow border of deep red.
I made the background by stamping the Artistic Outpost text on the top right corner of a square of beige card with VersaFine Crimson Red ink and then stamped the Hero Arts script all around with Brilliance Pearlescent Beige ink. I inked the edges with brown ink.
I die cut a circle and embossed it with a butterfly folder free with Papercraft Essentials magazine and inked this with Antique Linen Distress ink and sand pigment ink. I added this to a scalloped mat of deep red paper and assembled my card as you see.

I hope you have a great day.
Stay warm!
Fliss xx

Sunday, 10 February 2013

Tales Of The Riverbank

Hello folks, hoping you're all having a lovely weekend and managing to fit in some crafting like me.

Today sees the start of a new challenge over at Fashionable Stamping Challenges and I had a bit of a dilemma with this one as I couldn't decide which of my many stamps on this theme to use! The challenge is Birds which is why I had the struggle but I finally decided on a riverside theme as I wanted to ink up my gorgeous Artemio kingfisher stamp. I made a little piece of artwork that will probably end up on the wall although I haven't yet added the hanging element. Hope you like it.


I made my background paper first with a square of thick watercolour paper which I sprayed with water and then swiped on Distress Stains in Crushed Olive, Shabby Shutters, Squeezed Lemonade, Mustard Seed and Dried Marigold. I dried this off and then stamped on the large fern leaf sprig from the Hero Arts Fern stamp and die set with VersaFine Spanish Moss. I stamped some on scrap paper first for a faded effect.
I cut a slightly larger square of recycled greyboard and inked round the edges with Distress Embossing Ink then heat embossed with Fran-tage Aged Green Embossing Enamel. I distressed the edges of my background paper with an emery board and added this to the greyboard panel.
I stamped the kingfisher on thick smooth cartridge paper with Memories black ink and then coloured him with Tombow markers and pastel pencils. I cut him out to leave a narrow off white border.
I made the distressed panel by applying Tumbled Glass Distress ink to a rectangle of the cartridge paper direct from the pad and then stamped on the Kaisercraft Wood Panel stamp with Weathered Wood DI and embossed with the Cuttlebug distressed stripes folder and swiped the ink on the raised areas.
The embellishments were made by  stamping the fern with the moss ink and the dragonflies with VersaFine Deep Lagoon. I then coloured the 2 dragonflies with Tombow markers then cut them out with the die and sponged with VersaMark ink and heat embossed with sparkly powder. The fern was die cut and because of the large white areas left, I sponged on some Crushed Olive DI to make them blend in.
I assembled the panel as you see with a mix of double sided and foam tape.

The Design Team have a gorgeous array of very different creations on the catwalk so don't forget to pop over for a look. We also have our usual lovely sponsor, Marina of Cottage Crafts with a voucher to spend in the online shop for our randomly drawn winner.

Have a lovely Sunday.
Hugs,
Fliss xx

Some challenges for my recycled art panel:
Craft Us Crazy - Get To Cutting (die cutting in my case)
Sarah Hurley Challenges - Anything But A Card
Divas By Design - Winged Things
Stamping Sensations - Fur and Feather (think you can see I have feather tee hee!)

Sunday, 16 December 2012

Late Again!

Or at least my DT post for today's new Fashionable Stamping Challenges is lol. This fortnight the theme is Mask It and you can use all sorts of masking techniques for this including actual masks, a masked stamped image, a stencil etc. etc. Don't forget that you must include some stamping too as we are a stamping challenge.
I decided on something a bit different for my inspiration this time as I've used a stencil of a large flourish shape that was free in a mag a while back but did something you might not expect with it. Read on to find out what I did!


I prepared my background paper first using a piece of card which I covered with Distress Stains in Victorian Velvet and Crushed Olive and spritzed with Glimmer Mists in Vintage Pink and Olive Vine.
Using the stencil, I applied embossing ink with the Ranger Emboss It Dabber which is brilliant for this sort of thing. I then sprinkled Fran-tage Shabby Pink Embossing Enamel on and heated to melt the powder. I sponged Victorian Velvet round the embossed flourish to make it really pop.
I then stamped the lovely lady (B Line Designs) on cream card with VersaFine Crimson Red ink and die cut the image into a circle. I embossed around the edges with the Cuttlebug roses folder. I coloured the lady with Promarkers and then added ink around the edges to highlight the embossed areas.
I assembled the card using some die cut doilies (Marianne Design) and some layered Prima hydrangea flowers which I glittered up a little and added pearls to.
To finish, I stamped the Hero Arts sentiment directly on the background paper at the base of the card.

Sorry for my lack of visiting lately, I will try and pop round before Christmas once I've got my unexpected workload out of the way!
Hope you have a good week.
Fliss xx

Some challenges for my card:
Addicted To Stamps And More! - Bingo (My line is Diagonal - Green, Free, Pearls)
Try It On Tuesday - Let's Get Inky

Monday, 29 October 2012

La Belle Femme

Hello folks, and especially my new followers, hoping you all had a good weekend despite the very chilly weather. In my case it was a good excuse to stay warm and do some crafting so I now have exceedingly inky fingers!
This brings me neatly to my inky creation for the last of the October French theme challenges over at Make My Monday and this week the challenge is to make something Feminine or Romantic, or both if you like. It must still have a French flavour to it though so please don't forget that bit of ooh la la!
My card as you will see is mostly pink again as I always think it's such a feminine colour.


The background paper is stamped with the gorgeous Prickley Pear Eiffel flourish image together with Hero Arts old French writing using Memories Artprint Brown ink. I then got very inky fingers sponging on Victorian Velvet Distress ink (not as bad as the usual blue, green or purple fingers I've had recently lol). I then added a smidgeon of colour with various Promarkers.
I stamped my favourite B Line Designs stamp, Le Brun, with the same brown ink then added a little colour with Promarkers (Saffron, Vanilla, Antique Pink and Tea Green) and cut out to leave a fairly wide contrasting border round the image.
I stamped the lace (also B Line Designs) with the brown ink and added colour again with Promarkers. I cut this out too and used deckle scissors on the shaped edge as these give a very good effect on a fluffy type edge.
I assembled the card as you see, adding text from a Kanban clear stamp set stamped in brown and coloured with the Dusky Pink Promarker.

Hope you have a good week.
Hugs, Fliss xx

Some challenges for my inky creation:
Vintage Stamping Challenges - Anything Goes
It's All About Vintage - Make Your Own Background

Sunday, 21 October 2012

Hocus Pocus

Good morning folks, hope you're all having a lovely weekend. It rained here most of the day yesterday so I got on with some necessary crafting for a workshop I'm teaching on Monday so will be able to share some cards from that with you soon.
Today sees the start of a new challenge over at Fashionable Stamping Challenges and our last one was certainly popular with a very large number of entries. We hope you like this theme as much as it's Halloween or Halloween Colours for those of you who don't do Halloween.
My card features a stamp set I've had my eye on for ages and finally succumbed to as it's not hugely Halloween themed and can be used for other occasions too.


I absolutely love this owl image which is from the Hocus Pocus stamp set by Indigo Blu as is the spider web complete with spider. I think the owl is so cute and cuddly looking although the castle in the background is quite Gothic.
I stamped the owl with Memories black ink and coloured both him and the castle with Promarkers. I then sponged on Spiced Marmalade and Barn Door Distress inks for a brooding sunset.
I then made a frame using the Tim Holtz cabinet card die and stamped on the spider and web on one side and just the web by masking off the spider on the other side. I added some doodling to the webs to make them fit the space. I sponged on a mix of Milled Lavender, Seedless Preserves and Dusty Concord Distress inks. I stamped the text on one side with Hero Arts alphabet stamps and doodled some brickwork round the edges of the arch shape.
I then cut a panel of white card slightly larger than the purple panel and sponged Mowed Lawn Distress ink down the sides, stamping the spider web on with the black ink.
I added the panels to a black card blank and finished off with a black card border punched with the Martha Stewart wrought iron punch.

The Fashionettes have made some fabulous inspiration for you to see HERE and please don't forget if you enter that we must see some stamping on your project to qualify for the prize from Marina of Cottage Crafts or the Top 3.

Have a great Sunday.
Hugs, Fliss xx

Some challenges for my card:
2 Sisters - Cute and Creepy
Craftymess Challenge - Halloween
Di's Digi Designs Challenge - Too Cute To Spook
My Sheri Crafts - Halloween

Monday, 8 October 2012

Vacances En France

Good morning folks, I've gone all French today as it's the second of my challenge themes over at Make My Monday and this week, the theme is French Vintage. As you see, I've managed to combine 2 of my favourite things this week!
My inspiration for you is a rather different shaped easel card which I made with a Papermania large die set with gorgeous elegant, frilly edges. It also uses a different inking technique which I'll be adding a tutorial for later on this week - it's really easy to do and gives a very effective vintage style grungy look.


I've added 3 photos as it was quite difficult to show it all properly with just one and the other pics show more of the detail.
I first made the card blank up using some cream textured card, quite a thick one as it's more sturdy. I added ink round the edges using my vintage inking technique (tutorial to follow) using Victorian Velvet, Tattered Rose, Crushed Olive and Frayed Burlap Distress inks.
I stamped the Hampton Arts Fusion passport image on cream card with Archival coffee ink and die cut the shape with the next size down in the die set. I coloured the panel with a mix of Promarkers and VersaColor inks in Split Pea, Khaki, Cinnamon and Old Rose. I stamped just the larger butterfly section twice more on cream card, coloured the butterflies with Promarkers and cut them out.
I die cut a panel of cream card for the base with the smaller die and inked this with Sand Beige, Cinnamon, Old Rose and Umber VersaColor inks then stamped on Hero Arts old French writing several times with Dovecraft Natural ink.
I made a floral embellishment with a Magenta flower stamp (I 0354) which I've had for many years but you can still buy it from The Stamp Man. I stamped the flower with yellow, pink and rust inks then embossed with iridescent Blonde Moments embossing powders. I cut them out and layered them up with a dew drop in the centre.
I assembled the card as you see, adding the 2 cut out butterflies with foam tape.

Hoping that you all had a good weekend and better than mine as it ended up being really expensive because my Dyson washing machine decided to give up the ghost on Saturday and was too expensive to repair so we've had to buy a new machine which is arriving tomorrow.

Have a good week.
Hugs, Fliss xx

Some challenges for my card:
Crafty Mess Challenge - Anything Goes
Fussy and Fancy - Easel Card
Totally Papercrafts - Let's See Those Shapes

Wednesday, 3 October 2012

Parisian Tag

Good morning folks and a big welcome to my new follower Trish as it's so lovely to see you there. I hope everyone is having a good week and managing to stay warm in our very iffy weather.
I'm here today with a tag to show you that's my mid week motivation over at Make My Monday as it's my turn to inspire you this week.
Here's the finished tag which uses my never put away Distress inks in some warm Autumnal shades.


I've inked the tag using cosmetic sponges with Distress inks in the following shades - Crushed Olive, Dried Marigold, Spiced Marmalade, Barn Door, Rusty Hinge and Aged Mahogany. I then stamped on an Artistic Outpost flowery flourish from the Serenity set with the Crushed Olive.

I've then added an inked panel embossed with the Cuttlebug fleur de lys folder together with the flourished Eiffel Tower (Prickley Pear), an inked Marianne Design flourish and some text stamped with a Hero Arts alphabet I've had for many years. Everything was stamped with Archival Coffee (but you probably already guessed that lol)

Hope you have a great day.
Hugs,
Fliss xx

Some challenges for my tag:
Creative Stamp Friends - Autumn Colours
House Of Gilli - Use 2 Favourite Things (Distress Inking and Inked Dry Embossing)
 Kaboodle Doodles Challenge - Colours Of Autumn
Totally Stampalicious - Anything Goes
There's Magic In The Air - Anything Fall (My Colours)

Monday, 2 July 2012

Primary Colours

Good morning folks, hope you all had a good weekend. I had a fabulous day yesterday dodging showers to watch all the wonderful demonstrators at The Craft Barn Extravaganza and particularly enjoyed watching Jean Hardy (and having a chat with the lovely Malcolm about Brighton), Lindsay Mason, Leandra Franich and Andy Skinner. I also met up with Claire (Happy Days) from the Polka Doodles DT and Alison (craftytrog) which was really lovely. Apologies to Helen Chilton too as I was going back to watch her demo when she was less busy but ran out of time!
As it's Monday and also July, we have a new monthly theme for the challenges over at Make My Monday and chosen by Mynnette the overall theme is the Colour Wheel. This week the challenge is to use Primary Colours, Red, Yellow and Blue. Here's what I made:


The flower is from a Hero Arts set and I stamped it repeatedly on white card to build up a floral scene - I was thinking meadow here in case you're wondering. I then coloured them with various yellow Promarkers and sponged on Stormy Sky Distress ink.
I stamped the B Line Designs butterfly with black and coloured this with red Promarkers then cut it out.
I assembled the simple card as you see adding a sentiment on a red card mat.


Here's Mynnette's first colour wheel interpretation above.

 
We are lucky enough to be sponsored this month by Priyanka of My Heart Pieces who is offering a prize of 3 digis of choice to the monthly winner. She has generously given the Design Team some gorgeous images to work with and my creation for next week will feature one of these.

Challenges for my card:
Dream Valley Challenges - Things With Wings
Dutch Dare Card Challenges - Flutterby Butterfly

Have a great day.
Hugs, Fliss xx