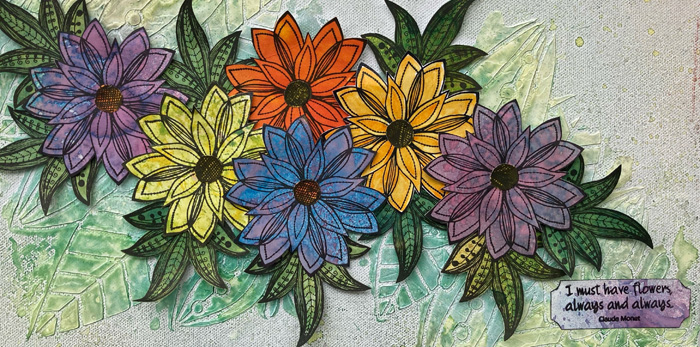
Hello! A rather late post today after another exceedingly busy week to let you know that I have my usual Friday post over at That's Crafty! Blog where I'm sharing a mixed media tag with a large blooming flower embellishment.
You'll find all the details over the blog as usual if you'd like to see how I created it.
I'm still involved in doing a lot of stuff on behalf of my in laws which is why I still don't have much time for blogging. Hopefully the end is soon in sight as my father in law is now at the rehabilitation centre and is being helped with his walking.
Have a great weekend.
Fliss xx
Showing posts with label That's Crafty! 8x8 Stencils. Show all posts
Friday, 2 November 2018
Friday, 12 October 2018
Going Floral at That's Crafty! Blog
Hello everyone on a rather blustery day, it seems like Autumn has arrived at last as it's definitely that sort of weather today.
Apologies for not visiting much lately, I'm in the middle of the rather daunting task of sorting out my mother in law's clothes on behalf of my father in law and it's taking ages as she has a lot of very lovely and classy items which I'm reluctant to just give to the local charity shops as they're worth quite a lot. I'm trying to find second hand clothing shops that would be interested at the moment so we could get more for them and donate it to a charity we choose.
I'm over at That's Crafty! Blog today with a floral mixed media chunkie which I hope you'll like if you hop over to see how it came about.
I've been playing with the texture pastes again as I love these for mixed media.
Have a great weekend and will visit as soon as I can find some spare time.
Fliss xx
Apologies for not visiting much lately, I'm in the middle of the rather daunting task of sorting out my mother in law's clothes on behalf of my father in law and it's taking ages as she has a lot of very lovely and classy items which I'm reluctant to just give to the local charity shops as they're worth quite a lot. I'm trying to find second hand clothing shops that would be interested at the moment so we could get more for them and donate it to a charity we choose.
I'm over at That's Crafty! Blog today with a floral mixed media chunkie which I hope you'll like if you hop over to see how it came about.
I've been playing with the texture pastes again as I love these for mixed media.
Have a great weekend and will visit as soon as I can find some spare time.
Fliss xx
Friday, 5 October 2018
Dragonfly Collage and Hochanda News
Hello! I hope you've all had a good week and are looking forward to the weekend as I am. I have one of my samples for today's Hochanda show which if you're reading this before 12 noon you can watch!
Here's a sneak peek of my dragonfly collage which I hope you'll hop over to That's Crafty! Blog to see the whole photo of and of course, how I created it.
Have a great day and a lovely weekend and see you soon.
Fliss xx
Here's a sneak peek of my dragonfly collage which I hope you'll hop over to That's Crafty! Blog to see the whole photo of and of course, how I created it.
Have a great day and a lovely weekend and see you soon.
Fliss xx
Wednesday, 3 October 2018
Quoth The Raven
Hello! Welcome to my inspiration for our new challenge this month over at That's Crafty! Challenge Blog where, being October, we have the theme of Spookalicious and would like to see your creepy or Halloween artwork.
My mixed media panel was inspired by Edgar Allan Poe and came about because when rummaging through my stencils, I came across my as yet unused raven stencil.
I chose a square MDF panel and covered this roughly with texture sand paste, leaving a few bits of the panel uncovered - mainly around the edges.
I sprayed the panel with Walnut, Blueberry and Blackberry flat matte sprays, giving it several coats and drying between each one.
Once the background was completely dry, I used the raven stencil with texture paste to create my main image. I let this dry well and then painted it with Black multi surface paint by placing the stencil back on top and applying the paint with a sponge.
I then removed the stencil and painted in between the sections as well to form a complete image. I then added some highlights to the bird with Metallic Blue and Silver multi surface paints. I went around the edges with Red shimmer paint and also painted his eye.
I trimmed a greyboard tree so that it would fit on the side and covered it with texture paste, scraping in a knarled bark pattern with a cocktail stick. When it was dry, I painted it with black multi surface paint and charcoal shimmer paint, treating several greyboard leaves in the same way. I glued these on the left hand side of my collage.
I stamped the skulls (actually the skull and crossbones image from Donna's Claire stamp set) on mixed media paper with black pigment ink and clear embossed them. I coloured them a little with my Zig pens and then heat embossed them further with Vintage Beeswax Baked Texture embossing powder. I also used this on a Tim Holtz quote chip.
I created a spooky moon in the top right hand corner with texture paste using a circle stencil and coloured this with a mix of multi surface and shimmer paints.
I hope you can join us for some great prizes.
Thank you to everyone who left kind comments on my last post. My father in law is now recovering well and is awaiting transfer to an NHS centre for physiotherapy care.
See you soon.
Fliss xx
My mixed media panel was inspired by Edgar Allan Poe and came about because when rummaging through my stencils, I came across my as yet unused raven stencil.
I chose a square MDF panel and covered this roughly with texture sand paste, leaving a few bits of the panel uncovered - mainly around the edges.
I sprayed the panel with Walnut, Blueberry and Blackberry flat matte sprays, giving it several coats and drying between each one.
Once the background was completely dry, I used the raven stencil with texture paste to create my main image. I let this dry well and then painted it with Black multi surface paint by placing the stencil back on top and applying the paint with a sponge.
I then removed the stencil and painted in between the sections as well to form a complete image. I then added some highlights to the bird with Metallic Blue and Silver multi surface paints. I went around the edges with Red shimmer paint and also painted his eye.
I trimmed a greyboard tree so that it would fit on the side and covered it with texture paste, scraping in a knarled bark pattern with a cocktail stick. When it was dry, I painted it with black multi surface paint and charcoal shimmer paint, treating several greyboard leaves in the same way. I glued these on the left hand side of my collage.
I stamped the skulls (actually the skull and crossbones image from Donna's Claire stamp set) on mixed media paper with black pigment ink and clear embossed them. I coloured them a little with my Zig pens and then heat embossed them further with Vintage Beeswax Baked Texture embossing powder. I also used this on a Tim Holtz quote chip.
I created a spooky moon in the top right hand corner with texture paste using a circle stencil and coloured this with a mix of multi surface and shimmer paints.
I hope you can join us for some great prizes.
Thank you to everyone who left kind comments on my last post. My father in law is now recovering well and is awaiting transfer to an NHS centre for physiotherapy care.
See you soon.
Fliss xx
Wednesday, 1 August 2018
Animal Magic at That's Crafty! Challenge Blog
Hello! I don't know about you but I can't believe it's August already! Don't know where the time goes these days and it seems like it goes faster the older you get!
As it's August, we have a new challenge starting today over at That's Crafty! Challenge Blog and the theme for this month is Animal Magic so you can make anything you like as long as you have at least one animal of some sort on there.
My inspiration has 3 from one of Magda Polakow's cute stamp sets for That's Crafty! which I've used in a somewhat outside the box project. Hope you like it.
I've taken one of the quirky shrines for my base, using the tree stump one as I'm sure you all know how much I love nature themed artwork.
I assembled the shrine back, painting the inside with orange multi surface paint for a lovely warm glow.
I then used the larger tree bark stencil with texture paste to add a bark pattern on the front. The twiggy bits at the top being done by dabbing on paste and scratching a bark pattern with a cocktail stick as I found this easier.
When it was dry, I painted the bark with a mix of multi surface paints, using chestnut brown, red, green, orange and metallic bronze. I misted on water and allowed the colours to run a little. When the paint was dry, I glued the front to the shrine base.
I then wanted to add some interest to the tree stump and was inspired by a tree I saw on a visit to Petworth Park in June - here's the photo which is quite weird!
As you can see, it looks like there's a creature's eye peeping out of the knot in the tree so I decided to try and create a knot around the oval aperture in the shrine.
I drew around the oval removed from the front on a piece of mixed media paper. I then used this to construct my knot, drawing the shape and cutting it out then piling on texture paste which I added a pattern to with the cocktail stick. Once it was dry, I painted it with multi surface paints and glued it in place.
I took a tiny MDF heart which I painted red and glued this inside the shrine using a stack of leftover greyboard waste (from the clocks set). I added the text over the top which I stamped with black ink on mixed media paper.
I stamped some leaves using the leaf from Magda's set, stamping on paper painted green. I added more detail before cutting the leaves out and glued these in place.
I then took 3 of the new MDF ATCoin 2.5 inch rounds and painted these with green and teal multi surface paints to roughly approximate sky and grass, then added some pattern with the new Clouds & Hearts stencil designed by Magda using white multi surface paint.
I stamped the cute critters from the stamp set on mixed media paper, coloured them with Zig clean color markers and cut them out, gluing them to my painted rounds which I added to the top of the tree stump.
Aren't they cute!
The last thing I did was to brush 3D gloss gel over the tree surface for some added oomph.
Supplies Used:
That's Crafty! ATC Art Shrines Set - contains the 4 new shapes including this one and the 2.5ins rounds
That's Crafty! Clear Stamp Set - Baby Bear and Friends by Magda Polakow
That's Crafty! Clear Stamp Set - The House Collection by Melina Dahl
That's Crafty! 8 x 8 Stencil - Clouds & Hearts
That's Crafty! Texture Paste
That's Crafty! 3D Gloss Gel
That's Crafty! Multi Surface Paints - White, Chestnut Brown, Red, Orange, Green, Metallic Bronze, Teal
Black Archival Ink
Mixed Media Paper
Zig Clean Color Marker Pens
I hope you can join us for some lovely prizes as you have to be in it to win it!
Have a great day,
Fliss xx
As it's August, we have a new challenge starting today over at That's Crafty! Challenge Blog and the theme for this month is Animal Magic so you can make anything you like as long as you have at least one animal of some sort on there.
My inspiration has 3 from one of Magda Polakow's cute stamp sets for That's Crafty! which I've used in a somewhat outside the box project. Hope you like it.
I've taken one of the quirky shrines for my base, using the tree stump one as I'm sure you all know how much I love nature themed artwork.
I assembled the shrine back, painting the inside with orange multi surface paint for a lovely warm glow.
I then used the larger tree bark stencil with texture paste to add a bark pattern on the front. The twiggy bits at the top being done by dabbing on paste and scratching a bark pattern with a cocktail stick as I found this easier.
When it was dry, I painted the bark with a mix of multi surface paints, using chestnut brown, red, green, orange and metallic bronze. I misted on water and allowed the colours to run a little. When the paint was dry, I glued the front to the shrine base.
I then wanted to add some interest to the tree stump and was inspired by a tree I saw on a visit to Petworth Park in June - here's the photo which is quite weird!
As you can see, it looks like there's a creature's eye peeping out of the knot in the tree so I decided to try and create a knot around the oval aperture in the shrine.
I drew around the oval removed from the front on a piece of mixed media paper. I then used this to construct my knot, drawing the shape and cutting it out then piling on texture paste which I added a pattern to with the cocktail stick. Once it was dry, I painted it with multi surface paints and glued it in place.
I took a tiny MDF heart which I painted red and glued this inside the shrine using a stack of leftover greyboard waste (from the clocks set). I added the text over the top which I stamped with black ink on mixed media paper.
I stamped some leaves using the leaf from Magda's set, stamping on paper painted green. I added more detail before cutting the leaves out and glued these in place.
I then took 3 of the new MDF ATCoin 2.5 inch rounds and painted these with green and teal multi surface paints to roughly approximate sky and grass, then added some pattern with the new Clouds & Hearts stencil designed by Magda using white multi surface paint.
I stamped the cute critters from the stamp set on mixed media paper, coloured them with Zig clean color markers and cut them out, gluing them to my painted rounds which I added to the top of the tree stump.
Aren't they cute!
The last thing I did was to brush 3D gloss gel over the tree surface for some added oomph.
Supplies Used:
That's Crafty! ATC Art Shrines Set - contains the 4 new shapes including this one and the 2.5ins rounds
That's Crafty! Clear Stamp Set - Baby Bear and Friends by Magda Polakow
That's Crafty! Clear Stamp Set - The House Collection by Melina Dahl
That's Crafty! 8 x 8 Stencil - Clouds & Hearts
That's Crafty! Texture Paste
That's Crafty! 3D Gloss Gel
That's Crafty! Multi Surface Paints - White, Chestnut Brown, Red, Orange, Green, Metallic Bronze, Teal
Black Archival Ink
Mixed Media Paper
Zig Clean Color Marker Pens
I hope you can join us for some lovely prizes as you have to be in it to win it!
Have a great day,
Fliss xx
Friday, 29 June 2018
Sharing Joy Mixed Media Artwork for That's Crafty!
Hello! Hope you're all OK at the moment and apologies for being a bit of a bad blogger lately, I've just been rather busy with family stuff, work and other behind the scenes stuff that can't yet be shared. Hopefully normal service will be resumed very soon.
I have my usual Friday post over at That's Crafty! Blog today and this week my softer side is on show as I decided (a bit reluctantly) to break into my treasured stash of vintage doilies to create a mixed media panel which is the reason for the soft colours that I hardly ever use.
This is just a sneak peek and if you'd like to see the whole thing you'll need to hop on over to the blog where all will be revealed.
Have a great day and a lovely weekend and hope to catch up soon.
Fliss xx
I have my usual Friday post over at That's Crafty! Blog today and this week my softer side is on show as I decided (a bit reluctantly) to break into my treasured stash of vintage doilies to create a mixed media panel which is the reason for the soft colours that I hardly ever use.
This is just a sneak peek and if you'd like to see the whole thing you'll need to hop on over to the blog where all will be revealed.
Have a great day and a lovely weekend and hope to catch up soon.
Fliss xx
Friday, 22 June 2018
Sea Life for That's Crafty!
Hello everyone, I hope you've all had a lovely week and hopefully less busy than mine so I'm really looking forward to the weekend.
Just a quick post to let you know that I'm over at That's Crafty! Blog today with one of the samples that I created for Tuesday's Hochanda shows which I hope you managed to watch but if not, there's always rewind.
Here's a sneak peek of my rather fishy make which I hope will intrigue you enough to hop over to the blog.
Have a lovely day and a really great weekend.
Fliss xx
Just a quick post to let you know that I'm over at That's Crafty! Blog today with one of the samples that I created for Tuesday's Hochanda shows which I hope you managed to watch but if not, there's always rewind.
Here's a sneak peek of my rather fishy make which I hope will intrigue you enough to hop over to the blog.
Have a lovely day and a really great weekend.
Fliss xx
Wednesday, 2 May 2018
A Stitch In Time at That's Crafty! Challenge Blog
Hello and welcome to my inspiration for our May Challenge over at That's Crafty! Challenge Blog where our theme for this month is A Stitch In Time which could be real or faux, the choice is yours.
Actually can't believe it's May already and the weather today is anything but as it's cold and blowing a gale!
Hope you like my inspiration which is the mixed media sampler style creation that I made for the last Hochanda shows so you might have spotted this if you watched them.
The base for my sampler is one of the new MDF circles which come in 3 sizes (this being the 6 inch diameter) and have holes at the top to add a hanger if you like.
I painted the substrate with white gesso and then a coat of ivory multi surface paint. Once the paint was dry, I stamped the woven texture stamp randomly over with Vintage Photo oxide ink without using an acrylic block to achieve a worn, shabby look.
I then used the new and gorgeous stitches stencil with texture paste to add faux stitching to the background. I have a tip for you here as there are 9 rows of different stitches and I found that the easiest way to work with them is to cut the stencil up into individual strips as this means you can use them in any order you like and don't have to wait for texture paste to dry before adding more rows - result!
I left the stencilling to dry and when I returned a short time later found that the texture paste had leached up some of the colour from the oxide ink stamping underneath giving a worn, vintage look - serendipity strikes again!
I then made my floral embellishment by stamping the flower with black VersaFine ink on 2 complimentary shades of fabric backed with Bondaweb. I ironed the fabric to thick interlining to add strength and then cut my flower out, the whole one from the amber shade and just the centre from the aged ivory one.
I assembled my panel, adding lace in between some rows of faux stitching. I glued the flower together and then to the panel with 3D glue and added some small toning flower beads for texture. Some lace was tied through the top to make a pretty hanger. I can recommend using a needle pushed through lace or ribbon to pull it through the holes as they're quite small and the needle really helps your chosen trim to go through with ease.
There's a great prize of a £30 voucher for the online shop for the randomly drawn winner and the Top 3 chosen by the DT will receive stencils of their choice so do enter if you can.
Have a great day whatever you're doing and see you soon.
Hugs,
Fliss xx
Actually can't believe it's May already and the weather today is anything but as it's cold and blowing a gale!
Hope you like my inspiration which is the mixed media sampler style creation that I made for the last Hochanda shows so you might have spotted this if you watched them.
The base for my sampler is one of the new MDF circles which come in 3 sizes (this being the 6 inch diameter) and have holes at the top to add a hanger if you like.
I painted the substrate with white gesso and then a coat of ivory multi surface paint. Once the paint was dry, I stamped the woven texture stamp randomly over with Vintage Photo oxide ink without using an acrylic block to achieve a worn, shabby look.
I then used the new and gorgeous stitches stencil with texture paste to add faux stitching to the background. I have a tip for you here as there are 9 rows of different stitches and I found that the easiest way to work with them is to cut the stencil up into individual strips as this means you can use them in any order you like and don't have to wait for texture paste to dry before adding more rows - result!
I left the stencilling to dry and when I returned a short time later found that the texture paste had leached up some of the colour from the oxide ink stamping underneath giving a worn, vintage look - serendipity strikes again!
I then made my floral embellishment by stamping the flower with black VersaFine ink on 2 complimentary shades of fabric backed with Bondaweb. I ironed the fabric to thick interlining to add strength and then cut my flower out, the whole one from the amber shade and just the centre from the aged ivory one.
I assembled my panel, adding lace in between some rows of faux stitching. I glued the flower together and then to the panel with 3D glue and added some small toning flower beads for texture. Some lace was tied through the top to make a pretty hanger. I can recommend using a needle pushed through lace or ribbon to pull it through the holes as they're quite small and the needle really helps your chosen trim to go through with ease.
There's a great prize of a £30 voucher for the online shop for the randomly drawn winner and the Top 3 chosen by the DT will receive stencils of their choice so do enter if you can.
Have a great day whatever you're doing and see you soon.
Hugs,
Fliss xx
Saturday, 28 April 2018
Floral Hello Card
Hello all, I've a card to share today as it was rather wet yesterday after a good start and today has been dull and cold so what better tonic than a bit of crafting (and sketching though can't yet show you).
This one is a little different and the colours are slightly off too as my camera seems to struggle with plummy tones and the doily is actually a shade of rose and not quite as strong as it appears here.
As you can see, I've included the background before embellishing and it was actually the leftover result from making my floral wishes card as the stencil was covered in the Distress oxides that I used and it was a shame to waste it so I misted on some water and pressed on a sheet of card. The above background was the end result and it's so pretty I just had to use it.
I stamped my fanciful flower twice on mixed media paper with VersaFine Spanish Moss ink. I then coloured it with Distress markers, using Spun Sugar, Crushed Olive and Wild Honey. I then cut out the whole flower once and just the petal part on the second. I shaped them with a large embossing ball tool and layered them up with 3D glue.
I assembled my card using a couple of pretty doilies, adding a gold pearl to the flower and stamping on the hello text (a free stamp from Making Cards magazine) with Archival Plum ink.
I'd like to enter the following challenges with my card:
Everybody Art Challenge - Flower
Simon Says Stamp Monday Challenge - Flowers
Hope the weather is better where you are and enjoy the rest of your weekend.
Fliss xx
This one is a little different and the colours are slightly off too as my camera seems to struggle with plummy tones and the doily is actually a shade of rose and not quite as strong as it appears here.
As you can see, I've included the background before embellishing and it was actually the leftover result from making my floral wishes card as the stencil was covered in the Distress oxides that I used and it was a shame to waste it so I misted on some water and pressed on a sheet of card. The above background was the end result and it's so pretty I just had to use it.
I stamped my fanciful flower twice on mixed media paper with VersaFine Spanish Moss ink. I then coloured it with Distress markers, using Spun Sugar, Crushed Olive and Wild Honey. I then cut out the whole flower once and just the petal part on the second. I shaped them with a large embossing ball tool and layered them up with 3D glue.
I assembled my card using a couple of pretty doilies, adding a gold pearl to the flower and stamping on the hello text (a free stamp from Making Cards magazine) with Archival Plum ink.
I'd like to enter the following challenges with my card:
Everybody Art Challenge - Flower
Simon Says Stamp Monday Challenge - Flowers
Hope the weather is better where you are and enjoy the rest of your weekend.
Fliss xx
Friday, 27 April 2018
Heart Blooms for That's Crafty!
Hello everyone, well it's now rather a wet day after a good start earlier on and I'm hoping things improve for the weekend too.
A very quick post before I start on some work I have to do today to let you know that I have my usual Friday post over at That's Crafty! Blog and this week I have a very bright creation to share which came about because I saw the colour of the year is ultraviolet and I love purple!
I love purple so much that I've actually managed to acquire a purple coat - my Andy won't lose me in a crowd lol. I'm hoping there will be more purple in the Autumn as the current clothing colours (yellow, orange!!!) do nothing for me with my blonde hair!!!
Have a great day whatever the weather and a lovely weekend.
Fliss xx
A very quick post before I start on some work I have to do today to let you know that I have my usual Friday post over at That's Crafty! Blog and this week I have a very bright creation to share which came about because I saw the colour of the year is ultraviolet and I love purple!
I love purple so much that I've actually managed to acquire a purple coat - my Andy won't lose me in a crowd lol. I'm hoping there will be more purple in the Autumn as the current clothing colours (yellow, orange!!!) do nothing for me with my blonde hair!!!
Have a great day whatever the weather and a lovely weekend.
Fliss xx
Monday, 23 April 2018
Floral Wishes Card
Hello everyone, I hope you've all had a lovely weekend with sunshine as we did and it actually felt like summer down here on the South Coast as it was so warm. Not quite so warm today but we still had a sunny start so hopefully the week will be good.
I have another card to share today made from my stack of flowers from my recent marathon stamping and cutting out session. This one is for a friend who's going through a bit of a tough time at the moment with health issues and I wanted to send her something to let her know I'm thinking of her.
Happily the colours fit the April colour challenge at Rubber Dance so although I haven't used their stamps this time, I hope that's OK (between you and me, I have to work out where I put them as I had a tidy up and now can't find things!)
I made my background paper by swiping card through some Distress Oxides (Squeezed Lemonade, Twisted Citron and Worn Lipstick) spritzed with water on my craft mat. I then used the That's Crafty! TC8024 Flourish stencil with the same inks used neat to add a shabby chic pattern as I wasn't too bothered about getting the pattern perfect.
I cut a piece to fit my square kraft card blank and glued it on. I stamped the sentiment (a stamp free with Making Cards magazine) with black ink and then added some layered up flowers assembled with dimensional glue.
I finished off with an offcut of my stencilled paper which I die cut with an old scallop lace border die and inked with Worn Lipstick, tucking a couple of pieces under the flowers for added interest.
I'd like to enter this in the current Rubber Dance Challenge having used the colours although not the altered bit this time:
Have a great week and see you soon.
Fliss xx
I have another card to share today made from my stack of flowers from my recent marathon stamping and cutting out session. This one is for a friend who's going through a bit of a tough time at the moment with health issues and I wanted to send her something to let her know I'm thinking of her.
Happily the colours fit the April colour challenge at Rubber Dance so although I haven't used their stamps this time, I hope that's OK (between you and me, I have to work out where I put them as I had a tidy up and now can't find things!)
I made my background paper by swiping card through some Distress Oxides (Squeezed Lemonade, Twisted Citron and Worn Lipstick) spritzed with water on my craft mat. I then used the That's Crafty! TC8024 Flourish stencil with the same inks used neat to add a shabby chic pattern as I wasn't too bothered about getting the pattern perfect.
I cut a piece to fit my square kraft card blank and glued it on. I stamped the sentiment (a stamp free with Making Cards magazine) with black ink and then added some layered up flowers assembled with dimensional glue.
I finished off with an offcut of my stencilled paper which I die cut with an old scallop lace border die and inked with Worn Lipstick, tucking a couple of pieces under the flowers for added interest.
I'd like to enter this in the current Rubber Dance Challenge having used the colours although not the altered bit this time:
Have a great week and see you soon.
Fliss xx
Wednesday, 7 March 2018
Spring Into Action at That's Crafty! Challenge Blog
Hello everyone, sorry for my lack of visiting lately, just very busy with life and work stuff at the moment which has cut down my blogging time.
A quick post to let you know that a new challenge is up for March today at That's Crafty! Challenge Blog where our new theme for the month is Spring Into Action which we could certainly do with after last week's arctic temperatures and snow. A bit warmer now and sunny with showers so maybe Spring is around the corner.
My inspiration is a mixed media panel featuring the most springlike of my new stamp designs which was inspired by a parrot tulip. Hope you like it.
What I did was to start with the backing panel which is an 8 x 8 rounded corner white/greyboard panel which I painted with green multi surface paint. I then added the detail with texture paste through the floral frame stencil and when dry, painted with yellow and orange multi surface paints.
I then took 3 MDF atcs and used the new bark dinky stencil (coming soon to the shop and Hochanda) with texture paste to make a tree bark look - much quicker than my previous method with a skewer!
Once the paste was dry, I painted the bark with a mix of chestnut brown, black, green and grey to look as realistic as possible.
I stamped the flowers on to some mixed media paper painted with multi surface paints and stamped with a sequin waste texture stamp. I cut out the flower heads only from my red and yellow paper, stamping again on green and trimming closely round the head area then glued the red and yellow heads over the top.
I glued the tree bark panel to my background panel, following up with the flowers, adding just part of the text from one of Melina's stamp sets, stamped on a scrap of orange paper, to the middle flower, tucking it under the leaves.
To finish off, I stamped around the edges of the panel with the sequin waste image and Spiced Marmalade oxide ink.
Supplies Used:
That's Crafty! White/Greyboard 8 x 8 Panel with rounded corners
That's Crafty! MDF Atcs
That's Crafty! Clear Stamp Sets - Fanciful Flowers Set 2, Nature's Faces Set 2, Textures Collection Set 4
That's Crafty! 8 x 8 Stencil - Daisy Frame
That's Crafty! Dinky Stencil - Tree Bark
That's Crafty! Multi Surface Paints
That's Crafty! White Texture Paste
Tim Holtz Oxide Ink - Spiced Marmalade, Fired Brick, Fossilised Amber
Archival Jet Black Ink
Silicone Glue
White Mixed Media Paper
You have a whole month to enter the challenge which is now open to entrants all over the world and there are great prizes up for grabs too.
Have a great day.
Fliss xx
A quick post to let you know that a new challenge is up for March today at That's Crafty! Challenge Blog where our new theme for the month is Spring Into Action which we could certainly do with after last week's arctic temperatures and snow. A bit warmer now and sunny with showers so maybe Spring is around the corner.
My inspiration is a mixed media panel featuring the most springlike of my new stamp designs which was inspired by a parrot tulip. Hope you like it.
What I did was to start with the backing panel which is an 8 x 8 rounded corner white/greyboard panel which I painted with green multi surface paint. I then added the detail with texture paste through the floral frame stencil and when dry, painted with yellow and orange multi surface paints.
I then took 3 MDF atcs and used the new bark dinky stencil (coming soon to the shop and Hochanda) with texture paste to make a tree bark look - much quicker than my previous method with a skewer!
Once the paste was dry, I painted the bark with a mix of chestnut brown, black, green and grey to look as realistic as possible.
I stamped the flowers on to some mixed media paper painted with multi surface paints and stamped with a sequin waste texture stamp. I cut out the flower heads only from my red and yellow paper, stamping again on green and trimming closely round the head area then glued the red and yellow heads over the top.
I glued the tree bark panel to my background panel, following up with the flowers, adding just part of the text from one of Melina's stamp sets, stamped on a scrap of orange paper, to the middle flower, tucking it under the leaves.
To finish off, I stamped around the edges of the panel with the sequin waste image and Spiced Marmalade oxide ink.
Supplies Used:
That's Crafty! White/Greyboard 8 x 8 Panel with rounded corners
That's Crafty! MDF Atcs
That's Crafty! Clear Stamp Sets - Fanciful Flowers Set 2, Nature's Faces Set 2, Textures Collection Set 4
That's Crafty! 8 x 8 Stencil - Daisy Frame
That's Crafty! Dinky Stencil - Tree Bark
That's Crafty! Multi Surface Paints
That's Crafty! White Texture Paste
Tim Holtz Oxide Ink - Spiced Marmalade, Fired Brick, Fossilised Amber
Archival Jet Black Ink
Silicone Glue
White Mixed Media Paper
You have a whole month to enter the challenge which is now open to entrants all over the world and there are great prizes up for grabs too.
Have a great day.
Fliss xx
Friday, 2 March 2018
Joyful Flowers Mixed Media Art for That's Crafty!
Hello everyone, I don't know about you but I've had a really awful week starting off on Wednesday morning when we woke up to find the boiler had stopped working in the middle of the night and the usual pressure adjustment didn't work so we had to call a man out. Apparently the boiler condenser outlet was frozen solid (no surprise there due to the arctic temperatures at the moment!) so he's done a temporary repair, rerouting the pipe to a bucket! It won't get fixed until the big freeze has ended.
On the same day, cold fingers became butter fingers and I dropped my laptop on the kitchen floor whilst trying to move to the dining room. So yesterday morning I made an emergency trip to the Brighton Apple store and luckily due to the weather people who had actually managed to book an appointment (not me as all they seemed to have was the middle of next week!!!), I only waited a few minutes before someone came to look at my computer. All he did was take it out the back and hoover it then ran the diagnostics in front of me and everything worked - no charge!
Yesterday afternoon was really awful as we lost our little Rosie, our Netherland Dwarf bunny, after several weeks of ill health, the result of a misdiagnosis of a problem with one of her back legs which unfortunately got beyond fixing.
On a happier note, I'm over at That's Crafty! Blog today sharing a mixed media make using some of my new stamp designs. Here's a sneak peek and hope you like it.
Have a great weekend and see you soon.
Fliss xx
On the same day, cold fingers became butter fingers and I dropped my laptop on the kitchen floor whilst trying to move to the dining room. So yesterday morning I made an emergency trip to the Brighton Apple store and luckily due to the weather people who had actually managed to book an appointment (not me as all they seemed to have was the middle of next week!!!), I only waited a few minutes before someone came to look at my computer. All he did was take it out the back and hoover it then ran the diagnostics in front of me and everything worked - no charge!
Yesterday afternoon was really awful as we lost our little Rosie, our Netherland Dwarf bunny, after several weeks of ill health, the result of a misdiagnosis of a problem with one of her back legs which unfortunately got beyond fixing.
On a happier note, I'm over at That's Crafty! Blog today sharing a mixed media make using some of my new stamp designs. Here's a sneak peek and hope you like it.
Have a great weekend and see you soon.
Fliss xx
Friday, 23 February 2018
Seeking Stillness for That's Crafty!
Hello everyone, I hope that you've all had a good week. This is a scheduled post as I'm currently visiting my nephew and his wife whose daughter Lily is now 6 weeks old. I'm really looking forward to it as so far I've only seen photos as they live quite a distance away, Justyn being in the RAF.
I have my usual Friday post over at That's Crafty! Blog and this week I'm sharing a mixed media card that I made for the December One Day Special.
This is just a sneak peek so if you'd like to see it all, you'll need to head on over to the blog.
Have a great day and a lovely weekend and see you next week when I shall finally be able to share some rather exciting news and I can hardly wait!
Hugs, Fliss xx
I have my usual Friday post over at That's Crafty! Blog and this week I'm sharing a mixed media card that I made for the December One Day Special.
This is just a sneak peek so if you'd like to see it all, you'll need to head on over to the blog.
Have a great day and a lovely weekend and see you next week when I shall finally be able to share some rather exciting news and I can hardly wait!
Hugs, Fliss xx
Friday, 2 February 2018
Spring Card for That's Crafty!
Hello everyone, hope you're all OK and sorry for the lack of visits which are because time has been short due to family stuff and something I'm working on behind the scenes. All will be sorted in the week or so I hope when I might just have some rather exciting news!
I'm over at That's Crafty! Blog today with a Spring inspired card which I decided to share to warm things up on a very chilly day. Hope you like it.
Have a great weekend and see you when I can.
Fliss xx
I'm over at That's Crafty! Blog today with a Spring inspired card which I decided to share to warm things up on a very chilly day. Hope you like it.
Have a great weekend and see you when I can.
Fliss xx
Friday, 17 November 2017
Fairy Dancer for That's Crafty!
Hello everyone, hope you've all had a lovely and hopefully crafty week. I'm creating like mad at the moment and making things I can't yet share and can't wait to show you as I so love what I'm working with!
A very quick post as I have some bookkeeping stuff to do today to let you know that I'm over at That's Crafty! Blog with my usual Friday post where I'm sharing a mixed media art panel featuring one of the gorgeous Tim Holtz paper dolls turned into a little fairy.
You'll find all the details over at the blog and would love it if you paid a visit as there's tons of amazing inspiration including links to Youtube videos made by design team member Melina which are not to be missed.
Have a great day and a lovely weekend.
Hoping to see you soon.
Fliss xx
A very quick post as I have some bookkeeping stuff to do today to let you know that I'm over at That's Crafty! Blog with my usual Friday post where I'm sharing a mixed media art panel featuring one of the gorgeous Tim Holtz paper dolls turned into a little fairy.
You'll find all the details over at the blog and would love it if you paid a visit as there's tons of amazing inspiration including links to Youtube videos made by design team member Melina which are not to be missed.
Have a great day and a lovely weekend.
Hoping to see you soon.
Fliss xx
Friday, 10 November 2017
Stencil It! at That's Crafty! Challenge Blog
Hello everyone, I hope you've had a good week and had some time for crafting as I have. It's been really great to have a bit more time to create as I do these days although some of it is still under wraps and can't be shared just yet!
We have a new challenge for you today over at That's Crafty! Challenge Blog where for the next fortnight, our theme is Stencil It! We would like to see you using at least one stencil on whatever you decide to make.
My inspiration is a mixed media art panel that I really enjoyed creating as my love of vintage has resurfaced due to wanting to use one of the fabulous Tim Holtz paper dolls, in my case a rather lovely couple.
I dragged the corrugated panel together with some butterflies, leaves and leftover swirls from mixed media cut outs through the leftover soft blue and pink paints to add some shabby chic colour.
I next painted a size 2 MDF art panel with a coat of gesso. Once dry, I painted it soft blue and pink, adding reverse stencilling by brayering a little cream paint (white multi surface paint with a dash of yellow) on to the big floral stencil and pressing it on the panel to transfer the paint. I rubbed some of the diluted chestnut brown around the edges.
I asembled the panel as you see in the main photo, adding the affirmation from Lynne's Affirmations Set 6, stamped with Archival Potting Soil ink on a scrap of mixed media paper.
I hope you can enter as there's a prize of a voucher for the randomly drawn winner and there's tons of lovely goodies in the online shop.
Have a great day.
Fliss xx
We have a new challenge for you today over at That's Crafty! Challenge Blog where for the next fortnight, our theme is Stencil It! We would like to see you using at least one stencil on whatever you decide to make.
My inspiration is a mixed media art panel that I really enjoyed creating as my love of vintage has resurfaced due to wanting to use one of the fabulous Tim Holtz paper dolls, in my case a rather lovely couple.
I started off with an 8x8 MDF panel which I covered with a coat of white gesso. I then used the big floral stencil with texture paste to add a pattern on the left side. Once the paste was dry, I mixed white multi surface with a little red to make pink and also some white with a little teal and purple to make a soft blue. I then brushed the paints roughly over the panel to colour it.
I stamped some script across the top and partly down the right side. I used a Tim Holtz Mixed Media die to cut a pattern out of a piece of recycled corrugated card and then used it as a stencil to add a pattern on the right side with some chestnut brown multi surface paint mixed with white.
I next painted a size 2 MDF art panel with a coat of gesso. Once dry, I painted it soft blue and pink, adding reverse stencilling by brayering a little cream paint (white multi surface paint with a dash of yellow) on to the big floral stencil and pressing it on the panel to transfer the paint. I rubbed some of the diluted chestnut brown around the edges.
I asembled the panel as you see in the main photo, adding the affirmation from Lynne's Affirmations Set 6, stamped with Archival Potting Soil ink on a scrap of mixed media paper.
I hope you can enter as there's a prize of a voucher for the randomly drawn winner and there's tons of lovely goodies in the online shop.
Have a great day.
Fliss xx
Friday, 12 May 2017
Oxide Ink Play at That's Crafty! Blog
Hello again, back to let you know I have my usual Friday post over at That's Crafty! Blog today and this week it's all about my experimenting with those addictive Oxide inks. If you haven't tried them do check it out to see just one of the effects you can achieve with the inks and water - they're totally amazing and I'm completely hooked!
As you can see, I made a whole batch of cards in one go - just think of the possibilities for Christmas!
Have a great weekend.
Fliss xx
As you can see, I made a whole batch of cards in one go - just think of the possibilities for Christmas!
Have a great weekend.
Fliss xx
Friday, 14 April 2017
Outnumbered at That's Crafty! Challenge Blog
Hello again and welcome to my inspiration for our new challenge today over at That's Crafty! Challenge Blog where for the next fortnight our theme is Outnumbered so numbers are the order of the day.
I've made another tag although this one is very different to the one on my last post as it's more vintage in style and came about from my experiments with the fab new 8x8 clock stencil.
When I saw the challenge theme, time jumped into my head from the point of view of the numbers on a clock so I decided to try something completely different with the clock stencil.
I taped the stencil to a piece of mixed media paper, positioning it so that just under half was over the paper. I then used DecoArt Media white modelling paste to make a raised pattern on the paper. When the paste was dry, I painted the clock segment with a mix of Paper Arsty Fresco Finish Chocolate Pudding acrylic paint and DecoArt Media Burnt Sienna Fluid acrylic paint.
I used a mix of DecoArt Media Metallic Gold and Quinacridone Gold over the raised areas and when it was dry, trimmed around the rounded edge leaving a tiny dark brown border.
I painted the tag with a mix of DecoArt Media Fluid Acrylics - Cobalt Teal Hue, Green Gold, Ultramarine, Raw Sienna and Transparent Yellow Oxide. I then stamped on the script image from That's Crafty! Texture Stamp Set 1 with Archival Potting Soil ink and stencilled on the Dinky Stencil numbers with Cobalt Teal Hue DecoArt Media Fluid Acrylic paint.
I glued the clock face on to the tag and finished off with some Chit Chat stickers which I edged with the Archival ink.
There's a fab prize of a voucher for the online shop for the randomly drawn winner and all you have to do to be in with a chance is enter!
Good luck!
Have a great long weekend.
Fliss xx
I've made another tag although this one is very different to the one on my last post as it's more vintage in style and came about from my experiments with the fab new 8x8 clock stencil.
When I saw the challenge theme, time jumped into my head from the point of view of the numbers on a clock so I decided to try something completely different with the clock stencil.
I taped the stencil to a piece of mixed media paper, positioning it so that just under half was over the paper. I then used DecoArt Media white modelling paste to make a raised pattern on the paper. When the paste was dry, I painted the clock segment with a mix of Paper Arsty Fresco Finish Chocolate Pudding acrylic paint and DecoArt Media Burnt Sienna Fluid acrylic paint.
I used a mix of DecoArt Media Metallic Gold and Quinacridone Gold over the raised areas and when it was dry, trimmed around the rounded edge leaving a tiny dark brown border.
I painted the tag with a mix of DecoArt Media Fluid Acrylics - Cobalt Teal Hue, Green Gold, Ultramarine, Raw Sienna and Transparent Yellow Oxide. I then stamped on the script image from That's Crafty! Texture Stamp Set 1 with Archival Potting Soil ink and stencilled on the Dinky Stencil numbers with Cobalt Teal Hue DecoArt Media Fluid Acrylic paint.
I glued the clock face on to the tag and finished off with some Chit Chat stickers which I edged with the Archival ink.
There's a fab prize of a voucher for the online shop for the randomly drawn winner and all you have to do to be in with a chance is enter!
Good luck!
Have a great long weekend.
Fliss xx
Friday, 7 April 2017
Feeling Groovy for That's Crafty!
Hello everyone, I hope you're all enjoying the Spring weather now that it's finally made an appearance along with loads of trees in full blossom - I do love the sight of so many beautiful flowers and talking of which, I have a journal page to share at That's Crafty! Blog today featuring rather a lot of flowers this week.
There's only a sneak peek this time to give you a flavour of the multitude of flowers you can see on my page if you hop over to the blog where you'll find the whole creation.
I'll be back in a while as I have some news to share too.
See you soon.
Fliss xx
There's only a sneak peek this time to give you a flavour of the multitude of flowers you can see on my page if you hop over to the blog where you'll find the whole creation.
I'll be back in a while as I have some news to share too.
See you soon.
Fliss xx
Subscribe to:
Posts (Atom)