Hello everyone, I hope you all had a lovely Easter break and better weather than here as it was mostly cold, wet and windy with tons of rain on Sunday which actually caused puddles on our back lawn as there was too much water to drain away as usual. Something we hadn't had happen for years!
We have a new challenge today over at That's Crafty! Challenge Blog and for April, we're Going Round In Circles, a favourite theme of mine as I love circle shapes so my inspiration is a journal page with layer upon layer of circles.
You can probably see that my inspiration for this was the sun which on it's current rare appearances, makes me happy, happy, happy!
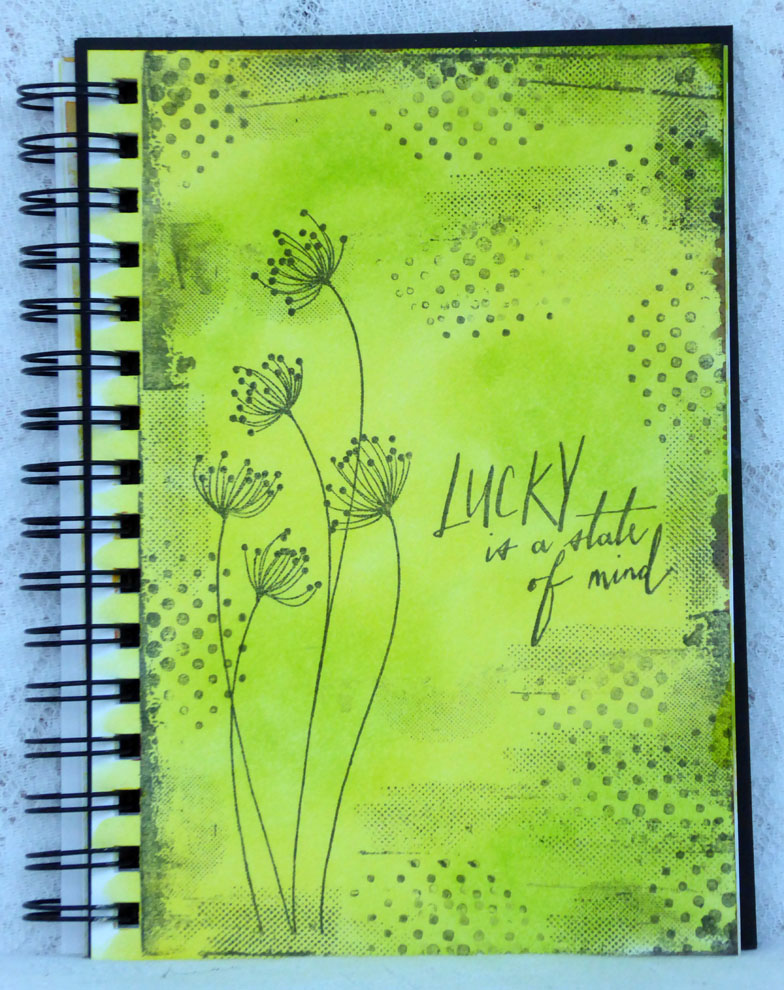
This is actually the first page in my new black journal which I thought would be a good challenge to see how paints and inks would go on that background.
I first swiped on multi surface paints with an old store card, using first yellow, then lime and lastly teal until the surface was roughly covered leaving bits of the black underneath on show.
I then took That's Crafty! Textures Collection Sets 1 and 2 and used the various circle stamps to make my background, starting with the lined circle image and Ranger Carribean Coast dye ink, following with the double circle image and Archival Cobalt ink. I then used the 2 circle background images with Archival Cactus Flower and Fern Green inks to add texture, stamping without an acrylic block.
I stamped the rather jolly sun from Melina's Nature's Faces Set 1 with black ink, adding the happy text underneath, stamping 3 times. I coloured in the sun image with alcohol markers, followed by some pastel pencil to make the image pop more.
I finished off with some doodling in and around the circles with a white and yellow pastel pencil. I sprayed the page with fixative to ensure the pastel stayed put too.
Hopefully you can enter and there are fab prizes on offer with a voucher for the online shop for the randomly drawn winner and stencils for the top 3 which the design team choose. How can you resist?!
Have a great week.
Fliss xx
Showing posts with label Archival Ink. Show all posts
Wednesday, 4 April 2018
Friday, 13 October 2017
Get Your Spook On at That's Crafty! Challenge Blog
Well, I'm late, late, late getting my spook on for our new challenge at That's Crafty! Challenge Blog. It really has seemed like Friday the 13th today!
This is because I've had to deal with a rather tricky accounting problem which began when someone who shall remain nameless plonked a print out on the table when I was eating my breakfast at 7.30 this morning and said I needed to look at it! The joys of working for someone you're married to - NOT!
Anyway, better late than never, here is my inspiration for our challenge which is a spooky card which involved the first use of my now much loved toy - the Tim Holtz Stamping Platform - which is awesome!
I used mixed media paper for my background as I wanted to use paint and this will take water without buckling.
I stamped the Stampendous image (Owl Tombstone) using the stamp platform. It's really easy to use and the best thing about it is that if you don't get a strong enough print the first time (I didn't as the paper is a bit rough) then you just repeat until you're happy with the colour. I also used some further colours, layering red, purple and brown over black and it does give a rather unique look to the image. I also used a bit of silver meant to look like monnlight and I'm not sure it was entirely successful but it will do!
I then coloured the paper with diluted That's Crafty! Multi Surface Paints - purple, red and yellow, repeating applications until I was happy. I then used leftover wash to add stronger colour to the main stamped image.
I used the That's Crafty! Flight of the Bats Dinky Stencil with Archival Jet Black ink to add the bats. I next used the Scaredy Cat Dinky Stencil to draw the cat shape on the back of a piece of white backed black card and cut the image out. It wasn't quite black enough so I sponged on Multi Surface Black Paint to strengthen the colour.
I glued the background paper to a black card blank and added the cat to finish.
I hope you can join us as there's a great prize of a voucher for the online shop for the randomly drawn winner.
See you again soon.
Fliss x
Friday, 23 June 2017
Keeping It Simple at That's Crafty Challenge Blog
Hello everyone, I hope you've been surviving the heat wave we've had here this last week. I have to admit I've really struggled to cope as I don't do well in such heat and have ended up with puffy feet and ankles, something I've never had in this country! The office I work in was so unbearably hot that I had to wear my linen holiday frocks to work in an effort to keep cool - not that it worked but they were much more comfy :)
We have a new challenge today over at That's Crafty Challenge Blog where for the next fortnight the theme is Keep It Simple so we want to see clean and simple creations.
This is a theme that really is a challenge for me as I don't do simple that often so the creative thinking cap went on! I was inspired in the end by one of my favourite quotes from Lynne's Affirmations stamp sets and this journal page was the result. Hope you like it.
I used a bubble texture stamp with some bright Distress inks to stamp a design repeatedly, starting in the bottom left corner, going up diagonally towards the top right in a flowing shape which spoke to me of soaring upwards.
I stamped the butterfly wings on scrap paper with black ink and drew bodies in between with a black marker then painted them with Distress ink. I cut them out and added them to fly up my soaring bubby design then stamped on the quote with black ink to finish. Tada, done!
I used:
That's Crafty! Texture Stamp Set 2
That's Crafty! Lynne's Affirmations Stamp Set 1 - for the butterfly wings
That's Crafty! Lynne's Affirmations Stamp Set 2 - for the quote
Ranger Jet Black Archival Ink
Distress Inks - Twisted Citron, Picked Raspberry, Ripe Persimmon, Fossilised Amber, Salty Ocean
Have a great day,
Fliss xx
Friday, 28 April 2017
That's Crafty! Bright! Challenge
Hello again and welcome to my rather late inspiration for the new challenge today at That's Crafty! Challenge Blog. Our theme for the new fortnight is Bright! and I'm sure you know how much I liked this one as most of my artwork comes under that category!
My make is a bright art journal page which I made for the Hochanda shows and haven't yet shared. As you can see, it is rather bright.
The base for this was one of the fab white/greyboard 8x8 journal pages which you can throw all sorts of things at without fear of buckling.
I scraped on the paint with an old store card, using Paper Artsy Fresco Finish Acrylics in shades of yellow, orange and pink until I was happy with the effect.
I then used the Dream Word art stencil to add the large text with white gesso. the end result was not quite as strong as I wanted so I went over the top with a white paint pen. I outlined the letters with a black fine Sharpie marker.
I stamped the bubbly image from That's Crafty! Texture Stamp Set 1 all over with Archival jet black ink and stamped the quote from That's Crafty! Inspirational Quotes Set 1 with the same ink.
I used the bubble border from the dream stencil with white gesso to add some random bubbles. I added a little detail round the edges by stamping the bubble design with black ink.
I finished off by stamping on a few more bubbles with Archival Cactus Flower.
There's a fab prize for the randomly drawn winner and all you have to do to be in with a chance is enter.
Have a great weekend.
Fliss xx
Thursday, 13 April 2017
Come Fly With Me
Also know as the unpredictability of Brushos!
Hello everyone from a rather sorry for herself Fliss who currently could give Rudolph the Red Nosed Reindeer a run for his money appearance wise only I'm not half as cute! I have my second lot of sinus troubles in less than 2 months since I started working in the new office - in case you missed it, my ex boss sold his client list to another firm where I now work. Before this, all I've had in nearly 5 years is a 1 day sick bug which is why I'm feeling so sorry for myself.
Anyhow, enough of my woes and on to the card I have to share which I began before I got sick and just got up the energy to assemble today. It's for the current Rubber Dance challenge which is a colour one and there's a bit of artistic license here as you'd never believe I used Dark Brown Brusho Crystals on the paper I coloured.
I took a piece of mixed media paper torn from the pad - I really love the torn edge for a bit of shabby chic texture. I misted it with water and sprinkled on Dark Brown and Turquoise Brush Crystals and misted with water again. This is where the unpredictable nature of Brushos came out because as you can see, there are some orangy red bits that came out. I did like the result though so decided to go with the flow!
I then added some stencilling, using That's Crafty! Dinky Stencils - Clock Background and Star Shower - with Gathered Twigs DI for the clock and Stormy Sky DI for the stars. I glued the paper to a kraft card blank.
I stamped the butterfly girl from Rubber Dance Fly With Me stamp set (couldn't find the set in the shop but single images are available so linking to that, or you can buy the set at That's Crafty!)) with Archival Potting Soil ink and added a touch of colour before cutting her out.
I stamped the Fly text from the set on a couple of times with the same ink then stamped the Come Fly With Me text on mixed media paper and cut the words out. It was then that serendipity struck as I realised I could position the word tiles to tie up with those stamped directly on the background paper - yay!
I bent the wings of the butterfly girl and added her with dimensional tape to finish.
I'm linking my card up to the Rubber Dance colour challenge and hope the slightly unpredictable Brusho episode is OK.
Have a great day everyone.
Fliss xx
Friday, 11 November 2016
There Must Be An Angel at That's Crafty! Challenge Blog
Hello again and welcome to my inspiration for our new challenge today over at That's Crafty! Challenge Blog where for the next fortnight we would like to see creations featuring an angel.
I know a lot of people would think of Christmas in connection with angels but I've done a journal page with my favourite Carabelle Studio angel.
I made the background by sponging the page with Tumbled Glass DI then used the same inkpad and an Antique Linen inkpad to lightly apply ink prints to the page in a random fashion. I then added some more with Weathered Wood, smudging the outlines for a softer effect.
I next stamped on the broken line image from the Visible Image Scratch the Surface stamp set using Old Paper DI.
I stamped the angel and the wings from the Carabelle set on stamping card with Archival Watering Can ink and coloured the images with pencils. I then cut them out and added them to the page with foam tape.
I then stamped the text from the Visible Image Learn to Fly Again stamp set at the top of the page with the grey ink and to finish my page stamped the feather from the set on with Weathered Wood DI to resemble feathers fluttering down from broken wings.
There's a great prize for the randomly drawn winner simply for entering the challenge so why not give it a go!
Have a great weekend and see you soon.
Fliss xx
Friday, 16 September 2016
Christmas in September at That's Crafty! Challenge Blog
Hello again, it's beginning to look a lot like Christmas at That's Crafty! Challenge Blog for the next fortnight even though it's chucking down the rain at the moment!
Here's my inspiration which I hope you like as it's a 2 for the price of one type creation. My hubby liked them and asked how easy they were to make and could he order 50 for the office!
They weren't that difficult to make, the only tricky bit being sticking on the die cut trees.
I made a sheet of decorated paper with an A4 piece of white card. I added dots of DecoArt Media Fluid Acrylics - Green Gold, Yellow Green Light, Titan Buff, Metallic Gold - to my 8x10 Gelli Plate, spread the colour with a brayer and misted with water, pressing on the card to pick up the paint and smooshing on the white bits left with the brayer to cover the card roughly. I then misted on more water and picked up a second print which meant enough paper for quite a few cards - yippee!
I then stamped on the dry papers with text from the Tim Holtz Scribbly Christmas stamp set using Fern Green Archival ink and Galaxy Gold Brilliance ink. I was hoping to cut each A4 sheet in 4 but the dies are a bit big for that so I cut squares instead which left me with 4 narrow bits to use on more cards.
I die cut 2 trees from the square which left me with a negative to use on a second card - good huh!I dry embossed the centre of a white card blank front with a snowflake folder and then glued the negative panel on top.
For the second card, I dry embossed the card front with a snowflake border folder then glued on the 2 die cut trees. I stamped on the winter wonderland text with the gold Brilliance ink to finish.
It's great to have finally made a start on my Christmas cards and if you do the same you could win a fab prize of a voucher for the online shop.
That's Crafty! are also at Ally Pally at the weekend so do visit the stand if you're lucky enough to attend as there will be lots of demos and make and takes with Lauren Hatwell, Alison Hall, Helen Chilton, Carol Fox and Kerry Roberts - not to be missed! Have a great time if you do go!
Fliss xx
Labels:
Archival Ink,
Christmas,
Clean and Simple,
Darice,
Tim Holtz Products
Monday, 29 August 2016
Back to School at Make My Monday
Hello there, I hope you've all had a lovely weekend and that those here in the UK are enjoying the Bank Holiday so far. I've been very busy with crafting stuff over the weekend as I'm off on my hols next weekend so have to get ahead and will be sharing my makes over the next couple of weeks.
There's a new challenge today over at Make My Monday which has the theme of Back to School, something I struggled with as my 2 are way beyond the school stage now and I couldn't think what to do! Luckily my Tim Holtz Sideshow stamp set came to the rescue and I hope you like my simple inspiration which is a Tim style good luck card.
I stamped the main image and numbers border on mixed media paper with Ranger Cobalt Archival ink and then sprinkled on Brusho Crystals in shades of orange, red and yellow then misted gently with water and allowed the colours to run.
Once I was happy with the colour, I then used the number block image with the cobalt ink, stamping partially several times before re-inking to add texture to the panel.
I added a deep turquoise mat and glued to my white card blank, finishing off with a Tim Holtz Small Talk sticker.
Have a great day and a lovely week.
Fliss xx
Friday, 19 August 2016
Get Cracking! with That's Crafty! Challenge Blog
Hello all, a very quick post from me to show you my inspiration piece from our new challenge at That's Crafty! Challenge Blog where for the next fortnight our theme is Get Cracking! so be it paint or paste, a cracked look is what we would like to see!
My crackle is rather delicate like cracked eggshells. I coloured a large That's Crafty! Surfaces MDF panel with Gesso then used stencil paste to add some pattern wth the Quatrefoil 1 Background Dinky Stencil. This was left to dry thoroughly.
I painted over the top with green and blue acrylic paints then brushed on a thick coat of Cosmic Shimmer Crackle Paint in blue and green in the areas that didn't have the textured stencilling. I then left this overnight and waited for the crackle to appear. Sorry about the colour difference here, I took the pic below mid creating and the light was terrible at the time which is why it looks rather different!
I stamped the flower from Paper Artsy Eclectica Lin Brown ELB15 twice on a scrap of orange Gelli Plate coloured paper and then stamped on the tiny flowers from the set with Ranger Wild Orchid dye ink. I stamped the leafy stalk on green Gelli Plate paper and cut this out together with the flowers.
I added the flower to the panel with foam tape then embellished with a yellow gem and some Chit Chat stickers which I swiped with leftover paint to blend them in. I stamped some of the tiny flowers on the panel with Archival Fern Green ink to draw everything together.
Have a great day and a lovely weekend.
Fliss xx
My crackle is rather delicate like cracked eggshells. I coloured a large That's Crafty! Surfaces MDF panel with Gesso then used stencil paste to add some pattern wth the Quatrefoil 1 Background Dinky Stencil. This was left to dry thoroughly.
I painted over the top with green and blue acrylic paints then brushed on a thick coat of Cosmic Shimmer Crackle Paint in blue and green in the areas that didn't have the textured stencilling. I then left this overnight and waited for the crackle to appear. Sorry about the colour difference here, I took the pic below mid creating and the light was terrible at the time which is why it looks rather different!
I added the flower to the panel with foam tape then embellished with a yellow gem and some Chit Chat stickers which I swiped with leftover paint to blend them in. I stamped some of the tiny flowers on the panel with Archival Fern Green ink to draw everything together.
Have a great day and a lovely weekend.
Fliss xx
Monday, 18 July 2016
Sentimental at Make My Monday
Hello everyone, hope you all had a great weekend with some glorious sunny weather as we did down here in the South of England - actually wore a short sleeved top all day for the first time this year!
Sorry for my lack of visiting lately too which is because I'm working on something behind the scenes which is taking up most of my spare time at the moment and I also started a new job 2 weeks ago with a change in my working week which will take a while to get used to.
There's a new challenge today over at Make My Monday which has a theme chosen by your truly for the next fortnight and it's Sentimental, by which I would like the sentiment or text to be the focal point of your creation whatever it might be - a tag, card, art journal page?
Here's my inspiration which is a simple card and unusually for me, took only 15 minutes to make!
My Brushos came out to play along with my treasured Tim Holtz Good Thoughts stamp set which I haven't inked up in an age!
The background was made by sprinkling lemon, purple and turquoise Brusho crystals on mixed media card and misting gently with water, blotting with a paper towel as the original colours were a bit in your face.
One the background was dry, I stamped on the text with Archival Cactus Flower ink which I think tones very well with the Brusho colours. I added a deep lilac mat and attached the panel to a white card blank.
As a finishing touch, I added a scattering of purple and fuchsia gems for some added sparkle.
Hope you can join in and would love to see you there. We have a DT call out at the moment too as we've lost a couple of DT members lately, the latest being Martina for the best possible reason as she's just had a beautiful baby girl - good luck Martina!
Have a great day and a lovelt week and see you soon I hope.
Fliss x
Monday, 4 July 2016
Happy 4th July My USA Friends!
Hello everyone, I hope you all had a lovely weekend and I'd like to wish any of my USA friends that see this a very Happy Independence Day!
My weekend included an emergency trip to London to pick up my elder one and computer for a dash to the Apple store in Kingston to drop off the iMac for fixing. Rather unexpected as we had planned a trip to Guildford instead as it was our Wedding Anniversary last weekend. I think we'll be doing that trip in a couple of weeks time now!
We have a new challenge today over at Make My Monday with the theme of Explode! chosen by Shawna as today is the 4th July. There are several ways you could interpret this theme but you'll need to hop on over to the Challenge Blog for all the details.
I have to admit to having struggled a bit with this one so I hope you like what I eventually came up with.
A lot of head scratching went on as I wanted to go the firework route but don't have any stamps to fit. I found the firework background via Google (what would we do without it!) and printed it out on white card.
I then stamped the skyline image (Art Impressions) over the top with Archival Jet Black ink and added the Tim Holtz Crazy Talk text underneath. I added a mat of red metallic card for contrast and assembled the panels on a white square card blank - ta dah!
Have a great day and a lovely week and see you soon.
Fliss xx
Labels:
Archival Ink,
Tim Holtz Products
Friday, 10 June 2016
Tell The Story For That's Crafty!
Hello everyone, hope you've all had a good week and have been enjoying some sunshine as we've had although some of it was very hot and humid. Shouldn't really complain though as it at least looks as if Summer might have decided to make an appearance at last!
I have a post over at That's Crafty today sharing one of my ATCs that I made for the last Hochanda shows and you'll find all the details of how I created it over at the blog.
Hope you like it and I'll be back in a bit as we have a new challenge today over at That's Crafty! Challenge Blog.
See you later!
Fliss xx
Labels:
Archival Ink,
ATCs,
Dinky Stencils,
Paper Artsy,
That's Crafty,
Tim Holtz Products
Friday, 27 May 2016
The Sea At That's Crafty! Challenge Blog
Hello again and welcome to my inspiration for our new challenge over at That's Crafty! Challenge Blog.
For the next fortnight our theme is The Sea so you could create something above or under water - the choice is yours!
For my inspiration I've broken out my Artistic Oupost Beyond The Sea stamps to decorate one of That's Crafty! surfaces, a square white/greyboard coaster.
I found a scrap of Gelli print paper which bore a striking resemblance to sea with a Summer sky above. I cut a piece to fit the coaster and glued it on.
I stamped the boating couple with Archival Jet Black ink in the right hand lower corner then masked off everything but the sea and stamped this to continue the water across the base.
I then stamped the text and the birds on at the top. I coloured the main image with pencils - I used a mix of Inktense and Prismacolor as they're highly pigmented which was necessary to cover the painted surface.
There's a fab prize for the randomly drawn winner of a voucher for the online shop so do enter if you can.
Have a great day and a lovely weekend.
Fliss xx
Labels:
Archival Ink,
Artistic Outpost,
Gelli Plate,
That's Crafty
Friday, 29 April 2016
Go Figure At That's Crafty! Challenge Blog
Hello again and welcome to my inspiration for our new challenge today over at That's Crafty! Challenge Blog which has the theme of Go Figure so we'd like to see entries with numbers on - how easy is that!
I came across the tag that I used as the base for this creation in my unfinished bits box. It was a mop up tag from a play session with my Gelli plate and some DecoArt Media Fluid Acrylics in shades of green and yellow.
I stamped the umbrella man image from the Tim Holtz Sideshow cling stamp set on to the tag with Archival Jet Black ink . I then stamped on the numbers from the set using Archival Fern Green ink using first and second generation stamping.
I finished off by hand writing on the text with a fine black Sharpie pen and tied some cord through the top.
Have a great day and a lovely weekend and hopefully see you soon.
Fliss xx
Labels:
Archival Ink,
DecoArt,
Gelli Plate,
Tags,
Tim Holtz Products
One For The Boys At That's Crafty!
Hello everyone, I hope you're keeping warm in this somewhat unseasonable weather. I'm definitely wishing for the Spring to come back!
I'm over at That's Crafty! today with a card for the boys in your life which I hope you'll like. It features my treasured Brusho Crystals and my new set of Tim Holtz stamps.
You'll find all the details over at the blog and i'd love it if you hopped over to take a look.
I'll be back in a bit as we have a great new challenge today over at That's Crafty! Challenge Blog and I have some inspiration to share.
Fliss xx
Friday, 22 April 2016
What If......? For That's Crafty
Hello everyone, I hope you've all had a good week. Things are still hectic down here as I've got a huge amount of work to get through by the end of the month so I've got very little time for blogging.
It's my turn to post over at That's Crafty! Blog todayand I'm sharing a quick and easy journal page which I hope you like. It's very bright and cheery - here's a sneak peek and hope you'll visit to see the whole thing.
Have a great day and a lovely weekend and see you soon.
Fliss xx
It's my turn to post over at That's Crafty! Blog todayand I'm sharing a quick and easy journal page which I hope you like. It's very bright and cheery - here's a sneak peek and hope you'll visit to see the whole thing.
Have a great day and a lovely weekend and see you soon.
Fliss xx
Labels:
Archival Ink,
Art Journaling,
Finnabair,
Paper Artsy,
Prima
Monday, 14 March 2016
Lucky - A State Of Mind
Hello there, I hope you all had a lovely weekend with some sunshine as we did down here in the South - it was really lovely although I didn't see that much of it as we had loads of family stuff going on.
I did manage a bit of crafting though for my inspiration for the new challenge at Make My Monday which has the theme of Lucky this week. I struggled with this a bit until I realised that one of the Handwritten Thoughts by Tim Holtz was about lucky being a state of mind and my journal page below is the result. Hope you like it.
This was a really quick page to make and I began by sponging on Twisted Citron and Squeezed Lemonade Distress inks on the blank page. As the edges had a bit of grey on them already fom a previous page, I stamped on my new favourite edge stamp (Crafters Companion Textures Splats & Accessories Set 2) with Watering Can Archival ink.
I stamped the flowers (Penny Black) and the text with the same ink to finish - ta dah!
Have a great week and see you again soon.
Fliss xx
Friday, 19 February 2016
Circle It! At That's Crafty Challenge Blog
Hello again, I'm back with the details of our new challenge at That's Crafty Challenge Blog which for the next fortnight has the theme of Circle It!
I've made a journal style art panel for my inspiration and as you'll see it's got circles everywhere!
Do you think I've gone over the top!
It came about because when I was colouring the background, which I did by applying red, yellow and blue acrylic paints to my Gelli plate, smooshing it over with my fingers and pressing the white/grey board panel on to pick up the colour.
The colour came out a bit muddy so I gave the panel a sort of bokeh look by applying the same paints over the top with a home made circle stencil. I then used a That's Crafty Dinky Stencil to make a random dot pattern with black paint. This actually came out stronger than I wanted so I toned it down with some grey paint.
I dipped some die cut circles into some red, yellow and blue paint on my craft mat and glued some of these on when the paint was dry.
I stamped my new Carabelle butterfly on white card with black ink, cut this out and added it to the panel with foam tape. I finished off with some Tim Holtz Small Talk stickers.
I used:
Paper Artsy Fresco Finish Acrylic Paints - Haystack, London Bus
DecoArt Media Fluid Acrylics - Carbon Black, Cobalt Blue Hue, Medium Grey Value 6
That's Crafty Surfaces - White/Grey Board Panel
Carabelle Studio Mini Stamp - Butterfly
Archival Jet Black Ink
That's Crafty Dinky Stencil - Punchinella Background
Gelli Plate - 8x10
Circle Dies
Tim Holtz Small Talk Stickers
Hope you can enter - good luck!
Have a great weekend,
Fliss xx
Monday, 30 November 2015
Stamp Without A Stamp At Make My Monday
Hello everyone, I'm a little late with my post for our new challenge at Make My Monday which has been chosen by Shawna and shock, horror, the theme is to Stamp But With Something That Isn't A Stamp!
Here's my rather zingy inspiration which I hope you like.
I made the background by using my fingers to apply several shades of acrylic paint to a piece of mixed media paper. I then used a piece of netting that held fruit as a stencil to apply Ranger Dye Ink in Wild Orchid and Electric Lime to the painted paper.
I used a That's Crafty Dinky Stencil with Archival Watering Can ink to apply the dotty pattern to the paper. I then used 3 different sizes of bottle caps with all 3 inks to apply the circles randomly to the paper.
I coloured some paper with the 3 shades of ink and die cut the flowers and centres from these with some X Cut flower dies. I drew the stalks and glued the flowers on then added this to a card blank. I finished off with some Tim Holtz Big Chat stickers.
Have a great week and see you soon.
Fliss xx
Labels:
Archival Ink,
Dinky Stencils,
Make My Monday,
Ranger,
Tim Holtz Products
Monday, 23 November 2015
Oh Christmas Tree At Make My Monday
Hello everyone, I hope you all had a lovely weekend despite the somewhat chilly weather. I woke up yesterday morning to sunshine but the coldest day for a long time as it was -1.5 degrees and we normally only get that in February in the middle of the night!
Today sees the start of a new challenge at Make My Monday and Caz has chosen the seasonal theme of Oh Christmas Tree so would like to see Christmas trees of the outdoor or indoor variety as the focal point on your creation.
For my inspiration my Tim Holtz Scribbly Christmas trees came to the rescue.
I stamped the trees on medium surface cartridge paper with Archival Fern Green and Adirondack Butterscotch inks. I then added a little colour with Intense pencils and cut the images to a panel.
I stamped the text repeatedly on a strip of the same paper with the Fern Green ink. I then used a ruler with the Adirondack Cranberry marker pen to draw a box around round the edges of the panels.
I glued the panels to a long card blank I made from an A4 sheet of card to finish.
Have a great week and see you again soon.
Fliss xx
Labels:
Archival Ink,
Christmas,
Make My Monday,
Tim Holtz Products
Subscribe to:
Posts (Atom)