Hi everyone, I have a creation to share today that is finally a because I wanted to project which I actually started before we went on holiday but have only now managed to finish off.
I'm probably last past the post with an entry for
Challenge 1 of ITAC17 Europe - which was the brainchild of Aall and Create and I really hope that I can get the others done too. This is my entry which is a mixed media canvas panel which I think has most of the required elements, if you click on the link above, you can check out the challenge and look at the others too as we're off around the globe for these.
Here are the elements of which you had to include at least one:
A face
Papers (newspaper, printed paper, rice paper .....etc
Letters, numbers
Blue for the colour of the European Union, Union Jack
Ribbon, twine, string or lace
Textures - take inspiration from history, from ancient civilisation to the fall of the Berlin wall
Something both vintage and modern
I brushed my natural coloured canvas with a mix of white gesso, titan buff and flesh tint, choosing not to cover up all of the background as I love the colour and the distressed look this gives.
I then glued on a torn piece of paper from a vintage and very tatty book of Shakespeare's plays from my stash - if you look closely, you can see the text is from Hamlet. I always think Shakespeare's plays have as much meaning today as they did when they were written so this could be my vintage and modern.
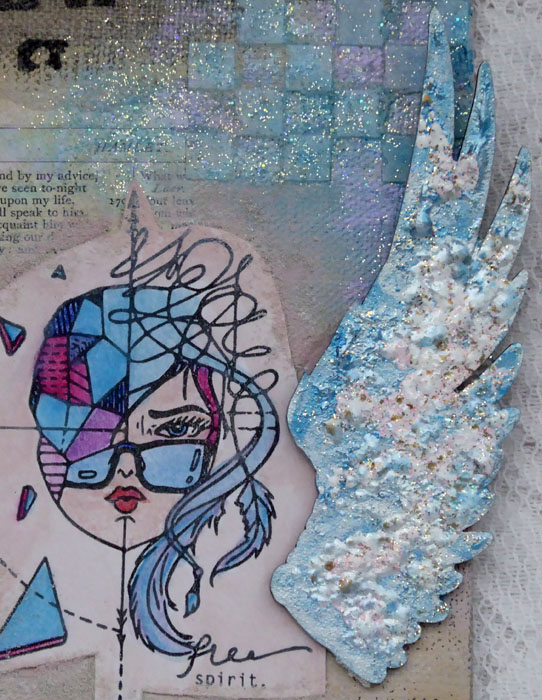
I then used texture paste with a couple of That's Crafty! Dinky Stencils (Hole in the Wall and Chequerboard Bacground) to add some patterned areas. When these were dry, I rubbed then with a mix of That's Crafty! Shimmer and Metallic Paints, adding highlights with DecoArt Glamour Dust Glitter Paint and Prima Art Alchemy Opal Magic paints.
I glued on a piece of chiffon rose ribbon which started out white and altered this with various of the paints to tone it in with my background.
I next stamped on the good vibes and positive mind images from the Aall and Create stamp set 7 by Bipasha BK and the numbers and rectangles texture stamps from stamp set 10 by Autour de Mwa using black VersaFine ink and heat embossed them with clear powder.
I stamped the free spirit image from the Bipasha BK set on mixed media paper with black ink, coloured it with paints and watercolour pencils, then trimmed it and glued it on.
The final touch was to add a wing (That's Crafty! Bits and Pieces Greyboard Large Wings Sheet) which I altered with shimmer, metallic and glitter paints and some Stampendous Frantage Shabby Pink Embossing Enamel.
I hope you like what I made as much as I enjoyed creating it.
Fliss xx


.jpeg)


.JPG)


