Showing posts with label Distress Stains. Show all posts

Monday, 19 October 2015

Inchies or Twinchies at Make My Monday

Hello everyone, I hope you all had a lovely weekend. Mine involved VAT (yuk!) as I got a bit behind due to being ill last week so it wasn't exactly a rest! Still, it's all done now thank goodness!
We have a new challenge today over at Make My Monday and would like to see your creations involving Inchies or Twinchies.


The paper I made for my inchies involved Distress Stains in Crushed Olive, Wild Honey, Rusty Hinge and Ripe Persimmon which I smooshed (love that word!) on smooth cartridge paper. I cut this into inchies.
I then used a set of Hobby Art clear stamps and stamped these on with Archival Jet Black ink. I inked the edges of the squares with Peeled Paint Distress ink and added them to a tall card blank.
I added a border of similar Distress Stain paper with a punched top that I found in my paper bits box and stamped it in black with a lace border stamp.
I finished off with a Prima paper flower and a button centre.

Have a great week.
Fliss xx

Some challenges I'd like to enter:

Suzy Bee's Bloomin' Challenge - Anything Goes With a Twist - Autumn Colours
The Crafty Addicts - Autumn Colour Palette


Monday, 27 July 2015

Flower Garden

Hello all, hoping you had a lovely weekend despite any adverse weather as yesterday here was a total deluge for most of the day! Also so cold I had to resort to a scarf to keep out the draughts!
It was good for crafting though and this week we're going floral at Make My Monday as the theme Suzi chose is Flowers and I'm sure you all know how much I love those.
My Flower Garden stamps came out again for this one and hope you like my inspiration.


I made the background paper with some DecoArt Spring Green paint which I applied to an acrylic block, spritzed with water then smooshed on some cartridge paper.
I dried off with a heat gun (I'm impatient you see!) and then stamped on the flower text from the Carabelle Studio Pretty Like A Flower set with Archival Fern Green ink. I then stamped on part of the Kaisercraft Honeycombe image with the same ink in the gaps.
I stamped the flower head on some paper from my bits box which was coloured with Picked Raspberry Distress Stain. I used Archival Watering Can ink for this. I then cut the image out.
I stamped the leafy stalk on the background paper with the Fern Green ink and coloured it with Inktense pencils.
I distressed the edges of the paper with an emery board and glued it to a card blank. I added the flower head with foam pads and finished off with the Carabelle text stamped on cartridge paper.

This is our last challenge until September as we're all taking a well earned rest for August to recharge our creative juices. Hope you can join us.

Have a great day and a lovely week.
Fliss xx

Friday, 13 March 2015

Wings 'n' Things

Hello again, I'm back with the promised details of today's new challenge over at That's Crafty Challenge Blog where for the next fortnight our theme is Wings 'n' Things so anything with wings goes!

I've broken out some Carabelle Studio stamps again for my inspiration which I hope you like.


I made my background with random splats of Distress Stains - I used Shabby Shutters, Spun Sugar and Bundled Sage. As you can see, I went roughly across the horizontal and vertical centre lines.
I next stamped some splats from the Carabelle Studio Etoiles, Taches et Background Stamp Set and Antique Linen Distress ink.
I stamped on some stars from the same set with Worn Lipstick Distress ink. I then added some pieces of Tim Holtz script tissue tape.
I stamped the angel tag (Un Coeur d'Ange stamp set) with Archival Coffee ink, placing the script stamp from the set directly underneath on the block and coloured it with Distress Stains and inks before cutting out.
I added the background paper to a kraft card blank and finished off with the tag embellished at the top with a button.

Hope you can enter as the prize is a £20 voucher to the online shop for the randomly drawn winner.
Good luck!
Fliss xx

Friday, 20 February 2015

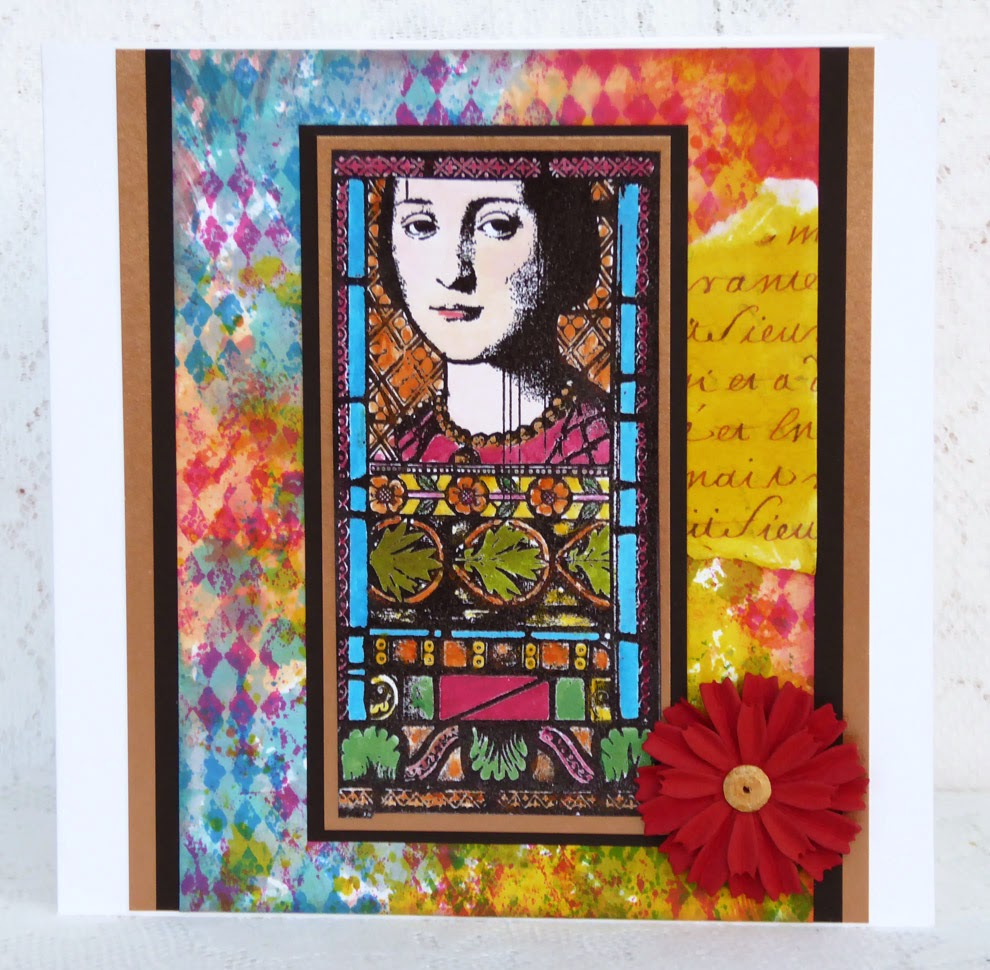
Contemplating With Lynne Perrella

Hello there, I hope you've all had a good week. I'm here today with my weekly project for That's Crafty which is a colourful creation featuring my new and first Lynne Perrella stamps from Paper Artsy.
I was totally unable to resist these gorgeous medieval style beauties done stained glass style and I suspect they'll be making an appearance quite a lot.


You'll find all the details over at the blog and some pics to show how the background came about. Hoping you can visit.

Have a great day and a lovely weekend.
Hugs,
Fliss xx

Friday, 30 January 2015

Animals at That's Crafty Challenges

Hello again, I'm back with my inspiration for our new challenge over at That's Crafty Challenges and our theme for the next fortnight is Animals (as you probably guessed from the title!).
I've chosen to use my favourite animal stamps which are Crafty Individuals gorgeous Alice Palace quirky bunnies.


I made the background paper first by applying splats of Distress Stains to watercolour paper - I used Shabby Shutters, Crushed Olive and Bundled Sage. I spread some of the colour with a finger for a shabby look. I then stamped a flourish design from Crafty Individuals CI-351 all around the edges with Bundled Sage Distress Ink and right on the edge with Pumice Stone. I think it looks a bit like leafy fronds.
I stamped the bunnies with Archival Watering Can ink on a scrap of card I made a while back which was coloured with Spun Sugar Distress Stain and a splash of Pumice Stone. I added colour to the crowns and a little to the bodies with Distress Markers. I then cut them out.
I added the background paper to a kraft card blank and stamped the text from the Stamp-It Australia Time To Dream stamp set with the grey ink  and fixed the bunnies in place with foam tape.

It's good to enter if you can as the prize is a £20 voucher to the online shop where there are oodles of fabulous goodies.

Have a great day and a lovely weekend.
Fliss xx

Friday, 5 December 2014

Christmas In Blueprint

Hello everyone, hope you've had a good week and better then mine as I've been extremely busy with work all week even though I've supposed to have had a couple of days off too! No rest for the wicked it seems :)
I have a project to share over at That's Crafty today featuring a creation made with one of Sir Tim's beautiful blueprint images. It's the first set I've got my inky mitts on and I love it so much I may have to indulge myself with more!


It actually looks much better in real life as i struggled to get a good photo with the light being so bad at the moment - nasty dull and cloudy weather which my camera doesn't like.
You'll find all the details over at the blog as usual and I'd love you to visit if you can.

Have a great day and a lovely weekend.
Hugs, Fliss xx

Friday, 31 October 2014

Some Like It Hot!

Hello again, I'm back with details of the new challenge today at That's Crafty which has the theme of Hot and Spicy which I interpreted as colours so I have a rather bright creation to share with you this time.


As you can see, I'm still on a bird theme here too having finally inked up some Carabelle Studio stamps which have been in my craft stash for a good couple of months.
My background paper is the result of quite a lot of layering and started out with the aplication of some Brusho Crystals to a piece of wet watercolour paper. This produced a splattered look but as the paper was very wet the powders disolved and spread about. I helped the process a little with a wide paint brush.
The next layer was some spritzing with some Cosmic Shimmer mica spray which added a little sparkle. I then stamped on a Deep Red background stamp with Barn Door Distress ink to add texture followed by random stamping with the triangular background stamp from the Carabelle set with Fired Brick.
I then stamped on the circular design from the Stampendous NK Studio Wired set with white and yellow acrylic paints. I stamped on the flowers, masking as I went until happy with the effect and then used a Dylusions stencils to add the leaves with Black Soot Distress ink, doodling with a fine black pen to join everything up.
I stamped the bird and sentiment together with some smaller flowers of the same design on some scraps from my gelli plate leftovers as the slightly lighter orange shade made a contrast with the chilli red background. I cut these out and glued them to the background paper after distressing the edges with an emery board. I then glued the paper to a card blank to finish.

I used:
Carabelle Studio Stamp Set - Femme et Oiseau
Stampendous NK Studio Stamp Set - Wired
Crafty Individuals Elements Stamp Set - Flower Heads
Dylusions Stencil - Lucious Leaves -
Brusho Crystals - Brilliant Red and Orange from the Starter Set
Archival Jet Black Ink
Distress Inks - Barn Door, Fired Brick, Black Soot
Cosmic Shimmer Mica Mist - Golden Fish
Paper Artsy Fresco Finish Paints - Haystack, Nougat

If you're UK based it's great to enter for a fab prize of a £20 voucher to the online shop. Good luck!

Have a great weekend.
Hugs,
Fliss xx

Friday, 21 March 2014

Imagine

Hello there folks and a special welcome to my new followers. A real pleasure to have you on board and I really appreciate you choosing to join me on my art journey.
This is my first post of the day to let you know I have a project today over at That's Crafty which is a vintage style creation made with the help of my treasured Stampendous Creative Palette.


You'll find all the details over at the blog with a tutorial and materials list and I'd love it if you'd pop over especially if you haven't yet done so as we have loads of fab tutorials for you so it really is worth a visit.

We had an absolutely astounding number of entries for our first challenge over at the That's Crafty Challenge Blog and if you hop over later today, you'll find all the details of the second challenge along with lots of gorgeous inspiration for the theme which is one I love and I'm sure you will too.

See you a bit later on.
Hugs,
Fliss xx

Monday, 20 January 2014

A Bit Of Krafting

Good morning everyone, I hope you've all had a lovely weekend and enjoyed some sunshine as we did - very necessary after Friday's deluge which caused huge problem down here in the South with flooding everywhere. Happily I got to work although soaked through and had to dry some of my clothes with a towel - my boots took ages to dry near the radiator too!
We have a new challenge for you today over at Make My Monday chosen by Jan this week and she has challenged us to use some kraft card on our creation. I loved this one as it's a favourite of mine and my inspiration this time is a fairly simple card.


The background kraft card was embossed on both sides with a Darice border folder, butterfly swirls.

I then stamped the Papermania Urban image with Archival coffee ink onto a piece of smooth, thick cartridge paper coloured with green and blue Distress Stains. I then added further colour to the butterflies with more Distress Stains.

I stamped the Hobby Art sentiment with the coffee ink on a further scrap of cartridge paper coloured with Distress Stains and added this as a finishing touch.

Have a great day.
Hugs,
Fliss xx


Wednesday, 20 November 2013

More Santa!

Good morning everyone and welcome to my Mid Week Inspiration for our current challenge theme at Make My Monday which this time is a rather inky and glimmery creation which I hope you'll like.


The background paper was made with a panel of watercolour paper which I coloured with Distress Stains in Peacock Feathers, Tumbled Glass and Crushed Olive. I found that if you coat the watercolour paper with water before pressing into the ink stains on a craft sheet the colours spread much more freely. Repeat this step until the paper is covered.
I then embossed the panel with a Darice snowflake swirl corner design, turning the card upside down to emboss the other side. I then brushed the raised areas with Brilliance Galaxy Gold ink wihich gave lots of lovely shimmer.
I stamped the Crafty Individuals Santa collage with VersaFine Smokey Gray ink on to thick, smooth cartridge paper and coloured it with Distress Stains. I cut it out with deckle scissors to leave a border and added it to a red card mat.
I added the background paper to a red card mat and then attached the panel to a white square card blank and finished off with a computer generated greeting on a red mat.

You still have a few days left to enter the challenge and hope to see you there.

Enjoy the rest of your week.
Hugs,
Fliss xx

Friday, 30 August 2013

Elizabeth's Garden For That's Crafty

Hello everyone, this is my first post of the day which is to tell you about my project today over at That's Crafty which is a wall hanging with a difference.
Here's a sneak peek but you'll need to hop on over to see the whole thing and how I made it:


I'll be back in a bit with post number two!
See you!
Fliss xx

Friday, 28 June 2013

Cherish For That's Crafty

Hello folks, guess who was so tired last night that she forgot to schedule her post for her That's Crafty project today! Apologies yet again for the lack of visiting too which is because I've had no time to myself all week having started my job and getting home too late and very tired so collapsing in front of the TV was the only thing I had energy left to do. Hopefully things will improve as I get used to it as I actually don't feel quite so exhausted today.
Anyway, enough waffle and on to my project which is the card I made for my hubby for our wedding anniversary which was on Wednesday and it's a simple design as he doesn't like fussy and I had to explain how I made the hearts as he thought they were metal.


Hope you like it too and you'll find all the details over at the blog.

Have a great weekend everyone.
Hugs,
Fliss xx

Monday, 17 June 2013

Going Purple With Make My Monday

Hello folks, hoping that you all had a good weekend with at least some good weather. Mine was really busy as I'm madly trying to get ahead before I start my job next week. A wardrobe overhaul is also on the cards as I need to check I have things to wear in an office (having worked from home I have quite a lot of jeans and t shirts as I'm sure you can imagine!)
Anyway, enough waffle and on to the new challenge at Make My Monday which this week is to make something in shades of Purple With Just One Neutral Shade Allowed. I really loved this one as it's a favourite colour of mine and I used to be known as the Purple Queen at the stamp club I went to. I hope you like my card.


As you can see I've made up for the CAS challenge last week and gone right back to my favourite shabby and distressed style.
The background paper was made using Seedless Preserves and Milled Lavender Distress Stains and I sprayed it with water to spread the colour. When it was dry I stamped on a filigree corner by Inkylicious in Lavender Sachet and Iris Palette inks. I stamped it repeatedly for a layered look. I then distressed the edges with an emery board and added it to a square cream card blank.
I stamped the daisies (B Line Designs) with the Lavender Sachet and Iris inks and then added just streaks of colour with Promarkers. I cut them out and shaped them by curling the petals round my decoupage scissor blades.
I stamped the butterfly by Kaisercraft with the Iris ink and added colour with Prismacolor pencils then cut it out and rounded the wings as I did the flower petals. I then stamped the Hero Arts sentiment with the same ink and trimmed to a panel by hand.
I assembled the card as you see adding a cream doily and some purple velvet ribbon.

Have a great day.
Hugs, Fliss xx

Monday, 20 May 2013

Spring Green And Yellow

Hello everyone, I hope you've all had a good weekend. Mine was rather busy as I had to dash up to Kingston on Saturday to help my daughter as she was struggling to finish off all her bits and pieces of her final collection with the hand in today! I spent much of the day running around fetching things so was very tired yesterday (guess who's not used to spending all day on her feet!).
I'm here today to tell you about our new challenge over at Make My Monday and this week the theme is a colour one - Green and Yellow - perfect for some Spring creations. I've made another nature themed card which is actually a sample from the workshop I'm teaching this morning and has a very easy to make background using Distress Stains so a tutorial will follow as soon as I have the time to get it together!


The background uses Distress Stains in shades of green and yellow - Shabby Shutters, Squeezed Lemonade and Crushed Olive and I then stamped on the fabulous Inkylicious worn paint background - I can see lots of use for this one - with Peeled Paint Distress ink.
I then stamped the gorgeous vintage bird collage image (also Inkylicious) with VersaFine Olympia Green ink and took a bit of a liberty by turning the birds into greenfinches. I painted them with Distress Stains and then inked the edges with Crushed Olive Distress ink.
I added the image panel to a green die cut (Papermania) and attached this to the card with the background panel. I decorated the card with paper flowers, some painted with Squeezed Lemonade Distress Stain and punched leaves and finished off with a Dovecraft sentiment.

Have a great day.
Hugs,
Fliss xx

Some challenges for my card:
Eclectic Ellapu - Anything Goes
One Stop Craft - Anything Goes
Cards In Envy - Make Your Own Background
Smudgy Antics - Feathers And/Or Fur

Tuesday, 14 May 2013

Time To Fly

Hello everyone on a very soggy and windy day. I hope it's better where you are although it is rather good crafting weather!
I'm here today with a little wall hanging I've made for my younger daughter and sent it off to her today along with some fabulous chunky hand carved wooden toggles that her friend's husband made for one of her creations. You may not know that she's currently making her final collection for the end of her fashion degree and only has just over a week to go. She's under the most terrible pressure at the moment and has a bad cold to cope with as well due to working too hard.
It makes us feel very helpless as we can't do much to help her out (apart from sending out now alarming handouts of money!). I made the little piece of artwork to hopefully cheer her up using  one of my favourite dies, the Tim Holtz dress form.
There are several pics so that you can see the detail on my stamped background.


I made the base with a piece of recycled greyboard which I painted with 2 coats of Golden Titan Buff fluid acrylic and I then stamped the floral flourish from the Artistic Outpost Serenity plate with Palette Lavender Sachet permanent ink (necessary to dry on the acrylic paint which has a slight sheen).
I die cut the dress form from kraft card and embossed it with the Cuttlebug textile folder. I made the lace skirt by dyeing some frilled lace trim with Seedless Preserves Distress Stain and added 2 layers to the dress form with tape at the back.
I made the wings with the B Line Designs large butterfly, stamped with Memories Art Print brown and painted with the Seedless Preserves stain. I cut this out, cut it in half and added to the dress form.
I trimmed the base of the wall hanging with pinking sheers and added a couple of layers of lace and ribbon (the pinkish trim is linen ribbon from The Range and is a steal at £1 for a roll - they have lots of styles and colours too!).
I added a die cut lace corners (Anja by Marianne Design) cut from beige parchment card and stamped the text with Hero Arts alphabet stamps and Memento Sweet Plum ink. I cut the words out and inked the edges. I attached the dress form with foam tape and glue.
I added some of the linen trim at the top to create a hanger, taping it to the back and covering it with lilac felt trimmed to size.

Enjoy the rest of your day.
Hugs, Fliss xx

Some challenges for my wall hanging:
The Craft Room Challenge - Stamp Your Own Background
Fashionista Challenge - Shabby or Vintage - mine is vintage
Get Inky - Die Cuts
Pretty Little Ribbon - Lace

Monday, 13 May 2013

Jane Eyre At Make My Monday

Good morning everyone on a very windy and miserable day. I don't know what's going on with the weather at the moment - seems more like March than May!
We have a new challenge for you at Make My Monday today chosen by the lovely Mynnette - I just found out it's her birthday today too so would like to say Happy Birthday and Many Happy Returns here - hope you have a lovely day!
Our theme this week is to create something based on either the cover (see the blog for this) or the story line. I chose the story as it's one of my favourite stories ever being so romantic. My card is based on Jane being shy and I found the beautiful Victorian image on the internet. I think she looks very shy and the rest of my creation came about because my favourite part of the book is where Jane thinks she hears Mr Rochester calling "Jane, Jane" and returns to Thornfield to find out what happened after she left.


I printed the image out on to thick cartridge paper and painted her with a mix of Aquamarkers and Distress Stains. I die cut the image to an oval panel and then sponged with Spun Sugar Distress ink. I then stamped on my most useful stamp - a tiny Anna Griffin flourish I must have had for around 10 years - with Milled Lavender Distress ink.
I ended up using patterned paper as I couldn't make anything stamped work (very frustrating!) and chose this lovely paisley paper from the Chocolate Baroque Filigree Fusion CD that I won from Claire C (thanks Claire!) a while back. I added 2 layers of lace to the panel before adding to a lavender mat and attaching to the card blank.
I added lots of Spring flowers to embellish the card and finished off with a heat embossed and inked cut out heart shape (Hobby Craft) made with VersaFine Imperial Purple ink, clear embossing powder and pink pigment ink. I then added the lovely Penny Black sentiment stamped with Memento Sweet Plum and inked with Spun Sugar DI.

I can't wait to see what you come up with for this one and if you'd like some inspiration, do hop over to the challenge blog as you'll see the Design Team has interpreted the theme in quite a lot of very different ways.

Have a lovely day.
Hugs, Fliss xx 

Some challenges for my card:
Gingerloft - Lilac and Lace
The Corrosive Challenge - My Sentiments Exactly

Monday, 6 May 2013

Mariposa

Good morning folks, hope you're all enjoying the extended weekend and that you have sunny weather like us as it's really lovely today. It was yesterday too and we went walking at Swanbourne Lake in Arundel and even managed the first ice creams of the year although they'd just run out of cones when we got there so we had to have tubs!
Today we have a new challenge for you over at Make My Monday and this week the theme is Anything That Flies. You only have to look at the DT samples to see that there are lots of ways to interpret this theme, including hot air balloons, although I went for a nature theme with butterflies as I love them so much.


The challenge gave me a chance to have a play with my brand new Marianne Design die and stamp set (Tiny's Butterfly 1) - isn't it just gorgeous!
I made my background paper with Crafty Individuals CI-253 floral background stamp using Forest Moss Distress ink and then sponged Shabby Shutters all over. I distressed the edges with an emery board and attached the paper to a kraft card blank.
I made an embossed panel of green card with a butterfly folder free in a magazine and rounded the corners before adding to the card.
I then cut a panel of cream card and embossed the right side with the butterfly from the Cuttlebug Collage folder set and inked this with Crushed Olive DI. I stamped 2 of the butterflies from the Kaisercraft Butterflies clear stamp set with Forest Moss DI and coloured these with Shabby Shutters and Rusty Hinge Distress Stains. I stamped on the mariposa text from Crafty Individuals CI-231 Beautiful Butterflies Elements stamp set with VersaFine Olympia Green ink and inked the edges with crushed Olive DI.
I stamped the large butterfly from the Marianne Design set with the VersaFine ink and then coloured the image with Distress Stains (Shabby Shutters, Crushed Olive, Bundled Sage, Iced Spruce, Tea Dye and Rusty Hinge) then die cut it and added to the card with a foam pad.

Have a great Bank Holiday Monday.
Hugs, Fliss xx

Sunday, 5 May 2013

Flight Of Fancy

Hello there, I'm back with my second post today because as you may remember, I won the Stamping Sensations March challenge (and a lot of gorgeous Crafty Individuals stamps too - happy dance followed!) and Brenda invited me to be the Guest Designer for May. To my complete delight, the theme is Embossing and Texture and I'm sure you know how much I love that!
I decided to make a little wall hanging piece for my project as whilst rummaging for something else just over a week ago, I found some decorated paper I made a few years ago on the one day workshop with Kim Thittichai (of Hot Textiles fame) where we made papers using painted bondaweb and other things. This particular paper was begging to be featured on something a little more permanent than a card so this is how my wall hanging came about.


There are several pics so that you can see the detail. As you see, the background paper is quite strongly coloured. It has a painted background with added mulberry papers, scraps of iridescent fabric, stamping and gold leafing pen. The overall effect is more textured than you can see in the photos but you can probably get a good idea. I glued the panel to a square of recycled packaging grey board.
I decided on pastel colours for contrast and pale pink seemed to work best. I die cut the Tim Holtz Sissix Alterations bird cage from strong card and embossed with a mix of Ranger Weathered White and Fran-tage Shabby Pink Embossing Enamel and then rubbed the edges with Bronze Gilding Wax.
I stamped the bird (Kanban) with black ink and painted him with Spun Sugar, Picked Raspberry and Peacock Feathers Distress Stains, then cut him out.
I die cut some flowers (Memory Box Petal Party) and some leafy sprigs (a very old Sizzix die) and coloured these with Distress inks and Versacolor inks. I layered the flowers up and added embroidered flowers to the centres.
I added these to my background as you see, finishing off with a stamped and inked sentiment (Inkylicious) and some more embroidered flowers (I cut these from some trim I bought from Paper Artsy a while back).

Thanks again to Brenda and the girls for picking my Tales of the Riverbank card as the winner - I was so thrilled to receive all those lovely stamps and will be making something with them very soon.
Hugs,
Fliss xx

Some challenges for my wall hanging:
Stampin' for the Weekend - Die Cuts And/Or Punches
Die Cuttin' Divas - Anything Goes
Inky Chicks - Shabby Chic

In An English Country Garden

Hello folks, hope you're all having a lovely weekend. Sorry about the title here but I couldn't resist and you'll see why when you see my card which is my inspiration for the new Fashionable Stamping Challenges theme which is everyone's favourite - Anything Goes!
I decided on a card this time because I wanted to ink up some of the gorgeous vintage stamps made by our sponsor, Flonzcraft, and I've actually used 4 different sets to make it so you'll be able to see how well they go together. Without further ado - here it is!


You can probably see why I chose the title now as I made a little scene with a framing technique to give added dimension to my creation.
I cut a piece of thick cartridge paper slightly smaller than my card blank and stamped the sweet lady with bird from the Flower Kingdom set on the left bottom corner with Memories Artprint Brown ink. I stamped the floral corner from the Have Some Fun set in the remaining corners with the same ink and the sentiment from the Countrylife Pastoral set in the centre of the right hand side.
I painted all the images with a mixture of Distress Stains and watercolour pencils. I then stamped the garden image from the Flower Kingdom set just above the centre on a second square of card and coloured this in the same way.
I then used a circle cutting set (Creative Memories) to cut an aperture in my main stamped paper, pausing in the cutting so that when I trimmed around the image and sentiment, they would be part of the frame. I then inked this with Shabby Shutters Distress ink and stamped a flourish from the Damask Floral Curves set all over with Memento Pear Tart ink to add texture.
I stuck the aperture panel over the garden image panel, using foam tape behind the main image and sentiment for dimension and added the panels to the card blank to finish.

The Fashionistas have a fabulous array of creations for you on the catwalk this fortnight so do hop over for a look.

I'll be back (now I sound like Arnie!!!) shortly with my second post today as I'm lucky enough to be Guest Designer at Stamping Sensations this month so see you very soon.
Hugs, Fliss xx

Sunday, 21 April 2013

Sentimental

Hello everyone, hope you're all having the fabulous sunshine that we have on the South Coast this weekend, it really does feel like Spring has arrived and I actually only have 2 layers of clothes on instead of 4!
Today sees the start of a new challenge over at Fashionable Stamping Challenges chosen by fellow fashionette, Esther, and it's Sentimental so there must be a sentiment on your creation. We are sponsored as always by the lovely Leo of Flonzcraft who will be giving a $20 voucher to his online shop for the randomly drawn winner - so what are you waiting for - you have to be in it to win it!
I've made a fairly clean and simple card (well, for me anyway lol) as I wanted to show the gorgeous sentiment by Lindsay Mason to its best advantage.


I made the background paper with some tiny flowers from the Prima mini Meadowlark stamp set, layer stamping 2 of the flowers with Tattered Rose, Wild Honey, Stormy Sky and Shaded Lilac Distress inks on cream card and covered my card blank with this.
I stamped the bird (Kaisercraft Bonjour stamp set) with Archival Coffee ink on the right side of a strip of thick cartridge paper and stamped the sentiment (Lindsay Mason Messages 1 by Personal Impressions) with the same ink. I then painted the bird with Distress Stains (Spun Sugar, Dried Marigold, Picked Raspberry, Tea Dye, Rusty Hinge, Pumice Stone and Crushed Olive) - I can't get enough of these at the moment as they're so easy to paint with.
I added the painted panel to the card and then added scalloped borders on either side, die cut from hyacinth blue card with a Sizzix die (658954 Borders). Done!

My fellow fashionettes have an amazing array of creations lined up for you on the catwalk so dop pop on over for a look and hope you can enter as we'd love to see you there.
We also have a fabulous guest designer with us this time and it's none other than my former fellow Make My Monday design team mate, Suzanne of Suzanne's Papercrafting. She's made a really gorgeous project for us too.

Have a great Sunday.
Hugs, Fliss xx