Hello everyone, wishing you a very Happy Easter. Typically for a bank holiday, it's raining down here in the South, however, perfect for staying in and crafting!
I have my usual Friday post over at That's Crafty! Blog and this week, I have a mixed media tag inspired by nature to share.
If you'd like to see what I did with this rather Autumnal leaf, you'll need to hop over to the blog, which of course, I hope you will.
Have a great weekend.
Fliss xx
Friday, 30 March 2018
Friday, 23 March 2018
Art in Monochrome for That's Crafty!
Hello everyone, I think Spring might finally be here as the last couple of days have been much warmer so fingers crossed it stays that way as it's nearly April!
I'm over at That's Crafty! Blog today with a rather striking monochrome mixed media creation to share. Hope you'll hop over to see the whole thing and how I made it.
As you'll see, it has quite a lot of texture going on and features quite a lot of stamping in different ways too.
Have a great day and a lovely weekend.
Fliss xx
Labels:
Mixed Media,
My Stamps for That's Crafty!
Wednesday, 21 March 2018
Midway Inspiration for That's Crafty! March Challenge
Hello, I'm back again to share my midway inspiration for our March challenge at That's Crafty! Challenge Blog, our theme this month being Spring Into Action and boy, has it taken a long time to appear! Snow in March is definitely not my idea of Spring!
I've created a mixed media art panel as my offering featuring, of course, some of my new stamps as how could I not!
If it's still freezing cold where you are, hopefully this will bring you a little warmth.
You might be surprised to learn that my artwork above actually has another piece of artwork underneath. I created it a couple of years ago and it had faded a lot so I decided to use it as the base for this. I glued crinkled tissue paper over the top with DecoArt Matte Medium and once it was dry, used the spirals stencil with texture paste to add a pattern on the left side.
If you look closely, you can just see the original artwork underneath!
The next step was to add some lime and mustard multi surface paints to a couple of spritzer bottles, diluting them with water and then spritzing them on, with lime on the patterned side and mustard on the other, allowing the colours to run down and re-applying in between blasting with my heat gun to give a distressed look.
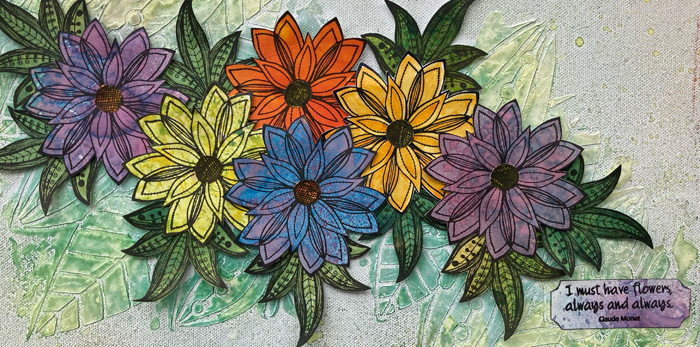
I then chose one of my floral images and stamped this on the right side together with the flourish image using Versamark ink and heat embossing with fine white embossing powder. I painted the images with diluted multi surface paints in shades of orange, yellow and green.
I stamped more floral images and leaf sprigs on gelli print and brayer paint wipe papers from my bits box, stamping enough to layer up the flowers. Once they were glued together, I scrunched the flowers a little for a shabby chic effect.
I glued the flowers and leaves in a spray and finished off with a painted white/greyboard plaque from the matches sets for my stamps, stamped with one of the quotes.
TIP: I quite often use my Tim Holtz stamping platform to stamp my flowers due to the amount of detail and although they stamp very well using an acrylic block, I find that if I'm stamping on painted paper with a slightly uneven surface, the platform really helps to achieve a clean image first time.
If you haven't yet entered, the challenge is now open to everyone, wherever you live and there are prizes for the top 3 too so what are you waiting for!
Have a great week.
Fliss xx
Tuesday, 20 March 2018
Bloom Doodled Art Journaling
Hello everyone, it's finally starting to warm up a bit as we've had some sunshine today and this has inspired me to do some doodling in my art journal. Most of it is done with Sharpie markers in various widths after I made a painty background so read on to hear what I did.
My background was made with watered down That's Crafty! Multi Surface Paints in shades of blue, teal and purple which I applied with sponges to cover my page. I then spritzed on some That's Crafty! Sparkler Spray using blue and lilac for some added shimmer.
Once the background was completely dry, I doodled on my floral design with Sharpies in various widths, adding dots and lines shooting out towards the edges and then scribbling on my chosen words as you see.
My finishing touch was to use the design element on the That's Crafty! Time Word Art stencil with white multi surface paint to add streams of dots.
Have a great week whatever you're doing and see you soon.
Fliss xx
Friday, 16 March 2018
A Taste of the Orient at That's Crafty!
Hello folks, hope you've all had a good week and had some sunny warmer weather as we now have here although apparently the big chill is about to reappear!
I've been very busy this week with family and work so hopefully I'll be able to come and visit over the weekend.
I have my usual Friday post over at That's Crafty! Blog and this week I'm sharing a mixed media piece of artwork with an Eastern flavour and a rather bold red, black and gold colour scheme. You'll find all the details over at the blog and here's a sneak peek of what I have in store for you.
Have a great day and a lovely, hopefully crafty weekend and see you soon.
Fliss xx
Wednesday, 14 March 2018
Birthday Card
Hello everyone, I hope you're all having a good week. This is just a quick post to share the card I made for my elder daughter whose birthday was on Monday.
It's a very quick and simple card featuring my new bird stamp again this time on a bright and bold style creation.
All I did was to stamp the scribbled lines using bright shades of Distress Oxide inks across a piece of white card.
I then stamped my bird with black ink (VersaFine) on smooth white card and heat embossed the image with clear powder. I then coloured the image with Zig clean colour markers and there's a note to self here to wipe the excess ink off the embossing which is of course a resist and would stop me getting a red blob near the bottom of my white card when I stuck the bird on! I had to chop it off which is why the blue border is wider than intended.
I stamped my current favourite birthday text (Dovecraft) on as you see and added the blue mat before gluing to a white card blank.
Supplies:
My Fanciful Flowers Clear Stamp Set 2 for That's Crafty!
That's Crafty! Textures Collection Set 1 Clear Stamp Set
Tim Holtz Oxide Inks - Broken China, Spiced Marmalade, Squeezed Lemonade, Twisted Citron
Versafine Onyx Black Ink
Zig Clean Colour Markers
Have a great rest of week and see you soon.
Fliss xx
Friday, 9 March 2018
Bring Me Sunshine for That's Crafty!
Hello everyone, I hope you've all had a lovely week and that Spring is almost on the way as it is here as it's much warmer and we've had some sunshine too.
If you don't have sunshine, do hop over to That's Crafty! Blog where I'm sharing a mixed media project which might just brighten your day.
This is just a sneak peek so you'll need to pop over to see the whole thing!
This is just a quick post as I'm watching Neil on Hochanda with some awesome new goodies including stamps, stencils and our brand new and fabulous chunkies - not to be missed!
Have a great day and a lovely weekend.
Fliss xx
Wednesday, 7 March 2018
Spring Into Action at That's Crafty! Challenge Blog
Hello everyone, sorry for my lack of visiting lately, just very busy with life and work stuff at the moment which has cut down my blogging time.
A quick post to let you know that a new challenge is up for March today at That's Crafty! Challenge Blog where our new theme for the month is Spring Into Action which we could certainly do with after last week's arctic temperatures and snow. A bit warmer now and sunny with showers so maybe Spring is around the corner.
My inspiration is a mixed media panel featuring the most springlike of my new stamp designs which was inspired by a parrot tulip. Hope you like it.
What I did was to start with the backing panel which is an 8 x 8 rounded corner white/greyboard panel which I painted with green multi surface paint. I then added the detail with texture paste through the floral frame stencil and when dry, painted with yellow and orange multi surface paints.
I then took 3 MDF atcs and used the new bark dinky stencil (coming soon to the shop and Hochanda) with texture paste to make a tree bark look - much quicker than my previous method with a skewer!
Once the paste was dry, I painted the bark with a mix of chestnut brown, black, green and grey to look as realistic as possible.
I stamped the flowers on to some mixed media paper painted with multi surface paints and stamped with a sequin waste texture stamp. I cut out the flower heads only from my red and yellow paper, stamping again on green and trimming closely round the head area then glued the red and yellow heads over the top.
I glued the tree bark panel to my background panel, following up with the flowers, adding just part of the text from one of Melina's stamp sets, stamped on a scrap of orange paper, to the middle flower, tucking it under the leaves.
To finish off, I stamped around the edges of the panel with the sequin waste image and Spiced Marmalade oxide ink.
Supplies Used:
That's Crafty! White/Greyboard 8 x 8 Panel with rounded corners
That's Crafty! MDF Atcs
That's Crafty! Clear Stamp Sets - Fanciful Flowers Set 2, Nature's Faces Set 2, Textures Collection Set 4
That's Crafty! 8 x 8 Stencil - Daisy Frame
That's Crafty! Dinky Stencil - Tree Bark
That's Crafty! Multi Surface Paints
That's Crafty! White Texture Paste
Tim Holtz Oxide Ink - Spiced Marmalade, Fired Brick, Fossilised Amber
Archival Jet Black Ink
Silicone Glue
White Mixed Media Paper
You have a whole month to enter the challenge which is now open to entrants all over the world and there are great prizes up for grabs too.
Have a great day.
Fliss xx
Monday, 5 March 2018
Yesterday's Workshop with Leonie Pujol
Hello everyone, I hope you had a lovely weekend as I did, as I was lucky enough to attend a workshop yesterday run by the lovely Leonie Pujol and we got to play with Powertex, very messy but great fun and also created a very textured journal page.
I managed to finish off my journal page as when I left, the texture gel on the star wasn't quite dry as it starts out white then goes clear when dry. I also added a little detail to the stencilled white fibre paste, outlining the areas in black and decorating with dots to make them pop more.
The page involved rice paper, Distress stains and crayons, stamping, stencilling and fibre paste all topped off with some metallic wax which doesn't quite show here but gave a lovely glow to the page in places.
We decorated the front of a Pink Pig book with Powertex dipped mixed media elements, in my case using the black and you should have seen my hands when I finished adding the elements, I looked as if I'd dipped them in a tar bucket! Happily it comes off with water and a bit of scrubbing. Once the front was dry, we used shimmery paints on top. here's the main detail on mine although it will change as I want to make the colours stronger so will post this again once I've finished playing with it.
You can see all the ladies' creations over on Leonie's website if you click HERE
It's amazing how different everyone's makes are when we all started off with the same thing.
Have a great week and see you again soon.
Fliss xx
Labels:
Art Journaling,
Leonie Pujol,
Mixed Media,
Powertex
Friday, 2 March 2018
Joyful Flowers Mixed Media Art for That's Crafty!
Hello everyone, I don't know about you but I've had a really awful week starting off on Wednesday morning when we woke up to find the boiler had stopped working in the middle of the night and the usual pressure adjustment didn't work so we had to call a man out. Apparently the boiler condenser outlet was frozen solid (no surprise there due to the arctic temperatures at the moment!) so he's done a temporary repair, rerouting the pipe to a bucket! It won't get fixed until the big freeze has ended.
On the same day, cold fingers became butter fingers and I dropped my laptop on the kitchen floor whilst trying to move to the dining room. So yesterday morning I made an emergency trip to the Brighton Apple store and luckily due to the weather people who had actually managed to book an appointment (not me as all they seemed to have was the middle of next week!!!), I only waited a few minutes before someone came to look at my computer. All he did was take it out the back and hoover it then ran the diagnostics in front of me and everything worked - no charge!
Yesterday afternoon was really awful as we lost our little Rosie, our Netherland Dwarf bunny, after several weeks of ill health, the result of a misdiagnosis of a problem with one of her back legs which unfortunately got beyond fixing.
On a happier note, I'm over at That's Crafty! Blog today sharing a mixed media make using some of my new stamp designs. Here's a sneak peek and hope you like it.
Have a great weekend and see you soon.
Fliss xx
Subscribe to:
Comments (Atom)




.JPG)


