Hello folks, it's time for another tutorial from me which is somewhat overdue I think as it's an age since I last did one.
You won't believe how easy this one is and how versatile it can be and there are quite a lot of pics so you might want a coffee before you start reading.
This one came about because last year I was really inspired by Sir Tim's patchwork inking with ink blending tools and wanted to pass this on to my ladies at a class. As I don't have that many ink blending tools and didn't want them all fighting over them, I improvised with fun foam blocks on Kling-On and it worked really well.
This got me thinking as I love making my own backgrounds (as I'm sure you know!) and wanted a way to create a larger inked area. I managed to drop a rather inky acrylic block on scrap paper and inspiration struck!
Easy Inking Technique
You will need:
A selection of acrylic blocks
Very smooth white cardstock
A selection of Distress inks
Some soft cosmetic sponges
STEP 1 - Add ink to the block by tapping all over and press, inked side down on your card. Remove the block and immediately rub gently over the inked area. As the ink is still wet, the ink will spread over the card.
STEP 2 - Repeat the above step until you have the colour required. I usually do 2 coats and the result will be a shabby chic inky panel. The reason that I specified smooth card is because if the card is very matte it will tend to be more absorbent and the ink will not spread around as much. It still gives a great effect though.
STEP 3 - Stamp a design on your inked panel. I have chosen a large corner design here and stamped on one side only. If you want a completely decorated paper you could turn it and stamp the other corner.
STEP 4 - A bit of Blue Peter here with a panel I made earlier lol. This one has a pretty sprig design stamped around the edges with the same colour ink as the panel and gives a pretty delicate look.
STEP 5 - Another idea here using a small square block to make a pretty patchwork panel with Crushed Olive and Wild Honey Distress inks. In this case you will need to sponge each square as you go to ensure that the earlier squares don't dry out before you sponge them.
STEP 6 - This panel uses a long rectangular block with Crushed Olive and Stormy Sky inks and will make a lovely addition to a masculine card I think.
STEP 7 - A very different idea here as the same technique can be used to make a quick inky panel to stamp on. In this case, I inked all over first with Scattered Straw and then added Crushed Olive at the bottom with Peeled Paint on the very edges of the block. I then added Mustard Seed to the rest, following up with Spiced Marmalade then Worn Lipstick at the top. I inked more heavily round the edges with the pink. I used 3 different sponges so as not to contaminate the inks.
STEP 8 - Here's the panel stamped with some Penny Black grasses. A lovely watercolour effect background.
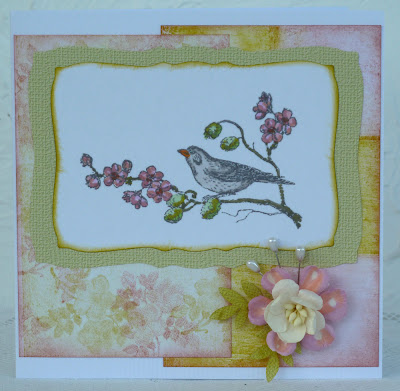
Here are some cards made with the technique so you can see the finished results.
Both the cards feature papers made with different sized acrylic blocks so you can adapt what you make very easily to suit the card layout. Some of the square blocks make lovely patchwork pieces by simply cutting each square out. The floral panel on my bird card started off as a Shabby Shutters inky panel was stamped all over with a floral sprig using first Crushed Olive then Victorian Velvet.
I hope you've enjoyed this and I'm sure you will see that there are loads of possibilities so do let me know if you make something.
Hugs, Fliss xx
Friday, 27 January 2012
Subscribe to:
Post Comments (Atom)




.JPG)









16 comments:
oh super tutorial's Hun,you always make amazing backgrounds and just adore what you have created,with them hugs Cheryl xxxx
You are so sharing with your wonderful knowledge Fliss.
Great tutorial and the finished results are stunning.
Wishes
Lynne
Lovely work Fliss, thanks for sharing! Hugs, Valerie
Thanks for sharing your great idea. Will have ago doing that later. Beautiful backgrounds and cards too. xx
Thank you Fliss, for a brilliant tutorial.
Irene xx
Thanks Fliss, your right it is a simple technique but it is SO effective and worthwhile. Watch this space for I'll be trying it too. Caz
So many great ideas!!! Thank you for sharing!
Thanks so much Fliss for the tutorial i will have to have a go at this
Sandra x
Thanks for sharing this tutorial. Both cards look beautiful.
what a great tutorial Fliss, love the effect it creates
hugs
Thanks for sharing Fliss, I will experiment with these techniques - such great ways to create backgrounds.
luv and hugs {brenda} xoxox
this is really beautiful, lovely colours!
Thank you for sharing this, you make it look so easy & beautifull! I am sure going to try this out.
great tutorial, love the effect, just love distress inks!! lainey x
Hi Fliss...what a great tutorial! I have just got some super smooth card in, so I can now have a go at this technique. Ta
Dot x
Thanks so much for sharing, Fliss! So sweet I you to do so. Best wishe, Yvonne
Post a Comment