Sunday, 22 December 2013

Merry Christmas To You!

Hello everyone, I've just popped on here to wish you all a very Happy Christmas and all the best for the New Year too as I have to work the next 2 days so probably won't have another chance to say this.

I also need to say sorry for being such a bad visitor the last few months too which is because I now get very little time to myself and seem to be totally unable to get organised enough to fit in everything in the small amount I do get. It makes me wonder how I coped 25 years ago which is the last time I had a full time job although then it was just me and my hubby and not the family we now have!

I'm here to share the last 3 cards I made this year before I go and do quite a lot of wrapping up so at least I can say that apart from a couple of bits, all the Christmas shopping is done.


As you can see, the basic principle for the trio is the same although the papers have been chosen to fit the particular image on each one. All of the images and papers (except the hessian one which you''l find on my FREE page) are from the Polka Doodles 2012 Here Comes Christmas CD which is my favourite of the Christmas CDs as I love those plaid papers to bits. The fab sentiments which I coloured with markers are from the 2013 A Home For Christmas CD.

Hoping that you all have a really lovely time with lots of crafty pressies and will see you after the big day.
Hugs,
Fliss xx
Friday, 20 December 2013

Voyage Of Discovery For That's Crafty

Hello there everyone, a really quick post from me today to let you know that I have a project to share over at That's Crafty which is a card for one of those more difficult occasions - or at least I find cards for men rather difficult!


It's really very simple to make and you'll find all the details over at the blog.

Have a great day and hope to see you there.
Hugs,
Fliss xx

Monday, 16 December 2013

CAS Christmas

Hello folks, hoping you all had a lovely weekend and I'm here today with my inspiration (or at least I hope so lol) for the new challenge today over at Make My Monday which has a theme chosen by Suzi and is the one I find the most challenging as white space is not normally on my creations:

CAS CHRISTMAS

As you can imagine, eek! came to mind when I saw this so I hope you like what I finally came up with after several non starters.


Quite a bit of layering I admit, but still white space!

The starry tree is Crafty Individuals and stamped with VersaFine Spanish Moss as I wanted it to go with a scrap of stamped paper from my bits box leftover from a William Morris style background attempt made with a Kaisercraft stamp set and shades of Distress ink.
I added various matting layers with further bits from the leftover box and stamped the Dovecraft sentiment at the top with VersaFine Crimson Red.

I think this will be the last Christmas card I'll be sharing as with my job now taking up most of my time, I actually had to go and buy some cards this year to make up the shortfall as quick and easy is not really me!

Have a great week.
Hugs,
Fliss xx

Friday, 13 December 2013

Say It With Flowers For That's Crafty

Hello everyone, I hope you've all had a good week and are managing to get there with the Christmas preparations which I have to say are going rather slowly here but I think I'll manage to get sorted in the end!
Today's post is to tell you about the project I have today over at That's Crafty which is the result of an experiment with the Inkadinkado stamping gear kit only I wanted to try out some stamps not made by Inkadinkado to see how well it would cope.
Here's the creation and you'll have to let me know what you think. All the details and some tips are over at the blog.


The card was for my sister in law's birthday and I'm happy to say that she was thrilled with it!

Have a great day and a lovely weekend.
Hugs,
Fliss xx

Monday, 9 December 2013

A Cold And Frosty Morning

Good morning everyone, I hope you all had a lovely weekend. Mine had some great things (seeing Catching Fire at the cinema with totally amazing costumes and talking to my daughter on Skype) and the not so great (8 yes I did say 8 wash loads!).
I did manage a small bit of crafting though which is my DT inspiration for today's new challenge at Make My Monday chosen by Rosie which is FROSTY so you could do anything that brings frosty to mind and in my case this was snow and ice.


I've again used the gorgeous Midwinter plate by Artistic Outpost which I'll be using to make quite a few cards as it's so versatile.

I decided to make a frame for the woodland scene so I picked out a die by Papermania which is slightly frilly so would suit the embossing folder I planned on using. I die cut the shape from a piece of smooth, thick cartridge paper and added colour by applying Tumbled Glass and Stormy Sky Distress Stains to a large square acrylic block then sprayed on some Dylusions White Linen and spritzed with a little water.  I pressed the paper into it to pick up the colour and you'll see the result below.


I then dry embossed the frame with the Darice snowflake flourish corner, twisting it around to emboss right around the frame. I then swiped Versamark ink over the raised areas and heat embossed it with my favourite Winter embossing powder which is Wow! Puff White. If you look at the pics below you'll see the fabulous snowy effect it gives.


I stamped the woodland scene on a further panel of cartridge paper with VersaFine Smokey Gray ink and added colour with Aquamarkers. I chose colours to make me think of a soft Winter sunset which I always think gives a lovely rosy blush to a snowy landscape. I added touches of Frosted Lace Stickles although you may not be able to see it very well in the pic.
I stamped the cute bunny with the grey ink and coloured him with Aquamarkers and cut him out. I assembled the card as you see adding the bunny and a sentiment from the stamp set stamped with the grey and a little colour added with Aquamarker.

Have a great day and a lovely week.
Hugs,
Fliss xx

I'd like to link this to the Artistic Outpost December Referral Programme which has an open theme though as you can see, I'm still on with the Christmas preparations!

Friday, 6 December 2013

Midwinter For That's Crafty

Hello everyone, I hope you're all managing to survive the current rather nasty and cold weather and my sympathies to anyone affected. Just very cold and wet down here although we have flood warnings along my route to work so fingers are crossed it's OK.
I have another Christmas card to share today over at That's Crafty which was made with the lovely Artistic Outpost Midwinter stamp plate and has quite subtle frosty sparkle. All the details are over on the blog so do please hop on over if you're interested.


Hoping to see you there and that you have a great weekend and stay safe.


Hugs, Fliss xx

I'm also linking this one to the Artistic Outpost December Referral Programme which has an Anything Goes with Artistic Outpost theme.

Monday, 2 December 2013

Christmas Flowers and Foliage

Good evening folks, I'm feeling a bit like a certain white rabbit here! A late post again for the new challenge today over at Make My Monday with your hostess with the mostest being Jacqueline with the theme of
CHRISTMAS FLOWERS AND FOLIAGE

I hope you all had a better weekend than I did as we had a rather traumatic Saturday after a frantic phone call in the early evening from my mother in law as my father in law had collapsed and couldn't get up. My hubby rushed there and to cut a long story involving paramedics and A & E short, my hubby picked him up again after tests just gone midnight and he seems OK although was told to visit his GP today as they couldn't find anything wrong.
Anyway, enough of my troubles and here's my DT inspiration:


Some stamps I've had for ages came out to play here as the background paper was made with a Papermania holly stampinked up on the leaves with Brilliance Pearlescent Olive ink and the berries coloured with a Cranberry Adirondack marker. I stamped this all over and then inked over the top with Crushed Olive Distress ink.
The main poinsettia image is a Hero Arts stamp and was inked with Brilliance Pearlescent Poppy and Olive and stamped on cream paper. I added this to a deep red mat and wrapped some checked ribbon from The Craft Fairy round.
I stamped the Hero Arts sentiment on the same cream paper with Archival Coffee ink (which for some reason looks red here?!) and added it to a deep red mat. I assembled all the elements on a kraft card blank adding a scrap of red poinsettia paper from the Polka Doodles Studio 12 Gingerbread Twist CD as a contrast.

Hoping you all have a good week.
Fliss xx

Friday, 29 November 2013

Santa Robin For That's Crafty

Hello there, I hope you've all had a good week and are looking forward to the weekend like me.
Today's post is to tell you about the project I have for you today over at That's Crafty which features an absolutely adorable little owl by Stampendous.
Here's what I made and you'll find all the details over at the blog.


Isn't he just so cute!

Have a great day and a lovely weekend.
Hugs,
Fliss xx

Tuesday, 26 November 2013

Contemporary Christmas

Hello there, I'm a bit late with my post for the new challenge over at Make My Monday chosen by team mate Jan who would like to see a creation with a Contemporary Christmas theme which means no traditional red, green and gold.
I decided on lilac and blue for my card as I came across some pearly diamond patterned card in my card box that must have been there for nearly 10 years! I'm trying to use up some of my bits so this was ideal for the snowflake design I had in mind.
Here's what I made and I hope you like it as it's very simple compared to my usual creations.


I used 2 Sissix snowflake dies to cut out the large and small snowflakes from the pearly card which has a lovely shimmer to it.
I covered my card blank with some lilac patterned paper from the Polka Doodles Angelberry Christmas CD.
I then used a Hero Arts border stamp to make a border strip with Memento Sweet Plum ink, stamping on white card.
I assembled the card as you see, adding the die cut snowflakes with foam pads for a little dimension.

Sorry for my lack of visiting lately, we've had a very busy time getting my younger daughter ready to move into her London accommodation which finally happened at the weekend and hopefully I will have a bit more time for blogging than I have over the last few weeks.
Hugs,
Fliss xx

Some challenges for my card:
Songbird - Die Another Day (Use One or More Dies on your creation)
Clear It Out - Anything Goes Stash Item: Add A Snowflake
Creative Craft Challenge - Non Traditional Christmas Colours
Use It Tuesdays - Anything Goes With Hoarded Stash (Pearl Card used for snowflakes around 10 years old)

Friday, 22 November 2013

Christmas Pine Wreath Card For That's Crafty

Guess who completely forgot to schedule her post for her project over at That's Crafty today - oops! Must do better next week!
I've been playing with my absolutely amazing new toy which is the Inkadinkado stamping gear kit that I got for my birthday and it really is a truly awesome tool and one to add to your Christmas list as you can create some fabulous shapes with it. My card below uses just one of the four tools in the kit and I can't wait for more time to experiment.


If you'd like to see how I made it pop over to the blog as I have some tips for you too and there's also a link to the video which might just persuade you it's a must have.

Have a great weekend everyone.
Hugs,
Fliss xx

Wednesday, 20 November 2013

More Santa!

Good morning everyone and welcome to my Mid Week Inspiration for our current challenge theme at Make My Monday which this time is a rather inky and glimmery creation which I hope you'll like.


The background paper was made with a panel of watercolour paper which I coloured with Distress Stains in Peacock Feathers, Tumbled Glass and Crushed Olive. I found that if you coat the watercolour paper with water before pressing into the ink stains on a craft sheet the colours spread much more freely. Repeat this step until the paper is covered.
I then embossed the panel with a Darice snowflake swirl corner design, turning the card upside down to emboss the other side. I then brushed the raised areas with Brilliance Galaxy Gold ink wihich gave lots of lovely shimmer.
I stamped the Crafty Individuals Santa collage with VersaFine Smokey Gray ink on to thick, smooth cartridge paper and coloured it with Distress Stains. I cut it out with deckle scissors to leave a border and added it to a red card mat.
I added the background paper to a red card mat and then attached the panel to a white square card blank and finished off with a computer generated greeting on a red mat.

You still have a few days left to enter the challenge and hope to see you there.

Enjoy the rest of your week.
Hugs,
Fliss xx

Monday, 18 November 2013

Santa Galore!

Morning all and hope you all had a good weekend in the rather chilly weather - Winter seems to be firmly setting in now so what better excuse to stay in the warm and do some crafting!
We have a new challenge over at Make My Monday today which has a theme chosen by our former team member Caz and having realised we'd all be madly trying to get those Christmas cards done now she picked:
Santa - The Big Guy

I had to go digital for my inspiration as I've got blocked sinuses at the moment and due to running eyes over part of the weekend couldn't wear my contact lenses so any colouring would look decidedly squiffy!


I've used some of the gorgeous Santa toppers from the Magical Winter CD by Polka Doodles which I combined with plaid paper and sentiments from the newest A Home For Christmas CD.
The hessian look paper I created myself using Photoshop Elements after scanning some fabric. It was very easy to do as I was able to adjust the colour slightly and create an A4 sheet to print out. I've added a Freebie page to the blog in case anyone would like it.
I also created the silvery matting layer on the second card with a cheat method which saves using up loads of precious glitter card. All you do is cut a piece of card wider than the card you need a mat for then rub silver pigment ink along the long edges (I used silver Encore Ultimate Metallic) and then heat emboss it with crystal embossing powder. This gives a subtle sparkle which is very elegant.
Lots of inking of edges before assembling and colouring of the sentiment panels with Promarkers - about the most I could manage!

Have a great day and a good week.
Hugs,
Fliss xx

Friday, 15 November 2013

Floribunda For That's Crafty

Good morning everyone, I hope you've all had a lovely week and are looking forward to the weekend as I am as I've been really busy yet again with work and family stuff.
Today's post is to tell you about the project I have today over at That's Crafty which is a rather shabby, vintage style card on a floral theme.


You'll find all of the details over at the blog and I hope you'll hop over to see how it came about.

Have a great weekend.
Hugs,
Fliss xx

Monday, 11 November 2013

Christmas Gift Bag

Good morning everyone, I hope you had a lovely weekend despite the somewhat chilly weather which I have to say was perfect for staying in the warm and doing a bit of crafting.
Here's one of my makes which is for the new challenge we have for you today over at Make My Monday and your hostess this week is Laura who would like to see:

Anything But A Card - Christmas Style


I decided to make a start on my gift bags as it's lovely to be able to personalise your packaging especially when you can pick up packs of kraft bags in different sizes incredibly cheaply - I got a pack of 5 for just £1 - amazing!
I added a panel to the front of the bag of text paper from the Polka Doodles Here Comes Christmas CD to which I added faux stitching made with the Tim Holtz ruler and a brown fine pen.
I made the snowflakes with a Sizzix die, cutting them from a piece of pink and blue flourish paper from my bits box. I covered them with Versamark ink and heat embossed them with Crystal powder for some sparkle.
I made a matching tag by covering a circle with the pink text paper and adding the remaining snowflake. I punched a hole at the top and tied some lace through to add a feminine touch.

Have a great day and a lovely week.
Hugs, Fliss xx

I'd like to enter my gift set in the following challenges:

2 Sisters Challenge - Christmas Sparkle
Crafty Calendar November Challenge - All Things Christmas
Crafts 4 Eternity - Anything But A Card

Friday, 8 November 2013

Steampunk Christmas Baubles At That's Crafty

Hello there everyone, hope you've all had a good week. Today I'll be winging my way up to Kingston for my daughter's graduation - she gained a first in her fashion degree and now has a job working as a print designer for a small but fast growing London Fashion company. She's having to commute at the moment as it seems that finding a flat share is as hard as getting a job these days!
I have a post today over at That's Crafty and there's a sneak peek below of my rather quirky steampunk creation which I hope you'll hop on over to see properly.


Have a great day and a lovely weekend.
Hugs,
Fliss xx

Wednesday, 6 November 2013

More Autumn Flowers!

Hello there, I have some more inspiration for the current Autumn Flowers challenge at Make My Monday to share with you with a card that is a little simpler than my last one shown on Monday.


The background here is made very simply by inking up a small square acrylic block with Dried Marigold and Crushed Olive Distress inks to make a check style paper and I ten punched 3 of the corners with a daisy corner rounder punch.
The daisies by Hobby Art were stamped with sepia ink and coloured with Promarkers and pencils. I then cut them out and added them to a small round doily.
I stamped the sentiment (also Hobby Art) directly on the background paper with the sepia ink and added all the elements to the card blank.

There you have it - simples!
Hugs,
Fliss xx

Monday, 4 November 2013

Autumn Flowers

Good morning everyone and I hope you all had a lovely weekend. Mine was quite busy as it was my birthday yesterday so we went out for lunch and had family round for tea and cake later on. Lots of lovely pressies too!
Today's post is to tell you about the new challenge today over at Make My Monday with a theme chosen by your truly of Autumn Flowers as I really love chrysanthemums and other Autumn florals. Here's my inspiration:


I've used a favourite flower stamp by Circa Design which I stamped with VersaFine Olympia Green and heat embossed with clear powder. I then coloured the image with Promarkers. I die cut it into an oval panel with a Papermania die.
The flourish background paper was made by stamping the flourishes with Versamark ink and heat embossing with pearl green powder. I then sponged on Wild Honey and Dried Marigold Distress inks.
The green panel is Canson Mi-Teintes paper dry embossed with a floral trellis folder.
I assembled the card as you see, adding vintage linen lace and a sentiment panel with and embossed mat using scraps of leftover paper.

I hope you can enter as I'd love to see you there.
Have a great week.
Hugs, Fliss xx

Friday, 1 November 2013

Little Red Robin

A very quick and somewhat late post from me about my project today over at That's Crafty which is a Christmas card as being November now I needed to add more to the very slowly growing card heap.


If you hop on over to the blog you'll see how I made it and you might want to click on the pic to get the full effect of the grungy and crunchy background I made.

Have a fab weekend all.
Hugs,
Fliss xx

Monday, 28 October 2013

Infinite Possibilty

Hello there folks and first up is a very big apology for being such a bad blogger lately and for my lack of visiting. This is because life has been really hectic the last few weeks with work full time and family stuff taking up the spare time leaving me very little time for anything but much needed sleep!
We have a new challenge for you over at Make My Monday today chosen by Suzi B and it's a theme dear to my heart:
Steampunk

I really enjoyed making my card and I hope you like it.


I decided on rich browns and teal for the card inspired by the rather sassy lady from Creative Expressions Steampunk Sirens stamp set. I stamped her with VersaFine Smokey Gray ink on thick, smooth cartridge paper which is my paper of choice for painting with Aquamarkers or Distress Stains. In this case I used Aquamarkers and then trimmed the image to a panel and inked the edges with blue and green.
I then embossed a card panel with the Papermania Tri-boss Chronology folder and inked it with Wild Honey, Brushed Corduroy and Walnut Stain Distress inks. I embossed a kraft card panel with the Cuttlebug cogs folder and cut this down to fit my card blank.
I inked some Maya Road chipboard cogs with VersaColor inks and added a metal Papermania cog to the centre of the larger one.
I added all the elements to the card and finished off with some text from the stamp set which I cut up because I couldn't bear to cover up the background!

I hope you all have a great week and aren't suffering to much in the extreme winds we're having at the moment.
Hugs, Fliss xx

Friday, 25 October 2013

Vintage Beauty

Hello folks, I hope you've had a good week despite the rather iffy weather. I've been really busy with work again so roll on the weekend!
I'm here today to tell you about the project I have over at That's Crafty which was actually meant to be last week's but things went rather pear shaped and I didn't get it finished in time - oops!


I can't tell you how much I loved making this card - don't you just love that absolutely gorgeous pansy border! I couldn't resist the set when I saw it as I adore pansies.

If you'd like to see how I made and a list of the materials and stamps, do hop on over to the blog.

Have a great day and a lovely weekend.
Hugs,
Fliss xx

Monday, 21 October 2013

Time To Get Spooky!

Hello there and hope you had a better weekend than mine, well some of it was good (lunch out with friends on Saturday) but yesterday was not as I spent most of the day doing laundry and trawling the internet for information on ovens and hobs as the main oven part of my cooker has decided to stop working and as it's around 20 years old will be difficult and expensive to fix so I'm having to decide what I want which is not as easy as it might sound!
And now to the reason for the post which is to tell you about the new challenge today over at Make My Monday which has the theme of Halloween as the spooky day is fast approaching.
Here's my inspiration which unusually for me has no stamping!


I don't have much in the way of Halloween stamps and found the lovely vintage collage pic on the internet. I simply re-sized it and then inked the edges with Black Soot Distress ink.
I covered my card blank with some Polka Doodles Halloween paper having first inked the edges of the card and the paper with the black Distress ink. I printed out some mushrooms from the Polka Doodles Bonbon Belles CD in different sizes and cut these out then inked the edges a little.
I then die cut the Tim Holtz bird cage and bird from black card and assembled my collage card as you see, adding some elements with foam tape for dimension.

Have a great day.
Hugs, Fliss xx

Tuesday, 15 October 2013

Sitting Pretty

Hello there, I'm here today with my rather late inspiration for the current challenge theme over at Fashionable Stamping Challenges which is to use a Stencil or Mask and I didn't want to miss this as I love using stencils at the moment.
A bit of serendipity struck here too so read on to find out how.


The background paper for my card was made by sponging a piece of thick, smooth cartridge paper with Tattered Rose Distress ink and if you're wondering why it looks orange, this is where the serendipity came in because the sponge I used had some Spiced Marmalade left on it and adding the Tattered Rose ink re-activated it causing an orange tinge which was a big surprise but I decided I like it!
I then used my favourite Prima flourish stencil to add the pattern with Spiced Marmalade and Victorian Velvet Distress inks.
I die cut the frame from the cartridge paper and stamped on the lovely Flonzcraft seated Gibson Lady with Archival Coffee ink and coloured her with markers. I then inked around the frame edges and image to soften the look.
I stamped the Flonzcraft rose with the coffee ink and coloured with markers then cut it out. I added this to the card with the frame and stamped the Flonzcraft text on with the coffee ink.

Have a great day and see you again soon.
Hugs, Fliss xx

Monday, 14 October 2013

Belissima

Hello there and hope you all had a lovely weekend. Mine was a bit of a mixed bag weather wise as Saturday was lovely and my hubby and I went to the warehouse sale where I picked up a couple of bargains (not as many as I hoped as most of the things I liked were the wrong size of course!) and we had coffee at Arundel before returning home.
Sunday was very wet and nasty so the perfect day for crafting although I didn't do as much as I wanted as I had quite a pile of washing to get through!
Today sees a new challenge over at Make My Monday and the theme this week chosen by Rosie is Texture, something you know I love and here's my inspiration.


My lilac backing paper is parchment card which I embossed with the Couture Creations Breeze folder and inked the edges with heliotrope and purple ink.
I made the frame with pale green card and a totally gorgeous Tattered Lace die. I stamped the image (Scrollswork) with Imperial Purple VersaFine ink then coloured her with Spectrum Noir and Copic pens and cut her out.
I added the backing paper and frame to the card blank and then tucked the image inside the frame, embellishing simply with tiny pearls.
As a finishing touch I stamped the belissima text from a Flonzcraft sentiments set.

Have a great day.
Hugs, Fliss xx

Friday, 11 October 2013

All You Need Is Love

Hello there folks and hope you've all had a good week. Mine has been extremely busy again with work and family stuff so hardly any blogging and crafting apart from DT stuff at the moment. I do have things coming up at the weekend though as tomorrow I'm off to a Crew clothing warehouse sale with my hubby as he loves their stuff and I do although I cringe at the prices so I hope they have some bargains.
Today's post is to let you know about my project over at That's Crafty which is a CAS card as I decided to challenge myself to do one again.


As you can see, unusually for me there's a lot of white space! If you'd like to see the how I made it and what I used, please head on over to the blog.

Have a great day whatever you're doing and a lovely weekend too.
Hugs, Fliss xx

Monday, 7 October 2013

A Little Elegance

Hello there everyone and hope that you all had a good weekend. I'm here today with my inspiration for the new challenge over at Make My Monday with the theme chosen by hostess Suzi B being Elegant Ladies
My card has a little of the ooh la la about it as it features my favourite B Line Designs stamps of a rather elegant French mademoiselle.


Sorry about the pic, it's a bit blurry as my camera didn't like the light. I covered my card blank with some rather pretty paper from a Debbi Moore Shabby Chic CD.
I stamped the Le Brun image with Memories Artprint Brown ink on cream card and coloured her with Copics and Promarkers. I then cut her out and added her to a kraft card mat made with a Papermania die and place a dusky pink mat behind.
I finished off with a butterfly that I found via the ever wonderful Pinterest (if you'd like to see the whole sheet just click on the link on my sidebar and go to my printables board where you'll find the link).

Have a great day and a good week.
Hugs, Fliss xx

Friday, 4 October 2013

Tangerine Dream

Hello there everyone and first up is an apology for my lack of commenting recently which is partly because my younger daughter who's been interning in London phoned me excitedly last Tuesday to say that she's now been offered a job there starting on 1st November so the accommodation hunting is now in full swing.
I'm also really busy on the work front at the moment which means a distinct lack of me time and has cut down on my blogging too apart from my DT duties so I'm so sorry and hoping for more free time soon.
Today's post is to let you know about the project I have today over at That's Crafty which is one where you might need your sunglasses as I decided on something bright and cheery due to the current rather dreary weather.


You'll find the details as always over at the blog and I hope you'll pop on over to see how it came about as it's quite simple to make.
Have a great day and a fab weekend.
Hugs,
Fliss xx

Wednesday, 2 October 2013

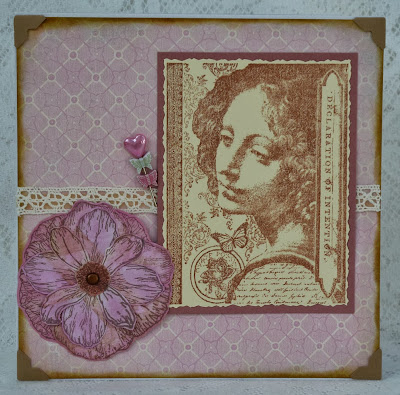
Pretty In Pink, Sepia and Cream

Hello there folks, a slightly belated midweek motivation post here for my Vintage Style challenge over at Make My Monday this week as I forgot to take a photo yesterday and the light today went from dull and drizzly to brilliant sunshine (neither of which are liked by my camera) in a short space of time!
For this card I've gone for pink with my sepia and cream to make a very feminine creation. Without further ado, here it is!


I've used an old favourite Rubber Stampede image stamped with sepia ink on cream card and trimmed with deckle edged scissors. I added this to a mat of dusky pink card.
I covered my card blank with some pretty paper by Melissa Frances that came free with a magazine a while back, having inked the edges with Vintage Photo Distress ink and adding Paperchase kraft paper photo corners before sticking on.
I made the floral decoration by stamping a Papermania layered decoupage wild rose image on pink paper and cut out the pieces, layereing up with a copper brad and inking a little with Victorian Velvet Distress ink.
I added some cream crochet lace to the card, then sticking on the image panel and flower, finishing off with a heart stick pink with some butterflies added.

See you again soon and hope this will encourage some more entries.
Hugs,
Fliss xx

Monday, 30 September 2013

Autumn Glory

Hello there, I'm back again today with a short post and my belated inspiration for the latest Fashionable Stamping Challenges theme chosen by Avril which is my absolute favourite colours being an Autumn born girl so I couldn't miss out on doing something with Autumn Colours.

Here's my card and I hope you like it as much as I enjoyed creating it:


It came about after a little trawl through my bits and pieces box where I came across a piece of watercolour paper stamped with a Hero Arts flower using Spiced Marmalade, Rusty Hinge and Aged Mahogany Distress inks. As it was cream, I sponged on Mustard Seed and Wild Honey DIs for a lovely warm glow.
I then embossed a panel of kraft card with a Darice Autumn leaves folder and swiped Versacolor Paprika over the raised areas. I added this to the paper panel then tied round some rusty gingham ribbon before sticking to the card.
I added some leaves which had been stamped by adding Distress re-inkers to a paper towel to make an ink pad. I cut these out to leave a narrow border and added them with foam tape for dimension.
I finished off with some text in a metal frame I've had for rather a long time! A Junkitz Tim Holtz set in antique copper.

See you again soon.
Hugs, Fliss xx

Some challenges for my card:
Come And Get It Challenges - Fall Colour Challenge
Dream Valley Challenges - Autumn
Pile It On - Leaves
Rogue Redhead Challenges - Autumn Colours

Vintage At Make My Monday

Good morning folks and welcome to my post for this week's challenge over at Make My Monday with a theme chosen by yours truly:

Vintage With Sepia And Cream Plus Optional Pink And /Or Blue

Here's my inspiration which I hope you like:


I've chosen to use one of my favourite Crafty Individuals vintage images which I stamped with Coffee Archival ink and coloured with Promarkers then trimmed to leave a narrow cream border.
I stamped a Viva Decor flourish on a scrap of cream card with the same ink and added this to a kraft card blank along with a blue panel embossed with a Crafts Too folder.
I inked a doily with Versacolor Smoke Blue ink and added this to the card with the image panel together with the B Line Designs text stamped on cream with the coffee ink and some cream and brown lace.

I look forward to seeing all your entries and for some more inspiration hop on over to the blog where the Design Team have some fabulous creations for you.

Have a great day.
Hugs, Fliss xx

Some challenges for my card:
2 Sisters - Anything Goes
A Creative Romance - Fairytale or Winged Creations
Crafts 4 Eternity Recipe Challenge - Anything Goes
Stampin' For The Weekend - Fairies and Fantasy

Friday, 27 September 2013

Little Bird Book Tags For That's Crafty

Hello everyone, sorry it's taken me so long to get back to blogging and many thanks go to those who left me good wishes for my recent holiday which I really do appreciate.
We had a lovely if rather wet time away (not really a surprise in the Lake District!) and had to buy some waterproof trousers on the second day to avoid soaking wet jeans. I'm also now the proud owner of a very pricy Barbour waxed hat as I got fed up with my hood falling in my eyes!
Apologies here for my lack of commenting and also for my non contributing to this week's Polka Doodles challenge for the first time in ages as I had the most terrible headache which took ages to clear and I didn't feel much like crafting. I'll try and make up for it next week.

This is rather a late post with my project for this week for That's Crafty which is a duo of tag style bookmarks and I hope you'll pop on over for the details on how I made them.


I'll be round soon to visit over the weekend and in the meantime, have a great one!

Hugs, Fliss xx

Monday, 16 September 2013

Swirls and Pearls

Hi there, I'm hoping this post will pop up as scheduled as I'm currently on my hols in the Lake District and I'm also hoping for some fine weather!
This week at Make My Monday, the challenge theme is Swirls and Pearls and I opted to ink up one of my favourite stamps, my Audrey Hepburn image by B Line Designs.


I made the background paper by lightly inking card with Shabby Shutters Distress ink and then stamping on a Viva Decor flourish image with Crushed Olive Distress ink.
I stamped the Audrey image with Memories Artprint Brown ink on cream card and added a little colour with pencils then die cut into a circle and added to an olive green scalloped mat.
I then added a pink die cut doily (Papermania die) and pearls.
I finished off with a stamped sentiment.

See you next week!
Hugs,
Fliss xx

Friday, 13 September 2013

One For The Boys

Hello again, my second post of the day is to tell you about the new challenge we have for you today over at Polka Doodles and it will be my last post for a bit, apart from a scheduled one next week as we're off to the Lake District tomorrow for a well earned break.
The challenge over at Polka Doodles is to make something for the men and boys in your life and I decided on a Christmas card as we have several male family members on their own so I need to make some cards to appeal to them and what else could I choose but my favourite snowman! The image and all the other elements are from the Here Comes Christmas CD.


I printed out the snowman on to cartridge paper and coloured him with Aquamarkers. The woolly look to his scarf is made by adding wiggly lines of colour in a stripe pattern and it results in a quite fluffy look.
I added the image panel to a red mat and partially covered the card blank with some of the gorgeous snowflake paper from the CD.
I printed my sentiment sheet out on to another piece of snowflake paper in a different colour and cut out the one I wanted, adding it to a mat of red card.

Have a great day and a lovely weekend.
Hugs,
Fliss xx

Who's Watching You Now?

Good morning folks, I hope you've all had a good week and aren't suffering from too much bad weather. It has rained here some of the time but the weather can't seem to make its mind up if it's going to be chilly or warm as we've had a mix of both.
This is my first post of the day to tell you about the project I have today over at That's Crafty which is rather bright and graphic in design as I've been playing with misting inks and a fab stencil. Hope you want to find out what I did and if so, please do head on over to the blog.


I'll see you again in a while as I have another post coming up a bit later on today, I know - busy, busy!

Hugs, Fliss xx

Monday, 9 September 2013

Whispering Grass

Good morning everyone, I hope you all had a lovely weekend. Mine was rather busy as I went to an open house rather posh do on Saturday with my hubby which was held by one of his clients for whom he's dealt with the renovation of a manor house. There have been huge problems and it's taken ages but the end result is really stunning and I was in raptures over some of the plaster mouldings which were amazing circular flourishes.
Yesterday we celebrated with my mother in law as it was her birthday so we had a family afternoon with tea and cake.
Today we have a new challenge for you over at Make My Monday and this week the theme has been chosen by Rosie who has challenged us to:
Create A Scene
It will be no surprise to hear that I've gone for a nature themed card again as I wanted to ink up my Inkylicious grasses stamp. I hope you like it.


As you can see it's quite a simple design and the grasses panel was made with a scrap of watercolour paper which was the exact size for the kraft card blank.
I sponged the paper with Crushed Olive Distress ink on the bottom half and Milled Lavender on the top.
I stamped the grasses on with VersaFine Spanish Moss ink and Seedless Preserves Distress ink,  Some of the stamping was second generation as I was aiming for a misty look in the background. I also added some stamping with the stamp upside down to add a bit more detail at the base.
The butterflies are from the ever useful Crafty Individuals Elements set CI-231 and were stamped with Memento Sweet Plum, VersaFine Spanish Moss and Olympia Green. I then coloured them with Aquamarkers, cut them out and added them with foam pads.

Have a great day.
Hugs, Fliss xx

Sunday, 8 September 2013

Can U Resist?

Well, can you folks lol. I hope you're enjoying the weekend so far and I'm here today with news of the new challenge today over at Fashionable Stamping Challenges with the theme chosen by yours truly with is
Can U Resist?
So it's time to try out those resist techniques and the one I have to share for my inspiration is a little bit different. It gives a very grungy result which I hope you like so please do tell me what you think.


You might need to click on the pic to see the effect properly as it's quite hard to see in the smaller photo here.
The background paper was made by stamping one of my favourite Viva Decor flourish stamps with embossing ink on thick linen textured card and heat embossing the images with clear powder.
I then rubbed green, brown and orange wax crayons over the embossed areas which picked up some but not all of the colour. I next sponged on Wild Honey and Spiced Marmalade Distress inks and you can see the resist effect in the photo. I rubbed a paper towel gently over the top to remove any excess ink.
I stamped the image from Paperbag Studios on watercolour paper with Archival coffee ink and coloured it lightly with Aquamarkers then trimmed close to the edge, leaving a narrow border.
I added the resist panel to a kraft card blank which was embossed on the right side with a Cuttlebug border embossing folder, wrapping a piece of coffee coloured lace round. I then added the image panel and some flowers, mesh leaves and ribbon to embellish the card.

The Fashionettes have some fabulous inspiration waiting for you on the catwalk and I hope you'll pop over for a look. I hope we'll see you entering the challenge too and please remember that we are a stamping challenge and that there must be stamping on your project to be eligible for the prize.
Our sponsor as always as the lovely Leo of Flonzcraft whose online store has lots of fabulous vintage images.

Have a great day.
Hugs, Fliss xx

Some challenges for my card:
Simply Create Too - Vintage
Stempelsonnen Challenge - Orange, Green, Brown
4 Krafty Girlz - Anything Goes
Happy Campers - Use A Stamp

Friday, 6 September 2013

Butterfly Watching For That's Crafty

Good morning everyone and hope you've all had a good week so far. Mine as usual has been busy with work but I have a card to share today which is my DT project for That's Crafty this week and is for my mother in law's birthday on Sunday.
Jean loves rabbits as they had them when my hubby and his brother were growing up and she often pops round to see our own 2 little grey Netherland Dwarf bunnies, Rosie and Dill, so what else could I put on her card but the 2 cute and quirky Alice Palace Designs bunnies for Crafty Individuals.


You'll find all the instructions over at the blog together with the materials list and hope you'll pay a visit as there are loads of fab tutorials to feast your eyes on.

Have a great day and a lovely weekend.
Hugs, Fliss xx

Monday, 2 September 2013

Childhood Memories

Good morning folks, I hope you all had a lovely weekend and it's Monday again so we have a new challenge for you over at Make My Monday which this week has the theme of Childhood Memories.
In my case I thought of my treasured teddies and it gave me the chance to ink up again a stamp I must have had for around 10 years and can't bear (no pun intended!) to part with. I hope you like what I made.


I think you can probably see why I love this cute ted as he looks so cuddly. I stamped him on kraft card with coffee Archival ink and added just a little colour with Luminance pencils. I find that because they're highly pigmented, they show up really well on kraft card. I trimmed the card to a panel and inked round the edges a little.
I made the background paper by using ink daubers to apply Distress inks to hammer card. I used Stormy Sky, Victorian Velvet, Wild Honey, Frayed Burlap and Milled Lavender. I inked the edges with the blue ink and added the paper to a kraft card blank.
I then die cut the pink panel using a Marianne die and as the card was quite thick I found that it didn't quite cut out all the sections but I do quite like the effect.
I finished off with braid, flowers, pearls and a button.

Have a great day.
Hugs,
Fliss xx

Friday, 30 August 2013

Fairy Time

I'm back with my second post of the day which is to tell you about the new challenge we have for you today over at Polka Doodles which has the theme of Fairy Time and we had an extra challenge between ourselves to include 2 fairies or angels on our inspiration piece.
Nikky also has a big surprise for everyone as she's offering a free Angelberry digi to anyone who emails in up until 5 September - don't miss out!
We also have 2 lovely new Design Team members with us this week so I'd like to say welcome to Rebekah and Zoe (known as Zo) here. They've both made a totally gorgeous inspiration piece for your delight.
For my challenge project I decided to make a mobile suitable for a little girl's room as it's double sided and has a different fairy on each side. All the elements came from the Bonbon Belles CD.


I chose 2 of the beautiful floral wreaths from the CD on to hammer card and cut them out. I added them to some circles of lilac pearl card which I made by cutting round a plate as my dies were too small!
I then printed out my 2 favourite fairies and had to use the pre-coloured images as I'm really short on time at the moment. Due to Nikky's fab digital colouring they look like I coloured them myself (or would if I could actually colour that well!) so sssh - don't tell Nikky!
I cut the fairies out and added them to the circles with foam tape, bending and shaping the images first.
I then glued the circles together with some chiffon ribbon between to form the hanger and added some paper roses at the top. I finished off with a scattering of bling and pearls.

Have a great day and a lovely weekend.
Hugs,
Fliss xx

Elizabeth's Garden For That's Crafty

Hello everyone, this is my first post of the day which is to tell you about my project today over at That's Crafty which is a wall hanging with a difference.
Here's a sneak peek but you'll need to hop on over to see the whole thing and how I made it:


I'll be back in a bit with post number two!
See you!
Fliss xx

Monday, 26 August 2013

Someday I'll Fly Away

Good morning folks, hoping you're all still having a good weekend if you live in the UK and I'm back today with news of the new challenge over at Make My Monday today chosen by Jan which has the theme of
Anything But A Card

I decided on another canvas although this one is a canvas board as I find them easier to work with when I want to stamp.


I was inspired to create my canvas by an article in the latest issue of Scrap 365 magazine as I love seeing new ways to use up those scraps of paper from my bits box. Here's what I used for my canvas:


I first covered the 5x7 canvas with a copy of a vintage French construction catalogue which I picked up on my recent visit to Eastbourne. I then cut strips of the decorated paper scraps (made with various techniques including stamping, stenciling and inking by pressing through my Cuttlebug) from my bits box and glued them on with Ranger Glue n Seal. I then brushed Gesso over the top, wiping with a baby wipe to soften the effect and then used the wipe to apply some Crushed Olive and Vintage Photo Distress ink.  


I stamped Addison (Paper Bag Studios) twice with Memories black ink on smooth white card and coloured the wings on one image with a red Promarker. I cut out the whole image from this one and the little boy from the other, layering them up with clear adhesive squares.


I stamped the Arty image (Kaisercraft) with Crushed Olive Distress ink randomly on the canvas and then used a jar lid and Vintage Photo to add circles. I stamped Imagine (Inkylicious) with the Memories black ink directly on the canvas and then added the little boy. I punched out a few circles from my larger grungy dot background (made by stamping with a cork) and inked the edges with Barn Door before adding them to the canvas.

The Design Team has made fabulous and varied creations to inspire you so do hop over for a peek.

Have a lovely day.
Hugs, Fliss xx

Some challenges for my canvas:
Addicted To Stamps Challenge - Shabby/Vintage
Creative Inspirations Paint - Anything Goes
Hobbycutz - Create Your Own Background (All my scraps are papers made by me)
Stamping Sensations - Wings and Things and a Touch of Vintage
Our Creative Corner - Words, Words, Words