Hi there, I'm here with the details on how I made the pretty lacy look background for my Polka Doodles challenge card this week.
As
I really love stamping, what else could I do to make my background and
it's really easy when you know how so now's the time to grab a cuppa and
read on.
Step 1
It's
best to use watercolour paper for this technique as you need something
sturdy that won't buckle. Cut a piece that will fit your chosen card
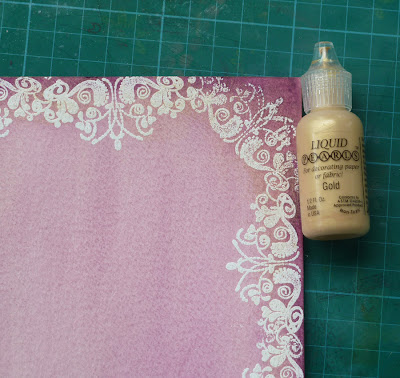
blank. The lovely flourish stamp I've used is my favourite from the
Daisy Doodle stamp set and I've used Ranger Distress Embossing Ink as it
stays wet for a long time. My paper is 8x8 and I stamped the image in
the corners first then twice in between and heat embossed the images
with the white detail powder. If you want to make a smaller card such as
6x6, you'll probably need to stamp just once between the corners. I've
added a bit of colour from the next step so you can see the embossing.
Step 2
Using
a craft sheet (or a plastic clipboard as I do), apply a large patch of
Victorian Velvet Distress ink and spray with a little water. Using a
fairly large paint brush, add a wash all over the over the top of the
embossing which will resist the colour.
Step 3
Deepen
the colour by applying a further wash of Seedless Preserves Distress
ink diluted with water spray as before and then add extra colour to the
corners by picking up ink direct from the ink pad with a damp brush.
Step 4
Once
the paper has dried, you can then give it some shimmer by applying gold
liquid pearls over the embossed area using your finger. Just dab on
gently and try not to rub too much. It gives a lovely soft sheen to the
embossing and softens the colour a little too.
Step 5
To
finish the paper off for my card, I added a little extra embossing
across the centre using the same stamp and the gold pearl as I found
that the lacy effect of the paper looked better without any added
embellishing and hope you agree.
Enjoy!
Fliss xx
Friday, 5 July 2013
Subscribe to:
Post Comments (Atom)


.JPG)


6 comments:
Lovely to see the steps towards your oh-so-pretty background, Fliss!
Alison x
Lovely work! Valerie
Stunning work Fliss - a gorgeous border - Jacqueline xx
Such a beautiful border Fliss! Delicate and feminine. The clipboard is a great idea.
Dot x
Fabulous background and lovely card
Rosie x
Your card is beautiful Fliss. I love the background you created. Thank you for sharing the steps.
Post a Comment