Here I am again with details of the new challenge over at Polka Doodles which is to create something inspired by April Showers.
I immediately thought of the sweet image by Emma Canning called Rainy Days which you can buy on her own or as part of the new Digi Stamp Heaven CD which has loads of Emma's images and sentiments.
Here's my card:
I printed the image out on to thick, smooth cartridge paper and coloured her with a mix of Aquamarkers and pencils. I die cut the image to an oval, added faux stitching round the outside with a pokey tool and brown fine liner then inked round with a brown ink pad.
I covered the card with brown pinstripe paper and then added panels of blue paper with faux stitching added. I finished off with a die cut sentiment treated in the same way as the image panel and a paper flower with a faux button centre (Studio 12 Picknix Collection 1 CD).
This is the last of my posts scheduled to pop up whilst I'm away and I'll see you all tomorrow.
Hugs, Fliss xx
Friday, 12 April 2013
Tres Chic For That's Crafty
Hello again everyone, today's my turn to post over at That's Crafty and I've been playing with my Prima doll stamp again, this time to make a tag. I've used Promarkers, as frankly I need the practice and colours that are quite muted and eerily similar to those in my wardrobe at the moment!
Here's what I created:
If you'd like to see what I used and how I made it, then please hop on over to the blog and you'll find everything you need there.
Have a great day and back shortly with another post - I know, busy, busy!
Hugs, Fliss xx
Here's what I created:
If you'd like to see what I used and how I made it, then please hop on over to the blog and you'll find everything you need there.
Have a great day and back shortly with another post - I know, busy, busy!
Hugs, Fliss xx
Labels:
Cute,
Prima,
Promarkers,
Tags,
That's Crafty
Wednesday, 10 April 2013
Mid Week Motivation For Make My Monday
Hello folks, another scheduled post here which I hope has popped up as it should. It's to tell you about my Mid Week Motivation post over at Make My Monday for the current challenge with my theme of Create Your Own Background.
Here's the card I made and if you'd like to see how I made the background for it, please hop over to the challenge blog and you'll find a tutorial with all the details. It's really easy to make when you know how, I promise!
Hope to see you there!
Hugs, Fliss xx
Here's the card I made and if you'd like to see how I made the background for it, please hop over to the challenge blog and you'll find a tutorial with all the details. It's really easy to make when you know how, I promise!
Hope to see you there!
Hugs, Fliss xx
Monday, 8 April 2013
Springtime In Paris
Good morning folks, hope you all had a lovely weekend and with the sunshine we had here. Still very chilly but lovely and bright so I can't complain.
This post is popping up as we're on our way to Bournemouth for a few days with our in laws, something that has been a family tradition around Easter time for a while now, although this is the first without our girls so it will be a bit strange!
Today sees the start of a new challenge at Make My Monday and as I chose the theme it's to do my favourite thing (well, you know me!) Create Your Own Background so no patterned papers, just something you did yourself.
Here's my rather floral creation (still dreaming of Spring):
The floral background paper here was made by simply spraying cream card with gold Glimmer Mist and then stamping on the flower (Time To Stamp) with Victorian Velvet and Crushed Olive Distess inks.
I made a panel with green pastel paper embossing with a Darice long folder with butterflies and swirls.
I stamped the Stampendous image on cream card and inked with Crushed Olive, Victorian Velvet and Vintage Photo Distress inks and then added colour to the flowers with Promarkers and pencils. I trimmed the image panel and added to a deep pink mat.
I assembled the card as you see, adding some Spring flowers to embellish.
I hope you enter the challenge and if you're stuck for background ideas, if you click on the Tutorial page at the top of my blog, you might find a technique to inspire you.
Hugs, Fliss xx
Labels:
Darice,
Distress Inks,
Make My Monday,
Stampendous
Sunday, 7 April 2013
Art Journaling At FSC
Hello folks, hope you're all having a lovely weekend so far. We actually have some sunshine for the second day in a row and it's not quite so chilly today. I'm hoping this keeps up as today is the last day before a short family break. We're all off to Bournemouth for a few days with the in laws so the next few days will be scheduled posts which I hope will pop up as planned.
Today sees the start of a new challenge over at Fashionable Stamping Challenges and it's been quite a challenge for me as Ellie picked something I've never done before, Art Journaling, and it took me a while to pluck up the courage to start something.
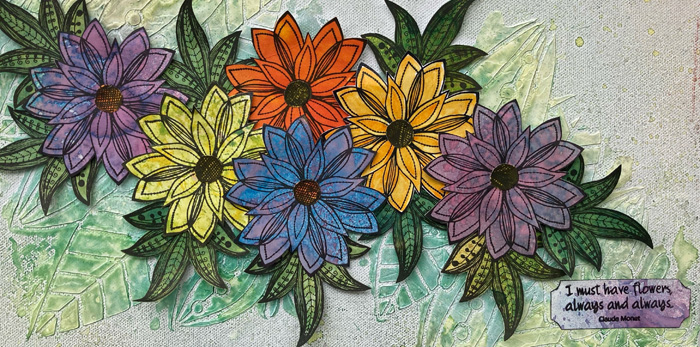
In the end, I decided to start a journal to show what inspires me as the ladies on my classes and my crafty friends often ask me where my inspiration comes from and it's very difficult to explain the way my brain works lol. My first page includes some of the elements that set my creative juices flowing and you'll have to let me know what you think.
I've created my page on an A4 sheet of watercolour paper because I couldn't find a journal with strong enough pages so will be binding my pages together when I have enough.
I made the background with Distress Stains - Crushed Olive, Shabby Shutters, Mustard Seed, Squeezed Lemonade, Tattered Rose and Victorian Velvet. I then stamped on the wild flowers (Artifacts by The Stamp Bug) with Crushed Olive, Peeled Paint and Wild Honey Distress inks.
I added a border round the edge with Vintage Photo (Andy Skinner Batik Garden). I then stamped the butterfly from the set with Archival Coffee ink together with some of the butterflies from the Crafty Individuals Elements set CI - 231. I coloured the large butterfly with Spiced Marmalade DI and then cut them all out.
I stamped the background stamp from the Batik set with Worn Lipstick and Vintage Photo DIs then coloured it with Victorian Velvet. I trimmed the image, distressed the edges and inked them with the Vintage Photo.
I stamped the text from the set with the coffee ink, tore this out and distressed the edges further. I die cut a doily (Papermania) from some Craftwork Cards kraft printed paper and assembled everything as you see, distressing the edges of the page.
As you can see, I couldn't resist some layering on the page, although it isn't heavy so should hopefully be Ok when I finally assemble the pages (when I've done them, that is!)
We have a fantastic guest designer with us for this challenge, the amazing Kate Crane, whose journaling I'm sure you're familiar with. The Fashionettes have also risen to the challenge with some gorgeous creations so do hop over for a look.
As always, our sponsor, the lovely Leo of Flonzcraft, is offering a fabulous $20 voucher to his online shop so do enter if you can.
A hello from me here to my lovely new followers and thanks for deciding to be here.
I'll be back next Saturday hopefully renewed from the break and I know I'll be raring to create again!
Before I go, I would like to say a huge thanks to the team at Stamping Sensations as I found out on Friday that I won the March challenge with a prize of rather a lot of fantastic Crafty Individuals stamps and did a happy dance when I saw this. Thanks ladies!
Hugs,
Fliss xx
Today sees the start of a new challenge over at Fashionable Stamping Challenges and it's been quite a challenge for me as Ellie picked something I've never done before, Art Journaling, and it took me a while to pluck up the courage to start something.
In the end, I decided to start a journal to show what inspires me as the ladies on my classes and my crafty friends often ask me where my inspiration comes from and it's very difficult to explain the way my brain works lol. My first page includes some of the elements that set my creative juices flowing and you'll have to let me know what you think.
I've created my page on an A4 sheet of watercolour paper because I couldn't find a journal with strong enough pages so will be binding my pages together when I have enough.
I made the background with Distress Stains - Crushed Olive, Shabby Shutters, Mustard Seed, Squeezed Lemonade, Tattered Rose and Victorian Velvet. I then stamped on the wild flowers (Artifacts by The Stamp Bug) with Crushed Olive, Peeled Paint and Wild Honey Distress inks.
I added a border round the edge with Vintage Photo (Andy Skinner Batik Garden). I then stamped the butterfly from the set with Archival Coffee ink together with some of the butterflies from the Crafty Individuals Elements set CI - 231. I coloured the large butterfly with Spiced Marmalade DI and then cut them all out.
I stamped the background stamp from the Batik set with Worn Lipstick and Vintage Photo DIs then coloured it with Victorian Velvet. I trimmed the image, distressed the edges and inked them with the Vintage Photo.
I stamped the text from the set with the coffee ink, tore this out and distressed the edges further. I die cut a doily (Papermania) from some Craftwork Cards kraft printed paper and assembled everything as you see, distressing the edges of the page.
As you can see, I couldn't resist some layering on the page, although it isn't heavy so should hopefully be Ok when I finally assemble the pages (when I've done them, that is!)
We have a fantastic guest designer with us for this challenge, the amazing Kate Crane, whose journaling I'm sure you're familiar with. The Fashionettes have also risen to the challenge with some gorgeous creations so do hop over for a look.
As always, our sponsor, the lovely Leo of Flonzcraft, is offering a fabulous $20 voucher to his online shop so do enter if you can.
A hello from me here to my lovely new followers and thanks for deciding to be here.
I'll be back next Saturday hopefully renewed from the break and I know I'll be raring to create again!
Before I go, I would like to say a huge thanks to the team at Stamping Sensations as I found out on Friday that I won the March challenge with a prize of rather a lot of fantastic Crafty Individuals stamps and did a happy dance when I saw this. Thanks ladies!
Hugs,
Fliss xx
Friday, 5 April 2013
Infinite Possibility For That's Crafty
Hello everyone, hope you've all had a good week and are not suffering too much from the current chill and snow which we've even had here on the South Coast.
I'm here today to tell you about my project today over at That's Crafty which is a steampunk style card which came about because about a week ago I joined Pinterest and a bit of surfing turned up some very inspiring steampunk creations.
Here's what I made:
If you'd like to see the materials list and all the instructions, you'll find them over at the blog and it would be great to see you there.
Have a lovely day and a great weekend.
Hugs,
Fliss xx
Labels:
Creative Expressions,
Steampunk,
That's Crafty
Monday, 1 April 2013
Stormy Skies
At least on my card that is! Hello everyone, hope you're having a lovely Easter long weekend so far and managing to fit some crafting in.
I have a card to share that is my inspiration for the new challenge today over at Make My Monday which is to make a Clean and Simple One Layer Card and mine is for my brother in law's birthday tomorrow. Perfect as he doesn't like fussy and in common with the men in my hubby's family likes the sea so here's what I came up with.
I had to scan my card as I was a bit late finishing it yesterday and had to put a sheet of blue paper round it as my scanner made it look like the fishing village and greeting were floating in the middle of nowhere!
I used a 7x5 card blank and stamped the Michael Powell image on with Memories black ink. I watercoloured the image with a mix of Distress Stains and Aquamarkers and then stamped on the Dovecraft sentiment. This was originally meant to be stamped in black but I picked up the Archival olive green by mistake and serendipity struck again as I think it looks better then black probably would have!
I hope you all got lots of nice chocs and that you didn't finish them all off at once lol
Have a great day.
Hugs, Fliss xx
Saturday, 30 March 2013
Daffodil Fairy
Hello folks, hope you're all having a lovely Easter weekend and those of you with the white stuff are keeping warm. We haven't had more than a sprinkle here thank goodness although it's still so chilly the poor daffodils don't want to show their faces lol
To make up for that, I decided to make something for the current Alphabet Challenge which has reached D and the theme of Daffodils was picked by fellow MMM DT mate Caz. I had a bit of a dilemma as I don't have any daffodil stamps or images so a search on the internet was necessary and I found a gorgeous vintage postcard to use as the basis for my card. Hope you like my bright and cheery creation.
I made the background paper by sponging Squeezed Lemonade Distress ink on a square of card and then stamped the Hobby Craft damask design on with Mustard Seed Distress ink. I distressed the edges of the paper and curled them up slightly.
I distressed the edges of the postcard with an emery board and inked with VersaColor Marigold ink before adding to a green mat with edges distressed in the same way.
I fussy cut a spray of vintage daffodils to make a floral embellishment and added to the card wrapping layered green and yellow ribbons around the background paper with the flower stalks tucked under. I wound the floral embellishment round the postcard before sticking it on to give a dimensional effect.
Have a lovely day tomorrow.
Hugs, Fliss xx
Some challenges for my card:
The Alphabet Challenge - D for Daffodils
Crafty Ribbons - Anything Goes With Ribbon
Paper Crafting Journey - Ribbon or Lace
Sisterhood Of Crafters - Easter or Spring
Labels:
Distress Inks,
Vintage Style
Friday, 29 March 2013
Vintage Paper Piecing
Hello again, I'm here with my second post today which is to tell you about the new challenge today over at Polka Doodles which is to make a project featuring Paper Piecing - my second go at creating like this in the last week too!
I've made a rather girly card with a lovely vintage lady from the Studio 12 Picknix Collection 1 CD and have combined her with one of my favourite things - roses. Hope you like what I've made.
I printed the image out on to thick cartridge paper and also on to a scrap of deep rose coloured paper with roses printed on it. I then cut just the frock out of the printed paper and added this over the plain image. I coloured the remaining parts of the image with watercolour pencils the trimmed the panel and added it to a mat made from the rest of the rose printed paper.
I cut a square of pink rose printed paper from the Pretty Sweet CD (this is where the other rose paper came from too) then distressed the edges and inked them with deep pink ink.
I die cut a doily with a Marianne Design die using paper from the Cherryblossom Lane CD and cut out some rose sprigs from the Sugarplum Daisy CD. The sentiment was printed and coloured with a pale pink Promarker then added to a die cut mat of the rose paper. I assembled the card as you see, tucking the roses around the image panel.
You might be interested to know that Nikky now has a brand new mini CD available called Fredericka with some rather sassy and chic images for all occasions together with a huge selection of papers, embellies and sentiments. At the moment you also receive a free paper pack when you purchase the CD but don't delay as this is a limited offer and when they're gone, they're gone!
Wishing you all a very Happy Easter.
Hugs, Fliss xx
Labels:
Girly,
Polka Doodles,
Vintage Style
All Of A Flutter
Hello everyone, the first of 2 posts today with my creation this week for That's Crafty. I've been playing with the Distress Stains again and have very blue fingers to prove it! I'm hoping it will wear off soon or I'll get some very strange looks in the supermarket!
As you can see, a very bright and cheery creation and I just wish I could say the same for the weather which is still really chilly and more like Winter than Spring.
If you'd like to see how I made the card please do hop on over to That's Crafty where you'll find a materials list and instructions.
See you later.
Fliss xx
Labels:
Distress Inks,
Distress Stains,
Kaisercraft,
Prima,
That's Crafty
Tuesday, 26 March 2013
Paper Piecing At FSC
Hello folks on a very gloomy Tuesday afternoon. I'm back today with my rather late inspirational creations for the current Fashionable Stamping Challenges theme which is Paper Piecing.
I had a bit of a struggle with this one as I found it impossible to combine the paper piecing with one of my usual hand made backgrounds and finally gave up today after trying several things with my second card (yes, 2 for the price of 1 this time!) and being very unhappy with all of them.
I then made the first card using one of the pieces from left over my workshop demo yesterday which was about using patterned paper in various ways to stamp on. This one is vintage style and having finished it, I then found the inspiration to finish the original card I tried to make so here they both are!
This one uses mostly Paper Cellar papers and I made the central panel with a bargello technique, trimming to size then stamping the Artistic Outpost serenity sentiment on with Memories Artprint Brown.
I stamped the butterfly (B Line Designs) with the same ink on to some polka dot paper and cut it out. I then distressed the edges of a piece of contrasting background paper and stuck this to a kraft card blank. I cut the floral border from a piece of patterned paper and trimmed round the floral section before adding to the card over the stamped panel.
I added the paper pieced butterfly to finish.
Now for something completely different!
A rather funky modern design using some Basic Grey papers that have been floating around in my paper box for quite a while!
I stamped the bird (a Papermania Urban stamp) on to white card with black ink then stamped various portions on to contrasting papers (Basic Grey Ambrosia). I cut out the sections and added them to the image on white card then trimmed to a rectangular panel. I added this to a red mat.
I covered a white card blank with one of the papers from the pad and added a sentiment (Inkadinkado) which I die cut with an X Cut label die and added this to the card with 2 tiny red heart shaped buttons.
The Fashionettes have done rather better than me with their backgrounds so do hop on over for a peek. We're also now sponsored by the lovely Leo of Flonzcraft who is offering a $20 voucher to his online shop for the randomly drawn winner. If you haven't yet visited his shop, please do as you're totally spoilt for choice with a huge array of images.
Back soon,
Hugs, Fliss xx
Monday, 25 March 2013
Garden Spells
Hello folks and a special welcome to my new followers, I'm very pleased and honoured that you decided to join me here.
I'm a little late today with my creation for this week's challenge over at Make My Monday mostly due to the prepping for a workshop I taught this morning which caused a bit of a creative overload lol. I couldn't think what to do until this morning when I woke up with the idea (must have been dreaming about it or something!) and here's the finished card which is quite a clean and simple one for me as you'll see.
The challenge is to make something based on the cover or the story behind Sarah Addison Allen's Garden Spells book. I based mine loosely on the cover but reversed the colours as I didn't want too much black.
As you can see, I've used the colours of the flowers and leaves on the cover to make my inked background which was created using Distress inks in Squeezed Lemonade, Milled Lavender, Shaded Lilac and Mowed Lawn, all sponged on for a rainbow variegated look.
I then stamped on the wild flower silhouette (The Craft Fairy) and the butterfly which was part of a set free with a magazine a while ago with VersaFine black ink. I added a narrow mat of black card and then stamped the butterfly again twice on a larger white panel with a sentiment from a Kanban set using the black ink and coloured the butterflies with Aquamarkers.
I finished the card by adding the panels to a larger panel of smoky blue card attached to a white square card blank.
I hope you like what I've made and you should hop over to the challenge blog as the Design Team have some gorgeous and varied creations to inspire you.
Have a great week and hope the white stuff is not causing you too many problems.
Hugs,
Fliss xx
Labels:
Clean and Simple,
Make My Monday
Friday, 22 March 2013
Sweet Pea For That's Crafty
Hello folks, I have a little warmth to share today in this absolutely freezing weather - doesn't seem like it's nearly April! I hope my creation for That's Crafty will bring a little colour to cheer everyone up.
Over at That's Crafty you'll find a picture of the background paper I made for my rather rustic wall hanging together with a materials list and instructions on how I made it. The technique for the background paper involves 2 materials that I wouldn't normally use together and came about a bit by accident (in common with quite a few of my background techniques!)
My creation also features recycled packaging, one of my real loves, using a plain notepad back which had 2 handy holes already punched at the top for the back and a strip of corrugated packaging which I tore for a distressed look.
If you're not yet following, do hop over for a peek as the blog is full of tutorials and unlike a magazine - is completely free!
Have a great day and a lovely weekend.
Hugs, Fliss xx
Thanks too Alison (aka Butterfly) who alerted me to the current challenge over at Eclectic Paperie where the eTeam pick is corrugated cardboard. I'd definitely like to link to that.
Labels:
Prima,
Recycling,
rustic style,
Stampendous,
That's Crafty,
Vintage Style,
Wall Art
Monday, 18 March 2013
William Morris Style
Hello again folks, I'm back as I managed to finish off my creation that I just had to do when I saw the theme at Frilly and Funkie for the fortnight chosen by Jenny (aka Buttons) was William Morris Style and I only just about got it made in time as a spare hour or so appeared yesterday and I decided to get exceedingly inky.
I absolutely love William Morris' designs and spent some of the time browsing the gorgeous images on Google trying to decide what to do. Having noticed that a lot of the designs feature acanthus leaves, I hit upon the idea of using my Kaisercraft Twig and Berry Flourish clear stamp set as the flourish is a little like the leaves.
The paper was supposed to be in shades of green but the first step I used with Versamark as resist didn't quite work so I had to overstamp it and this is the result - a bit Christmassy I admit but I like it!
The resist that didn't quite work used Versamark ink with the flourish and I then sponged on Shabby Shutters Distress ink followed by Bundled Sage and Crushed Olive while attempting to make the flourish design stand out but it refused to play! Might be that the card was too absorbent or something.
It did give a good background colour for the layered stamping though and I stamped the flourish first with Forest Moss then Wild Honey. I then added the leafy berry sprig with Aged Mahogany (this came out quite red for some reason!) and the berries with Pine Needles. What do you think - is it William Morris style enough?
My next dilemma was what to do with the paper as I didn't want to cover it up! An A5 size card turned out to be the answer and I made my own from a piece of olive green mottled card (my last of this colour - sigh). Here's the card and you'll have to let me know what you think.
I stamped down the right side with the flourish stamp and VersaFine Spanish Moss ink and the attached a square of pearly red swirl patterned card distressed round the edges.
I cut a panel from my background paper (as it's 21cm square I have enough to make a couple more things with it or I might just keep it to look at lol) and distressed the edges before attaching to the card.
I stamped the Hero Arts bird collage on white card with VersaFine Deep Lagoon ink and embossed this with clear powder. I then coloured the panel with Distress inks and trimmed down. I added this to a deep teal panel leaving a wide border under the image panel and knotting some deep pink wired ribbon round it.
I haven't yet added a sentiment as I prefer to wait until the right occasion appears.
After a rainy start we now have sunshine so I hope you do too!
Hugs, Fliss xx
Labels:
Distress Inks,
Hero Arts,
Kaisercraft,
Vintage Style
Monochrome Tones
Good morning folks and welcome to today's post, especially my new followers and so lovely to have you here. We have a new challenge for you over at Make My Monday and it's one that's always a big challenge for me as it's CAS In Monotone and I'm sure you know how far away from my usual style that is!
I've done my best though and decided on shades of green as I really wish that Spring would come - I did see an uplifting sight in the snow last week though as I spotted 2 trees absolutely covered in pink blossom! Here's my card and hope you like it.
I stamped the wild flower image (The Craft Fairy) on the left side of a square of off white card with VersaFine Spanish Moss ink and smudged a little colour over it with a green pastel pencil. I stamped the sentiment (Inkylicious) with the same ink at the top left side.
I stamped the bird (Stampendous) with the green ink on off white card and coloured the bird with the green pastel pencil. I trimmed the image to a rectangle and added it to an olive green textured card mat with a longer border left at the bottom. I knotted a piece of green twine round the border and attached the panel to the card with foam tape.
The Design Team have created some fabulous inspiration for you this week and we'd all love you to join in.
Have a great day.
Hugs, Fliss xx
Some challenges for my card:
Addicted To CAS - Wings
Just Add Ink - Just Add Green
4 Crafty Chicks - Clean and Simple
MilkCoffee Challenge - Go Green
Sisterhood Of Crafters - Green
The Stamping Chef - Good Luck/Green
Labels:
Clean and Simple,
Make My Monday,
Stampendous
Friday, 15 March 2013
Feelin' Groovy For That's Crafty
Hello again folks, I'm back with my project for today over at That's Crafty and I can't tell you enough how much I enjoyed creating this.
I saw an article a while back in my favourite US crafting mag, Somerset Studio, about collage artist Julie Nutting who makes the most fabulous collages featuring rather quirky, fun girls with clothes made from patterned papers, magazine and book text and so on. I also have her beautiful book, Collage Couture, which you can see HERE if you're interested.
Julie has now designed a range of cling stamps for Prima and you can imagine my delight to find that Laura of That's Crafty is stocking them. I've now got my mitts on a few and this is the first of my creations. Hope you like it!
The actual colours on my canvas are a little brighter than the photo as my camera struggled a bit in the slightly weird light yesterday.
If you'd like to see how I made it, then please hop on over to the That's Crafty Blog and you'll find a list of materials and all the instructions.
This won't be the only time you see these stamps!
Have a great weekend.
Hugs, Fliss xx
I'm also going to link this up to Hels' Sunday Stamper latest challenge _ You Make Me Feel Brand New as I so enjoyed playing with my new stamps and also Sir Tim's Inside Out alphabet strip die which is really clever (you get 2 letters of each for the price of 1!)
I saw an article a while back in my favourite US crafting mag, Somerset Studio, about collage artist Julie Nutting who makes the most fabulous collages featuring rather quirky, fun girls with clothes made from patterned papers, magazine and book text and so on. I also have her beautiful book, Collage Couture, which you can see HERE if you're interested.
Julie has now designed a range of cling stamps for Prima and you can imagine my delight to find that Laura of That's Crafty is stocking them. I've now got my mitts on a few and this is the first of my creations. Hope you like it!
If you'd like to see how I made it, then please hop on over to the That's Crafty Blog and you'll find a list of materials and all the instructions.
This won't be the only time you see these stamps!
Have a great weekend.
Hugs, Fliss xx
I'm also going to link this up to Hels' Sunday Stamper latest challenge _ You Make Me Feel Brand New as I so enjoyed playing with my new stamps and also Sir Tim's Inside Out alphabet strip die which is really clever (you get 2 letters of each for the price of 1!)
Labels:
Canvasses,
Cute,
Distress Inks,
Julie Nutting,
Prima,
That's Crafty
Easter Chicks
Good morning folks, it's time for a little Easter inspiration from me as I'm here today with details for the new challenge today over at Polka Doodles which with Easter fast looming is to make an Easter creation.
I've gone cute for my card with one of the new Easter digis from Emma Canning which you can find in the Polka Doodles online shop, all ready to download.
I couldn't resist these adorably cute chicks which I printed out on to thick cartridge paper and coloured with watercolour pencils. I die cut the image into a circle and added a green mat made from the scrap.
I had a bit of a challenge here as I'm waiting for some more coloured printer ink and had to rummage in my scraps box for papers in yellow and green. I hit upon the idea of cutting the papers into strips which I added to a square of thin card before attaching to the card blank.
I added a strip across horizontally and finished off with an Easter sentiment cut from a larger one on the Paper Boutique Volume 3 CD.
Have a great day and back in a bit with my That's Crafty project for this week.
Fliss xx
Some challenges for my card:
Cute Card Thursday - Anything Goes
Cards By Lady Anne/Stamp Challenge - Anything Goes
Paper Shelter - Easter
Deep Ocean Challenge - Cute and Cuddly
Labels:
Cute,
Polka Doodles
Tuesday, 12 March 2013
Pretty In Pink, Blue and Green
Hello folks, hope you're all keeping warm and surviving the current snowy weather. We still have it here as it snowed all day yesterday and most of today, finally stopping in the afternoon when the sun came out!
My poor hubby took over 3 hours to get home yesterday evening having finally had to abandon the car in Brighton and trudge to the station to wait for a train. He went back when the snow stopped earlier and luckily the car was undamaged and started without any trouble. He's been quite lucky compared to some people who ended up spending the night in their cars!
I do have some pics to share of the front and back views from our upstairs windows first thing this morning which are under the details of the card I want to share with you today which will hopefully make you think of Spring despite the weather!
This is another of the cards from the workshop I taught last month where we used the gorgeous Stampendous Garden Gal stamp. The image here was stamped with VersaFine Smokey Gray ink and then coloured with Promarkers and a little detail added with pencils. I trimmed the image to a rectangle and added a blue mat.
I made the background with various strips, the blue being dry embossed with a Crafts Too folder, the green is marbled card stamped with a floral flourish with Adirondack Aqua and the pink is flourish stamped with Aqua and Pink Sherbert Adirondack inks. I layered up the strips on a thin piece of card before attaching it to the card blank as if you do this, you can trim off any edges which are not quite straight.
I finished off with a Memory Box bouquet die cut from pink card and a corner in the same card die cut with the Marianne Design Anja corner.
Here are my snowy pics which I snapped because we don't usually get much of the white stuff here as I live about 200 metres from the sea as the crow flies.
Definitely brrrrrrrr here!
Back soon.
Hugs, Fliss xx
Some challenges for my card:
Bunny Zoes's Crafts - Girly
Vintage Stamping Challenges - Spring Is In The Air
My poor hubby took over 3 hours to get home yesterday evening having finally had to abandon the car in Brighton and trudge to the station to wait for a train. He went back when the snow stopped earlier and luckily the car was undamaged and started without any trouble. He's been quite lucky compared to some people who ended up spending the night in their cars!
I do have some pics to share of the front and back views from our upstairs windows first thing this morning which are under the details of the card I want to share with you today which will hopefully make you think of Spring despite the weather!
I made the background with various strips, the blue being dry embossed with a Crafts Too folder, the green is marbled card stamped with a floral flourish with Adirondack Aqua and the pink is flourish stamped with Aqua and Pink Sherbert Adirondack inks. I layered up the strips on a thin piece of card before attaching it to the card blank as if you do this, you can trim off any edges which are not quite straight.
I finished off with a Memory Box bouquet die cut from pink card and a corner in the same card die cut with the Marianne Design Anja corner.
Here are my snowy pics which I snapped because we don't usually get much of the white stuff here as I live about 200 metres from the sea as the crow flies.
Definitely brrrrrrrr here!
Back soon.
Hugs, Fliss xx
Some challenges for my card:
Bunny Zoes's Crafts - Girly
Vintage Stamping Challenges - Spring Is In The Air
Labels:
Feminine,
Stampendous
Monday, 11 March 2013
Heat It Up!
Morning folks, we certainly need a bit of heating up this morning as Spring has decided to hide away and I woke up this morning to thick frost, -5 and it's now snowing! Eek! I shall be staying in the warm today I think.
I hope you all had a great weekend. I'm a big fan of Dancing On Ice and was thrilled to bits when Beth won as I've been so fed up with Jason's negative comments about her and I thought her version of Bolero with the lovely Dan so full of emotion (I have to confess it brought tears to my eyes).
Anyway, enough waffle and on to the reason for my post which is to tell you about the new challenge today at Make My Monday which has the theme of Heat Embossing. I have to say I struggled a bit with this one as I couldn't make up my mind what to do and have half done bits all over the place. In the end, I created something quite simple which I hope you like.
We also some some lovely new Design Team members and would like to welcome Jan, Laura and Rosie. You'll need to hop over to the challenge blog to see their gorgeous first creations.
I made the butterfly first by stamping the Hero Arts image on deep red crinkle card with black ink and heat embossing it with clear powder. I then cut it out leaving a narrow border of deep red.
I made the background by stamping the Artistic Outpost text on the top right corner of a square of beige card with VersaFine Crimson Red ink and then stamped the Hero Arts script all around with Brilliance Pearlescent Beige ink. I inked the edges with brown ink.
I die cut a circle and embossed it with a butterfly folder free with Papercraft Essentials magazine and inked this with Antique Linen Distress ink and sand pigment ink. I added this to a scalloped mat of deep red paper and assembled my card as you see.
I hope you have a great day.
Stay warm!
Fliss xx
Labels:
Artistic Outpost,
Hero Arts,
Make My Monday
Sunday, 10 March 2013
All Of A Swirl!
Hello folks, sorry about the title but I was a bit stumped for something to call it! I hope you're all having a great weekend and also Happy Mothers Day to everyone in the UK.
Today's post is all about Fashionable Stamping Challenges as we've had a bit of a change around and we have a fab new sponsor, the lovely Leo of Flonzcraft. He is awarding a $20 voucher to his online shop for the lucky winner and you should take a look as he has a fabulous array of stamps in there, some of which I have and will be showing you very soon once I've had a chance to make something up with them.
The theme for this fortnight is Swirls and I'm continuing with my nature inspiration and have created a canvas.
I painted my canvas with spring green acrylic paint and then applied olive green paint through a stencil to make the swirly pattern.
I stamped the butterflies and daisies (both B Line Designs) with Memories Artprint Brown and coloured then with watercolour pencils. I then added touches of Distress inks (Squeezed Lemonade, Mustard Seed and Spiced Marmalade) to make the images pop.
I finished off with a sentiment stamp (Artistic Outpost) stamped with the brown ink, die cut with a Papermania die and inked with the lemon Distress ink.
Hope you have a great day.
Hugs, Fliss xx
Some challenges for my canvas:
Hotshot Craft Challenge - Anything But A Card
Paper Crafting Journey - Anything But A Card
Subscribe to:
Posts (Atom)