Hello again, slightly late to let you know I have my usual Friday post over at That's Crafty! Blog and I'd love it if you hopped over to see my very bright and funky retro style tag as I've been channeling my inner teenager :D
I've also got a few photos of my London trip to share, mostly for anyone who hasn't seen them on Facebook. Hope you enjoy the short tour.
As you can see, a rather eclectic mix of brand new, quirky modern and rather more iconic older buildings.
Have a great weekend and see you soon.
Fliss xx
Friday, 27 October 2017
Forever Floral at That's Crafty! Challenge Blog
Hello everyone, I'm now back from my trip to stay with my daughter in London. We had a lovely if rather tiring time as we did a whistlestop tour of quite a few of the attractions that despite living in the UK our whole lives, we'd never managed to see.
There are some pics on my next post for those of you who didn't see them on Facebook but first the actual reason for this post which is to show you my inspiration for our new challenge today at That's Crafty! Challenge Blog which has the theme of Forever Floral so flowers are the order of the day.
I've created a mixed media postcard for the challenge, starting off with a rounded corner white/greyboard postcard which I spread with a thin layer of texture paste then drew on a rough stripe pattern with an old store card.
When the paste was dry, I roughly brushed on several shades of That's Crafty! Multi Surface Paint - Teal, White, Green and Yellow. I used more teal at the top and more green at the bottom. When the paint was dry, I swiped on some Fern Green Archival ink on the raised areas to resemble grass.
I next used the script stamp (from Textures Collection Set 1 by That's Crafty!) without a mount to add a pattern across the bottom half. I brushed some diluted green roughly on the grass area and some diluted Metallic Antique Gold in various places.
I painted the poppy and butterfly Bits and Pieces Greyboard Embellishments with Multi Surface Paints after scoring with a fine embossing tool to add detail. Once the paint was dry, I added more detail with pigment pencils.
I brushed a little diluted gold over the painted greyboard elements to add a glazed finish then glued them on the postcard with silicone glue.
I finished off with part of the text from one of the gorgeous quotes on Lynne's Affirmations Set 6 which I stamped with Archival Fern Green on a scrap of mixed media paper washed with leftover green paint.
There's a great prize for the randomly drawn winner of a voucher for the online shop and all you have to do to be in with a chance is enter.
Hope to see you there!
Fliss xx
Friday, 20 October 2017
Winter Moon for That's Crafty!
Hello everyone, I hope you've all had a good week. Mine has been rather busy with work at my hubby's office (and a 2 hour train journey home due to Southern Rail issues!) and something hush hush that I can't share for a while yet.
I have my usual Friday post over at That's Crafty! Blog and this week I have a frosty offering in the form of a card which was one of my Hochanda samples.
You'll need to hop over to the blog to see the whole thing as always and hope to see you there.
Have a great day and a lovely weekend and I'll see you maybe next week as we're off to stay with my Sarah on Sunday for a few days.
Fliss xx
Friday, 13 October 2017
Tropical Rainforest Shrine at That's Crafty! Blog
I'm back again just to let you know that I have my usual Friday project over at That's Crafty! Blog today and this week it's the rather bright and jazzy ATC shrine that I made for last week's Hochanda shows.
This is just a sneak peek so you'll need to head on over to the blog to see the whole thing and how it came about.
Hope to see you there!
Have a great weekend and see you soon.
Fliss xx
This is just a sneak peek so you'll need to head on over to the blog to see the whole thing and how it came about.
Hope to see you there!
Have a great weekend and see you soon.
Fliss xx
Get Your Spook On at That's Crafty! Challenge Blog
Well, I'm late, late, late getting my spook on for our new challenge at That's Crafty! Challenge Blog. It really has seemed like Friday the 13th today!
This is because I've had to deal with a rather tricky accounting problem which began when someone who shall remain nameless plonked a print out on the table when I was eating my breakfast at 7.30 this morning and said I needed to look at it! The joys of working for someone you're married to - NOT!
Anyway, better late than never, here is my inspiration for our challenge which is a spooky card which involved the first use of my now much loved toy - the Tim Holtz Stamping Platform - which is awesome!
I used mixed media paper for my background as I wanted to use paint and this will take water without buckling.
I stamped the Stampendous image (Owl Tombstone) using the stamp platform. It's really easy to use and the best thing about it is that if you don't get a strong enough print the first time (I didn't as the paper is a bit rough) then you just repeat until you're happy with the colour. I also used some further colours, layering red, purple and brown over black and it does give a rather unique look to the image. I also used a bit of silver meant to look like monnlight and I'm not sure it was entirely successful but it will do!
I then coloured the paper with diluted That's Crafty! Multi Surface Paints - purple, red and yellow, repeating applications until I was happy. I then used leftover wash to add stronger colour to the main stamped image.
I used the That's Crafty! Flight of the Bats Dinky Stencil with Archival Jet Black ink to add the bats. I next used the Scaredy Cat Dinky Stencil to draw the cat shape on the back of a piece of white backed black card and cut the image out. It wasn't quite black enough so I sponged on Multi Surface Black Paint to strengthen the colour.
I glued the background paper to a black card blank and added the cat to finish.
I hope you can join us as there's a great prize of a voucher for the online shop for the randomly drawn winner.
See you again soon.
Fliss x
Sunday, 8 October 2017
My Wings
Hello all, hope you've had a lovely weekend. Mine has been quite busy mostly on the craft type front and yesterday evening we went to see the new Blade Runner film as the original one is my favourite film of all time (which might surprise you but I admit to a lifelong love of sci fi and fantasy both in films and in books too)
I was rather apprehensive about the new one as quite often I wonder why they bother with a sequel. This was, although not quite up to the standard of the original classic, very well done. It was extremely atmospheric and there were things that mirrored the past film that were good. It left quite a few loose ends though so I don't know if they're planning on a further sequel - though if they want to include Harrison Ford they need to be quick as he's not getting any younger!
I gave myself a bit of a challenge today to create something in just half an hour which is always difficult as I am NOT a fast crafter. There is something rather satifying though in just slapping the paint on and not thinking too hard about what you're doing which is why my tag ended up quite grungy!
So, my base was a Ranger Size 8 black tag and the first step was to brayer on a layer of purple paint. I then added dots of lilac and lavender paints and roughly spread it with the brayer.
I then slapped some turquoise paint on a piece of bubble wrap and pressed this here and there on the tag. As you'll see, some ended up on the black areas too.
I then applied a bit of pattern, using Herringbone Background Dinky stencil with yellow and turquoise paints and the Distressed Harlequin Dinky stencil with orange paint.
I added a That's Crafty! Bits and Pieces Greyboard butterfly painted orange, stamped with a butterfly from Lynne's Affirmations Set 1 stamp set, stamped with black Archival ink and painted yellow.
I finished off with one of the new Lynne's Affirmations quotes from Set 3 which I stamped with black and painted with a wash of turquoise before cutting into tiles. I ran the black ink round the edges and glued them on to finish.
Hope you like it
Fliss xx
Friday, 6 October 2017
Autumn Fairy for That's Crafty!
Hello everyone, Neil's second show is just starting on Hochanda (Freeview Channel 85) but if you missed it there's always rewind.
I'm over at That's Crafty! Blog sharing one of my samples which is a card featuring one of the gorgeous new fairy greyboard sheets. She's Autumnal as I thought her wings looked like leaves. All details over at the blog.
Have a great day and a lovely weekend and if you watched the shows, hope you enjoyed them as I did.
Fliss xx
Wednesday, 4 October 2017
That's Crafty! Next Hochanda Shows
Hello there, just a quick post for anyone out there who doesn't do Facebook or Instagram to let you know that there will be some fabulous new goodies from That's Crafty! on Hochanda on Friday with the lovely Neil doing some great demos.
The shows are at 8am and 11am and not to be missed as the new stamps, stencils and greyboard on the show are just amazing!
Some fantastic samples from my DT sisters too and here's some sneak peeks of some of mine (in fact, my Friday post over at That's Crafty! Blog will feature one of my samples but you'll have to wait until then to find out which lol)
These are just 3 of my samples and I'll be sharing some more tomorrow so watch this space!
Fliss xx
Tuesday, 3 October 2017
Serendipity Strikes - I Think!
Hello all, I have another art journal page to share today which has the background that was actually intended for my Autumn journal page yesterday but things did not go quite as planned due to the unpredictability of oxide inks.
I decided to have a go today to make the background work for another page and again things didn't quite go to plan as the grey in the mix took on a slightly greenish cast but with the addition of more dark blue and some Rusty Hinge Distress ink I think it just about fits the colour challenge at Rubber Dance. I really love these colours which is why I wanted to make the page fit!
The oxide inks I used were Faded Jeans and Fired Brick with Hickory Smoke Distress ink. I added them to my craft mat, misted them with water and dipped the page in. This is when the grey Distress ink went a little green in places but I knocked it back with Faded Jeans and Rusty Hinge Distress inks.
I then stamped on some of the circular images from the Rubber Dance Round in Circles stamp set using the same inks. This was a bit bolder than I wanted so I misted the page with water and blotted it with a paper towel.
I next stamped on the Phone Home girl with Archival Watering Can ink and added some of the text phrases from the Something Wonderful set which I love for the positive thoughts on it. The final touch was a little stencilling with the Brick Background Dinky Stencil using the Rusty Hinge ink.
I hope you like my happy accident (I think serendipity might be my middle name lol)
Thanks for looking,
Fliss xx
I decided to have a go today to make the background work for another page and again things didn't quite go to plan as the grey in the mix took on a slightly greenish cast but with the addition of more dark blue and some Rusty Hinge Distress ink I think it just about fits the colour challenge at Rubber Dance. I really love these colours which is why I wanted to make the page fit!
I then stamped on some of the circular images from the Rubber Dance Round in Circles stamp set using the same inks. This was a bit bolder than I wanted so I misted the page with water and blotted it with a paper towel.
I next stamped on the Phone Home girl with Archival Watering Can ink and added some of the text phrases from the Something Wonderful set which I love for the positive thoughts on it. The final touch was a little stencilling with the Brick Background Dinky Stencil using the Rusty Hinge ink.
I hope you like my happy accident (I think serendipity might be my middle name lol)
Thanks for looking,
Fliss xx
Labels:
Art Journaling,
Distress Inks,
Oxide Inks,
Rubber Dance
Monday, 2 October 2017
Autumn Art Journaling
Hello all, hope you've had a good start to the week. Mine started off with a walk first thing as the new chapter in my life has now begun and one of my resolutions is to get fitter so I went out, first walking along the seafront and then making my way back a bit inland. Along the route, I managed to collect some fallen leaves which inspired and indeed helped with my journal page for today.
I'm entering this in the Rubber Dance October colour challenge as I love these particular colours and challenged myself to create my journal page with them.
I decided on Autumn as it's my favourite time of year and created the background with a wash of grey and cobalt paints which I applied in rough stripes.
I then used a very unusual stamp - one of the leaves I collected - to add a pattern to my page. I used Chipped Sapphire and Rusty Hinge Distress inks which I pressed on the leaf, using both sides and then placed the inked leaf on the page, running the brayer over the top to transfer the ink. I repeated this until I was happy with the effect.
As you can see, the leaf has left a very good impression and I love the way nature can be brought into art like this.
I finished off my page very simply (I felt the leaves didn't need much else) by stamping on the Art text which is part of the Rubber Dance Kiwi Postoid stamp using the Chipped Sapphire ink.
Have a great week.
Fliss xx
Labels:
Art Journaling,
Distress Inks,
Nature,
Rubber Dance
Sunday, 1 October 2017
I Must Always Have Flowers
Hello everyone, Happy Sunday to you all!
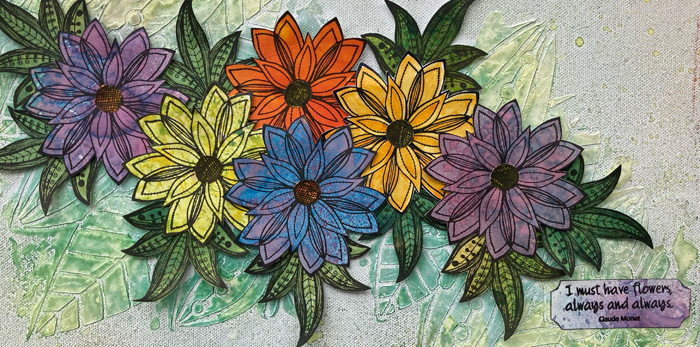
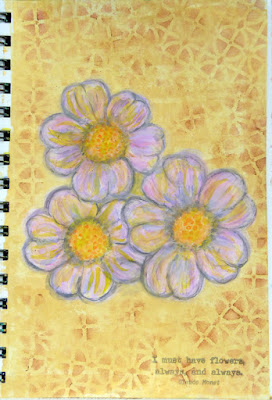
I want to share the first bit of hand painting that I've done in an absolute age which is a page in my A5 art journal as I need to practice before putting paint to canvas. I decided on flowers inspired by one of the beautiful quotes on Alison's (of Words and Pictures) first issue of stamps for Paper Artsy which I've only just had the time to ink up.
The colour is a bit off as you can't see the shimmer on my page which I painted by swiping with buttermilk and gold paint applied with an old store card.
I then painted on rough flower shapes (circles surrounded by circles with white gesso. When this was dry, I went a bit mad, free painting with several shades of pink and purple, adding in some orange for the centres and a touch of lime green.
Once everything was dry, I used charcoal shimmer paint to add some detail and make the flowers pop. They're a bit wonky and I think I need more practice!
I finished off by stencilling on a pattern with bronze paint and stamping on my chosen quote with Archival watering can ink.
I used:
That's Crafty! Multi Surface Metallic Bronze Paint (my absolute favourite!)
That's Crafty! Metallic Gold Paint
That's Crafty! Charcoal Shimmer Paint
That's Crafty Dinky Stencil - TC068 Decorative Background
Paper Artsy Eclectica EAB01 by Alison Bomber
Have a lovely Sunday and see you again soon.
Fliss xx
Subscribe to:
Comments (Atom)




.JPG)


