Hello there, I hope you all had a good weekend and are refreshed and ready for the week. I have to confess I'm not quite ready for mine as we have a rather sick bunny at the moment and yesterday was spent giving medicine followed by water by the teaspoon and finally managing to get her to eat a small bit of kale yesterday evening so hopefully she's on the mend.
Now to this week's challenge over at Make My Monday which has a theme of Fairies or Mystical chosen by Jacqueline.
Here's my inspiration which I hope you like.
I've used the gorgeous Hydrangea Fairy from Aurora Wings for my card as I love hydrangeas, my only regret being I just can't seem to grow blue ones in my garden only pink - sigh!
I printed her out on to thick, smooth cartridge paper and coloured her with Aquamarkers and then added a little detail with Prismacolor pencils. I painted the wings with glitter glue for some sparkle. I then trimmed the image to a rectagular panel and added mats of lilac and mauve.
I covered my card blank with some hydrangea paper by Polka Doodles and made a trellis embellishment with a Martha Stewart punch and a scrap of green patterned paper. I added mauve underneath to bring out the colours.
I stamped the sentiment (my favourite by Flonzcraft) with Memento Grape Jelly ink on a scrap of green paper then die cut it to a circle and added a mauve scalloped mat.
I die cut a butterfly (X Cut) from purple card and then glittered it up. I also die cur 2 tiny butterflies with the same set and layered these uo with some glittery fabric butterflies from my embellishments box. I then finished assembling the card which turned out as you see above.
Have a great day and a good week.
Hugs,
Fliss xx
Some challenges for my card:
Corrosive Challenges - Colour Me Happy (Use your favourite colouring medium - no brainer here as for me it's Aquamarkers with Prismacolor pencil detail)
Crafting At The Weekend - Anything Goes
Monday, 30 June 2014
Friday, 27 June 2014
All At Sea
Hello again! It's challenge time for another fortnight over at the That's Crafty Challenge and this time we're All At Sea so anything beach or sea related is what we'd like to see.
This gave me the chance to ink up my Graphic 45 By The Sea so far unused stamps or at least it did when I remembered where I'd put them!
I got my mono printing plate out to make the background paper as I had nautical stripes in mind for what I wanted to create. I applied Paper Artsy Fresco Finish paints in London Bus, Baltic Blue and Snowflake in stripes with my fingers on the plate (very messy but giving a lovely grungy feel) and pressed on thin white card to pick up the colour. I was able to make several prints by spraying with a little water.
I stamped the lighthouse, text, shells and capstan on to white card with Archival black ink. I cut the lighthouse to a panel and added this to a blue mat. I then coloured the shells with Promarkers and inked the text and cut all the items out.
I cut a piece of my striped paper to fit the card blank then inked the edges with blue before sticking it on.
I cut a strip of printed paper and stamped on the smaller seahorse with Archival Fern Green ink and added the panel to a blue mat before sticking on the card in the lower half.
I added all the remaining elements as you see.
The prize is a £20 voucher for the online shop but you must be a UK resident to win so hope you can enter if you qualify - well worth it as the winner is picked at random.
Have a great day and a lovely weekend.
Fliss xx
This gave me the chance to ink up my Graphic 45 By The Sea so far unused stamps or at least it did when I remembered where I'd put them!
I got my mono printing plate out to make the background paper as I had nautical stripes in mind for what I wanted to create. I applied Paper Artsy Fresco Finish paints in London Bus, Baltic Blue and Snowflake in stripes with my fingers on the plate (very messy but giving a lovely grungy feel) and pressed on thin white card to pick up the colour. I was able to make several prints by spraying with a little water.
I stamped the lighthouse, text, shells and capstan on to white card with Archival black ink. I cut the lighthouse to a panel and added this to a blue mat. I then coloured the shells with Promarkers and inked the text and cut all the items out.
I cut a piece of my striped paper to fit the card blank then inked the edges with blue before sticking it on.
I cut a strip of printed paper and stamped on the smaller seahorse with Archival Fern Green ink and added the panel to a blue mat before sticking on the card in the lower half.
I added all the remaining elements as you see.
The prize is a £20 voucher for the online shop but you must be a UK resident to win so hope you can enter if you qualify - well worth it as the winner is picked at random.
Have a great day and a lovely weekend.
Fliss xx
Labels:
Graphic 45,
Promarkers,
Stampendous,
That's Crafty
I Spy For That's Crafty
Hello folks, a very sneezy Fliss here today as I've had the worst hay fever I can remember for the last few days with extremely itchy eyes which have been driving me crazy! My sympathies to any fellow sufferers too as I don't normally get this when it's almost July.
I have a project today over at That's Crafty which will hopefully be up soon if it's not there yet as I was rather late pinging it through the ether to Laura this time.
It's the first of a series I wanted to do using my supplies for some steampunk themed creations having been inspired by some of the beautiful artwork Finnabair creates. Not that this is anything like that of course!
As you can see, quite a simple creation this time and you'll find all the details over at the blog - not many as I promise it is very simple and easy to make.
I'll be back later as we have a new challenge for you today too.
See you in a bit.
Fliss xx
I have a project today over at That's Crafty which will hopefully be up soon if it's not there yet as I was rather late pinging it through the ether to Laura this time.
It's the first of a series I wanted to do using my supplies for some steampunk themed creations having been inspired by some of the beautiful artwork Finnabair creates. Not that this is anything like that of course!
As you can see, quite a simple creation this time and you'll find all the details over at the blog - not many as I promise it is very simple and easy to make.
I'll be back later as we have a new challenge for you today too.
See you in a bit.
Fliss xx
Labels:
Distress Inks,
Papermania,
That's Crafty,
Tim Holtz Products
Monday, 23 June 2014
Stencils And/Or Masks At Quirky Crafts Challenges
Hello there folks and first up is an apology for not visiting today as in common with many others I have that pesky reading list problem with just the latest post showing and clicking on view more to no avail! Let's hope normal service is resumed soon as it's so annoying when you want to visit!!!
Now on to the main reason for my post which is because I'm a guest designer at Quirky Crafts Challenges for the latest challenge having won second place in the quirky time challenge so thanks to Cazzy and the team for this.
I have 2 creations to share using images from 2 of the challenge sponsors and first up is a rather girly card using the cute Hannah from Nikki of Limited Runs:
I printed Hannah out on to smooth stamping card and coloured her with a mix of Aquamarkers and pencils.
I made the background using an ink applicator with Spun Sugar and Tattered Rose Distress inks. I then used Wendy Vecchi's Studio 490 Stencils For Art Never Enough Hearts stencil with Victorian Velvet and Worn Lipstick inks to add the hearts round the top and side.
I used a Cuttlebug hearts embossing folder to emboss cream card and then tapped Spun Sugar on the raised areas to make the heart panel and die cut a pink doily heart with an X Cut die.
The sentiment is Flonzcraft and was stamped with VersaFine Spanish Moss ink. I did some mat layering and decorated with some of the hearts left from cutting out the doily.
Next up is something completely different using a rather quirky image from Paper Pretties called Graffiti who comes with several different sentiments. I was inspired by the sentiment Follow Your Rainbow to make this very bright card.
I printed Graffiti out on to smooth cartridge paper and coloured her with Aquamarkers to produce a rainbow of colour on the paint flow and her skirt. I added the panel to a mauve mat.
I then made a rainbow stencil using a circle cutter to cut it out of thick card and used this to make a rainbow with Distress inks - I used Barn Door, Ripe Persimmon, Mustard Seed, Mowed Lawn, Salty Ocean, Chipped Sapphire and Seedless Preserves. I had to trim off the edges as my homemade rainbow wasn't quite perfect!
I added the sentiment to an arrow shaped mat of mauve card and added all the elements to a card blank I made from yellow marbled card.
Have a great rest of week and will be visiting once Mr Blogger has sorted himself out!
Hugs,
Fliss xx
Now on to the main reason for my post which is because I'm a guest designer at Quirky Crafts Challenges for the latest challenge having won second place in the quirky time challenge so thanks to Cazzy and the team for this.
I have 2 creations to share using images from 2 of the challenge sponsors and first up is a rather girly card using the cute Hannah from Nikki of Limited Runs:
I printed Hannah out on to smooth stamping card and coloured her with a mix of Aquamarkers and pencils.
I made the background using an ink applicator with Spun Sugar and Tattered Rose Distress inks. I then used Wendy Vecchi's Studio 490 Stencils For Art Never Enough Hearts stencil with Victorian Velvet and Worn Lipstick inks to add the hearts round the top and side.
I used a Cuttlebug hearts embossing folder to emboss cream card and then tapped Spun Sugar on the raised areas to make the heart panel and die cut a pink doily heart with an X Cut die.
The sentiment is Flonzcraft and was stamped with VersaFine Spanish Moss ink. I did some mat layering and decorated with some of the hearts left from cutting out the doily.
Next up is something completely different using a rather quirky image from Paper Pretties called Graffiti who comes with several different sentiments. I was inspired by the sentiment Follow Your Rainbow to make this very bright card.
I printed Graffiti out on to smooth cartridge paper and coloured her with Aquamarkers to produce a rainbow of colour on the paint flow and her skirt. I added the panel to a mauve mat.
I then made a rainbow stencil using a circle cutter to cut it out of thick card and used this to make a rainbow with Distress inks - I used Barn Door, Ripe Persimmon, Mustard Seed, Mowed Lawn, Salty Ocean, Chipped Sapphire and Seedless Preserves. I had to trim off the edges as my homemade rainbow wasn't quite perfect!
I added the sentiment to an arrow shaped mat of mauve card and added all the elements to a card blank I made from yellow marbled card.
Have a great rest of week and will be visiting once Mr Blogger has sorted himself out!
Hugs,
Fliss xx
Labels:
Quirky Crafts Guest Designer
Moon Gazing
Good morning folks and hope you all has a lovely weekend. It was very sunny here which was great as one of my nieces got married on Saturday and the day was beautiful so a lovely time was had by both families and all the friends.
There's a new challenge today over at Make My Monday which I chose the theme for (it's Anniversaries) as my hubby and I will be celebrating our 32nd Wedding Anniversary this week and I've made a rather different card for him inspired by our 2 little fur babies - Rosie and Dill, the grey Netherland Dwarf bunnies who are really my hubby's babies :)
I stamped the Alice Palace bunnies by Crafty Individuals with VersaFine Smokey Gray ink and coloured them with Aquamarkers then cut them out.
I made the background paper by using second generation stamping with VersaFine Spanish Moss and Crafty Individuals CI - 367 across the base. I made a moon stencil with a circle die and sponged Squeezed Lemonade and Faded Jeans Distress inks. I then coloured the remaining areas with Pan Pastel tints in blue, pink and lavender.
I die cut a heart from cream card with an X Cut nesting die anf stamped the meadow silhouette image with the green ink across it.
I stamped the Kaisercraft sentiment in the corner using second generations stamping and VersaFine Deep Lagoon ink for a softer effect then added the heart and bunnies to the card.
I hope my hubby likes it but I think he will!
Have a great day.
Hugs,
Fliss xx
There's a new challenge today over at Make My Monday which I chose the theme for (it's Anniversaries) as my hubby and I will be celebrating our 32nd Wedding Anniversary this week and I've made a rather different card for him inspired by our 2 little fur babies - Rosie and Dill, the grey Netherland Dwarf bunnies who are really my hubby's babies :)
I stamped the Alice Palace bunnies by Crafty Individuals with VersaFine Smokey Gray ink and coloured them with Aquamarkers then cut them out.
I made the background paper by using second generation stamping with VersaFine Spanish Moss and Crafty Individuals CI - 367 across the base. I made a moon stencil with a circle die and sponged Squeezed Lemonade and Faded Jeans Distress inks. I then coloured the remaining areas with Pan Pastel tints in blue, pink and lavender.
I die cut a heart from cream card with an X Cut nesting die anf stamped the meadow silhouette image with the green ink across it.
I stamped the Kaisercraft sentiment in the corner using second generations stamping and VersaFine Deep Lagoon ink for a softer effect then added the heart and bunnies to the card.
I hope my hubby likes it but I think he will!
Have a great day.
Hugs,
Fliss xx
Labels:
Crafty Individuals,
Kaisercraft,
Make My Monday,
Pan Pastels
Friday, 20 June 2014
Parisian Melange For That's Crafty
Hello there everyone and hope you've all had a good week. Mine has been very busy but sadly most of it work so I'm looking forward to the weekend.
I have a project today over at That's Crafty which might need sunglasses as it's rather bright but if it's a dull day where you are it will at least add some warmth to the day.
Here it is and hope you like it.
All the details are over at the blog if you want to take a look to see how it came about.
Have a great day and a lovely weekend.
Hugs, Fliss xx
A big thanks to Alison aka butterfly for heading me in the direction of Our Creative Corner's current challenge which is Flaming June so hope it's OK if I enter ladies!
I have a project today over at That's Crafty which might need sunglasses as it's rather bright but if it's a dull day where you are it will at least add some warmth to the day.
Here it is and hope you like it.
All the details are over at the blog if you want to take a look to see how it came about.
Have a great day and a lovely weekend.
Hugs, Fliss xx
A big thanks to Alison aka butterfly for heading me in the direction of Our Creative Corner's current challenge which is Flaming June so hope it's OK if I enter ladies!
Labels:
Artistic Outpost,
Stampendous,
That's Crafty
Monday, 16 June 2014
Pretty In Pink
Morning folks, a bit of a pink alert here as I think my creation for today has the most of that colour that I've ever put on one of my creations - I think I went a bit overboard!
The reason for the pink is today's new challenge over at Make My Monday which was chosen by our former team member, Jan, and is Pretty In Pink.
I've used my favourite fairy stamp for my card which is a Faerie Poppet image by Christine Haworth and I think she's rather adorable.
I'm sure you can see what I mean by all the pink now!
I stamped the little fairy on to smooth cartridge paper with Archival coffee ink and then coloured her with Aquamarkers adding detail with Prismacolor pencils. I then trimmed the image to a square panel and added mats of pink and pale green.
I made the background paper by painting a square of watercolour paper pink then embossing it with a Crafters Companion trellis folder. I then swiped it with Brilliance Pearlescent Orchid and Galaxy Gold inks for some shimmer. I stamped some tiny peg flowers and hearts in some of the trellis debossed areas.
I then die cut a doily (X Cut) and a butterfly (Cheery Lynn) from fuchsia pink card and made a double layer for the butterfly by tracing round the die on lighter pink card and cutting it out.
I stamped the birthday sentiment (Flonzcraft) with Memento Lilac Posies ink and hand cut it out, adding a pale green mat also hand cut.
I assembled the card and finished off with some pink gems.
Have a great day and a good week.
Hugs,
Fliss xx
I'd like to enter my card in the following challenges:
Come and Get It Challenges - Fairy Fantasy
Dragonfly Dreams - Things With Wings
Feeling Crafty Challenge - One For The Girls/Ladies
Quirky Crafts Challenges - Fairy Ring (Sparkle and Sentiment in my case - thanks Cazzy!!!)
The reason for the pink is today's new challenge over at Make My Monday which was chosen by our former team member, Jan, and is Pretty In Pink.
I've used my favourite fairy stamp for my card which is a Faerie Poppet image by Christine Haworth and I think she's rather adorable.
I'm sure you can see what I mean by all the pink now!
I stamped the little fairy on to smooth cartridge paper with Archival coffee ink and then coloured her with Aquamarkers adding detail with Prismacolor pencils. I then trimmed the image to a square panel and added mats of pink and pale green.
I made the background paper by painting a square of watercolour paper pink then embossing it with a Crafters Companion trellis folder. I then swiped it with Brilliance Pearlescent Orchid and Galaxy Gold inks for some shimmer. I stamped some tiny peg flowers and hearts in some of the trellis debossed areas.
I then die cut a doily (X Cut) and a butterfly (Cheery Lynn) from fuchsia pink card and made a double layer for the butterfly by tracing round the die on lighter pink card and cutting it out.
I stamped the birthday sentiment (Flonzcraft) with Memento Lilac Posies ink and hand cut it out, adding a pale green mat also hand cut.
I assembled the card and finished off with some pink gems.
Have a great day and a good week.
Hugs,
Fliss xx
I'd like to enter my card in the following challenges:
Come and Get It Challenges - Fairy Fantasy
Dragonfly Dreams - Things With Wings
Feeling Crafty Challenge - One For The Girls/Ladies
Quirky Crafts Challenges - Fairy Ring (Sparkle and Sentiment in my case - thanks Cazzy!!!)
Labels:
Aquamarkers,
Cheery Lynn,
Cute,
Flonzcraft,
Girly,
Make My Monday,
Prisma Pencils,
X Cut
Friday, 13 June 2014
The Birds
Evening all, guess who was so tired yesterday she totally forgot to schedule her post for the new challenge over at the That's Crafty Challenge Blog - oops!
The theme for this fortnight is The Birds so you can make anything you like as long as there's some stamping and a bird somewhere.
Here's my inspiration using a favourite IndigoBlu bird stamp along with the details on how I made the background.
I wanted a fairly vintage style creation so I made a fairly shabby style background using an ink applicator to apply a patchwork effect of subtle shades of Distress inks in a repeating fashion. I used Wild Honey, Shabby Shutters, Crushed Olive and Tattered Rose starting with the lightest shade and building up.
I then used second generation stamping with the IndigoBlu Dinkie Vintage Flourish and Forest Moss Distress ink to make a frame around the edge of the inked paper. It's very forgiving as you can just carry on overstamping until you create an effect you like. If you do as I did, you'll end up with 2 decorated papers for the price of one as if you look below you'll see my stamp off paper and I know I'll be using it soon as I think it turned out looking rather good.
I stamped the IndigoBlu bird image on smooth stamping card with Archival Coffee ink and added colour with pencils (Spectrum Noir pencils are rather good). I then stamped around the edges of the panel with the flourish stamp and Squeezed Lemonade Distress ink for a subtle textured effect.
I distressed the edges of the panel with scissors and glued it to a piece of corrugated packaging (liberated from the office recycling) left au naturel as it goes so well with my kraft card blank.
I then distressed the edges of the background paper and added it to the card, gluing the bird panel on the left side.
I stamped the text from the Artistic Outpost Typography set with Archival Olive ink on a scrap of card, stamped on the flourish with the lemon ink, distressed the edges and added to a distressed mat of recycled brown paper before gluing to the card.
I hope you can join in with the challenge if you live in the UK as the prize is a £20 voucher for the online shop which has tons of fabulous crafty goodies to see.
Have a great weekend.
Fliss xx
The theme for this fortnight is The Birds so you can make anything you like as long as there's some stamping and a bird somewhere.
Here's my inspiration using a favourite IndigoBlu bird stamp along with the details on how I made the background.
I wanted a fairly vintage style creation so I made a fairly shabby style background using an ink applicator to apply a patchwork effect of subtle shades of Distress inks in a repeating fashion. I used Wild Honey, Shabby Shutters, Crushed Olive and Tattered Rose starting with the lightest shade and building up.
I then used second generation stamping with the IndigoBlu Dinkie Vintage Flourish and Forest Moss Distress ink to make a frame around the edge of the inked paper. It's very forgiving as you can just carry on overstamping until you create an effect you like. If you do as I did, you'll end up with 2 decorated papers for the price of one as if you look below you'll see my stamp off paper and I know I'll be using it soon as I think it turned out looking rather good.
I stamped the IndigoBlu bird image on smooth stamping card with Archival Coffee ink and added colour with pencils (Spectrum Noir pencils are rather good). I then stamped around the edges of the panel with the flourish stamp and Squeezed Lemonade Distress ink for a subtle textured effect.
I distressed the edges of the panel with scissors and glued it to a piece of corrugated packaging (liberated from the office recycling) left au naturel as it goes so well with my kraft card blank.
I then distressed the edges of the background paper and added it to the card, gluing the bird panel on the left side.
I stamped the text from the Artistic Outpost Typography set with Archival Olive ink on a scrap of card, stamped on the flourish with the lemon ink, distressed the edges and added to a distressed mat of recycled brown paper before gluing to the card.
I hope you can join in with the challenge if you live in the UK as the prize is a £20 voucher for the online shop which has tons of fabulous crafty goodies to see.
Have a great weekend.
Fliss xx
Labels:
Artistic Outpost,
Distress Inks,
IndigoBlu,
Spectrum Noir,
That's Crafty
The Writing's On The Wall
Good morning everyone and welcome to my first post today which is to tell you about the project I have over at That's Crafty which is a rather bold and graphic creation in bright colours.
Here's a sneak peek and you'll find the whole project over at the blog as usual if you'd like to pop over to see it.
Have a great day and see you later on.
Hugs,
Fliss xx
Here's a sneak peek and you'll find the whole project over at the blog as usual if you'd like to pop over to see it.
Have a great day and see you later on.
Hugs,
Fliss xx
Labels:
Artistic Outpost,
Distress Inks,
Paper Artsy,
Studio 12,
Tags,
That's Crafty,
Wendy Vecchi
Monday, 9 June 2014
Red Sail At Sunset
Morning all and hope you all had a lovely warm weekend as we did here on the sunny South Coast. It was so lovely to have sunshine and get out in the fresh air for a while.
Today we have a new challenge for you over at Make My Monday with a theme chosen by teamie Suzi B which as a certain day is fast looming is sure to be popular - For The Males In Your Life.
For my inspiration I've made my first proper attempt at a scenic card with a Stampscapes set with a nautical theme which I chose because the men in my family have a love of the sea.
I stamped the lighthouse first and masked it to stamp the cove image and then the yacht, stamping all the images with Archival Watering Can ink.
I added some colour with Aquamarkers and then used the sky textural stamp all over with Adirondack inks in Denim, Butterscotch and Cranberry. It really is a fabulous stamp for adding textured detail.
I simply added a navy and an orange mat before sticking all the layers to my card blank.
Have a great day and hope you can join us.
Hugs,
Fliss xx
I'd like to enter my card in the current challenge at Craft A Scene too as happily it's By The Sea - serendipity strikes!
Today we have a new challenge for you over at Make My Monday with a theme chosen by teamie Suzi B which as a certain day is fast looming is sure to be popular - For The Males In Your Life.
For my inspiration I've made my first proper attempt at a scenic card with a Stampscapes set with a nautical theme which I chose because the men in my family have a love of the sea.
I stamped the lighthouse first and masked it to stamp the cove image and then the yacht, stamping all the images with Archival Watering Can ink.
I added some colour with Aquamarkers and then used the sky textural stamp all over with Adirondack inks in Denim, Butterscotch and Cranberry. It really is a fabulous stamp for adding textured detail.
I simply added a navy and an orange mat before sticking all the layers to my card blank.
Have a great day and hope you can join us.
Hugs,
Fliss xx
I'd like to enter my card in the current challenge at Craft A Scene too as happily it's By The Sea - serendipity strikes!
Labels:
Make My Monday,
Male Cards,
Scenic,
Stampscapes
Friday, 6 June 2014
Shades of Grey For That's Crafty
Hello everyone, hoping you've all had a good week so far and are looking forward to the weekend as I am as my back is still playing up and I have to be very careful what I do at the moment to stop it hurting when I move in the wrong direction - sigh!
I have a project today over at That's Crafty which is the first page in my new journal - the one I altered the cover of a couple of weeks ago and it's my experiment with neutral monochromatic shades of grey and I promise, nothing to do with those infamous books - tee hee!
Here's a sneak peek and you'll find the whole creation over at the blog with all the details.
Have a great day and a lovely weekend.
Hugs, Fliss xx
I have a project today over at That's Crafty which is the first page in my new journal - the one I altered the cover of a couple of weeks ago and it's my experiment with neutral monochromatic shades of grey and I promise, nothing to do with those infamous books - tee hee!
Here's a sneak peek and you'll find the whole creation over at the blog with all the details.
Have a great day and a lovely weekend.
Hugs, Fliss xx
Labels:
Aquamarkers,
Art Journaling,
Paper Artsy,
Stamp-It,
Stampendous,
That's Crafty
Monday, 2 June 2014
Time For A Wedding
Good morning everyone and welcome to my first post of the week which is to let you know about the new challenge today over at Make My Monday and the theme chosen by Laura is Weddings.
This gave me the perfect opportunity to get a little ahead with a card for one of my nieces who is getting married in a couple of weeks. Unusually for me I've gone clean and simple for my card as I wanted something quite modern for the happy couple.
I die cut 2 hearts from gold and kraft card using an X Cut folk heart nesting die. I then used the Memory Box cherish border to die cut borders from kraft and cream cut and added portions of these to the die cut hearts.
I stamped the Hero Arts sentiment with Archival coffee ink directly on the card blank. I added the hearts to the card and finished off with a cherub button embellishment, cutting the shank off with my trusty Tim Holtz scissors.
Have a great week.
Hugs, Fliss xx
This gave me the perfect opportunity to get a little ahead with a card for one of my nieces who is getting married in a couple of weeks. Unusually for me I've gone clean and simple for my card as I wanted something quite modern for the happy couple.
I die cut 2 hearts from gold and kraft card using an X Cut folk heart nesting die. I then used the Memory Box cherish border to die cut borders from kraft and cream cut and added portions of these to the die cut hearts.
I stamped the Hero Arts sentiment with Archival coffee ink directly on the card blank. I added the hearts to the card and finished off with a cherub button embellishment, cutting the shank off with my trusty Tim Holtz scissors.
Have a great week.
Hugs, Fliss xx
Labels:
Clean and Simple,
Make My Monday
Sunday, 1 June 2014
A Little Sophistication
Hello folks from a rather sorry for herself Fliss. I've finally managed to start wearing my left contact lens again although not all day yet as after 2 weeks without, I have to build up again over a few days as my lenses are gas permeable due to my being blind as a bat without :)
I've now put my back out somehow so am currently hobbling about and have to be careful not to make any sudden moves in the wrong direction - sigh!
Anyhow, enough of my whingeing and on to a card I made the elements for a while back and only just got to assemble. This is for the birthday of one of my nieces and as the title says is quite richly coloured and I think fairly sophisticated.
The rather sassy lady is another of Mitzi at Aurora Wings's beautiful digital images and apologies to Mitzi here if my interpretation is not quite as she intended as I couldn't quite decide if she was wearing a head-dress but decided that she was - artistic license! I printed her on to smooth cartridge paper and coloured her with Aquamarkers, adding detail with Prismacolor pencils. I trimmed the image to a panel and heat embossed the edges with Cosmic Shimmer tarmished gold embossing powder. I added some gems to the dangling part of the head-dress.
I then made some embossed panels - a gold one embossed with an Anna Griffin folder and some red textured paper embossed with a floral Darice strip folder. I then rounded opposite corners with a corner rounder punch.
I made some embellishments - a corner using a Tonic corner die and bronze card, a a butterfly from the same card used a Cheery Lynn die, a trellis cut from mauve card using a Cheery Lynn die and a round bronze card doily shape.
I assembled the card as you see, adding a metal medallion, some gems and a stamped, matted sentiment (Hero Arts) to finish.
Enjoy the rest of your weekend.
Fliss xx
I'd like to enter my card in the following challenges:
Aurora Wings Challenge 3 - Butterflies
My Time To Craft Challenge - No Designer Paper
Suzy Bee's Bloomin' Challenge - Layer It Up
Chocolate, Coffee and Cards Challenge - Embossing
I've now put my back out somehow so am currently hobbling about and have to be careful not to make any sudden moves in the wrong direction - sigh!
Anyhow, enough of my whingeing and on to a card I made the elements for a while back and only just got to assemble. This is for the birthday of one of my nieces and as the title says is quite richly coloured and I think fairly sophisticated.
The rather sassy lady is another of Mitzi at Aurora Wings's beautiful digital images and apologies to Mitzi here if my interpretation is not quite as she intended as I couldn't quite decide if she was wearing a head-dress but decided that she was - artistic license! I printed her on to smooth cartridge paper and coloured her with Aquamarkers, adding detail with Prismacolor pencils. I trimmed the image to a panel and heat embossed the edges with Cosmic Shimmer tarmished gold embossing powder. I added some gems to the dangling part of the head-dress.
I then made some embossed panels - a gold one embossed with an Anna Griffin folder and some red textured paper embossed with a floral Darice strip folder. I then rounded opposite corners with a corner rounder punch.
I made some embellishments - a corner using a Tonic corner die and bronze card, a a butterfly from the same card used a Cheery Lynn die, a trellis cut from mauve card using a Cheery Lynn die and a round bronze card doily shape.
I assembled the card as you see, adding a metal medallion, some gems and a stamped, matted sentiment (Hero Arts) to finish.
Enjoy the rest of your weekend.
Fliss xx
I'd like to enter my card in the following challenges:
Aurora Wings Challenge 3 - Butterflies
My Time To Craft Challenge - No Designer Paper
Suzy Bee's Bloomin' Challenge - Layer It Up
Chocolate, Coffee and Cards Challenge - Embossing
Labels:
Anna Griffin,
Aquamarkers,
Aurora Wings,
Cheery Lynn,
Darice,
Hero Arts,
Prisma Pencils
Monday, 26 May 2014
Butterflies Galore
Hello there and welcome to my second post today as having had rain most of the day, I've managed to fit in a bit more crafting with some images I've been colouring up whilst listening to the TV in the evening.
This is the first of those using a beautiful Aurora Wings digital image with my favourite Spring flowers, pansies.
Isn't she adorable? I printed her out on to thick, smooth cartridge paper which is my choice for colouring with my favourite medium, Aquamarkers. After I painted the image, I then added detail with Prismacolor pencils. I trimmed the image to a panel and added it to a mauve mat with a strip of lilac pearls on one side.
Next I made the background paper by sponging lilac paint on a square of medium surface cartridge paper and stamped on lots of butterflies with a Stamp-It Australia image and lilac VersaColor ink. This is what it looked like before I covered rather a lot of it up!
I then die cut some flourishes (Cheery Lynn) and a corner (Marianne Design) from silver embossed card and some butterflies from teal card. I assembled the card as you see, finishing off with a silver metal filigree butterfly.
I'd like to enter my card in the following challenges:
Aurora Wings Challenge - Butterflies
Brown Sugar Challenge- Anything Goes
Craftitude Challenge - That's Die-Licious - Use A Die
Glitter & Sparkle Challenge - Add Some Metal
Thanks for looking.
Fliss xx
This is the first of those using a beautiful Aurora Wings digital image with my favourite Spring flowers, pansies.
Isn't she adorable? I printed her out on to thick, smooth cartridge paper which is my choice for colouring with my favourite medium, Aquamarkers. After I painted the image, I then added detail with Prismacolor pencils. I trimmed the image to a panel and added it to a mauve mat with a strip of lilac pearls on one side.
Next I made the background paper by sponging lilac paint on a square of medium surface cartridge paper and stamped on lots of butterflies with a Stamp-It Australia image and lilac VersaColor ink. This is what it looked like before I covered rather a lot of it up!
I then die cut some flourishes (Cheery Lynn) and a corner (Marianne Design) from silver embossed card and some butterflies from teal card. I assembled the card as you see, finishing off with a silver metal filigree butterfly.
I'd like to enter my card in the following challenges:
Aurora Wings Challenge - Butterflies
Brown Sugar Challenge- Anything Goes
Craftitude Challenge - That's Die-Licious - Use A Die
Glitter & Sparkle Challenge - Add Some Metal
Thanks for looking.
Fliss xx
Labels:
Aurora Wings,
Cheery Lynn,
Marianne Design
Make Us Laugh!
Hello there on a rather wet and typical Bank Holiday Monday for the UK. It was lovely yesterday but not so today!
I'm here with my rather late creation for the new challenge at Make My Monday with a theme chosen by Jacqueline who would like to see:
A Card To Make Us Laugh
I have to admit to a bit of a struggle with this one as it's not something I do very often (the once in 5 years something - tee hee!) so what I've come up with may make you smile but I'm not sure about the laughter. My DT sisters have done much better than me with this so do hop over for a peek.
I made the background panel with a homemade splatter style stamp and stamped this all over white card using Distress inks - Mustard Seed, Ripe Persimmon and Picked Raspberry. I started with the yellow and layer stamped over the top with the darker shades, stamping 2 or 3 times before re-inking. I then stamped in black with the squares, a Roman numeral and flourish stamp in a very random manner.
I stamped the cute and quirky bird (Viva LasVegastamps) - who's clearly not keen on the usual bird breakfast :) - with black ink on smooth card, trimmed to a panel and added to a red and black mat.
I die cut the pocket watch (Britannia Dies) from black and white card, assembled it and added to the card, finishing off with a computer generated sentiment which I then die cut and added to a red mat, fixing on with brads.
I think my card fits in quite nicely with the new challenge at Quirky Crafts Challenges which helped me to get inspiration as the theme is It's About Quirky Time and the card features that as well as the rather quirky bird. Thanks ladies!
Have a good week.
Hugs, Fliss xx
Labels:
Make My Monday,
Quirky,
Viva Las Vegastamps
Friday, 23 May 2014
True Colours
Good morning everyone, I hope you're all having a better week than me as I currently have a rather red left eye having got grit in it on Wednesday when walking up to the local shops in rather windy weather. It goes quite well with my colourful creation over at That's Crafty this week which is the altered cover of my new journal for colour experimentation :)
Here' s a sneak peek and you'll find the whole thing over at the blog with all the details.
Have a great day and a lovely weekend.
Hugs, Fliss xx
Here' s a sneak peek and you'll find the whole thing over at the blog with all the details.
Have a great day and a lovely weekend.
Hugs, Fliss xx
Labels:
Art Journaling,
Stampendous,
That's Crafty
Monday, 19 May 2014
Nature
Good morning folks, hope you all had a lovely and hopefully sunny weekend. It was so warm here it almost felt like Summer and it really was sunny Sussex by the sea.
Today we have a new challenge for you over at Make My Monday and this week the theme was chosen by yours truly as it's a big favourite of mine:
NATURE
I've made a Spring card for my inspiration with a gorgeous new stamp I recently acquired by Stacy Stamps which you can find at Joanna Sheen's online shop in the UK. It stamps amazingly well too with all the intricate detail.
I stamped the bird collage on to smooth cartridge paper with Memories Creamy Coffee ink and coloured it with Aquamarkers then added detail with Prisma pencils. I trimmed the image to a rectangular panel and added mats of pink and green.
I then made my background paper with the same stamp, just inking up the flowers in the lower part of the image with Dovecraft Natural ink and stamping round the edges. I then did some Distress inking with Spun Sugar, Shabby Shutters, Crushed Olive and Mowed Lawn. There's a pic below so you can see the whole piece before I stuck the main panel on.
I added this to a card blank, stuck on the main image panel and finished off with a stamped sentiment which I inked and coloured a little to tone in.
Here are a couple of nature photos I took in our garden too as we've had 4 little fox cubs playing in the garden and seagulls on our neighbours roof so hope you like these. I also think the baby seagull might make you smile too :)
I hope you can join in as we'd love to see you there.
Have a great week.
Fliss xx
I'd like to enter the following challenges:
Dream Valley Challenges - Things With Wings
Sister Act Challenge - Anything Goes
Labels:
Make My Monday,
Nature,
Stacy Stamps
Friday, 16 May 2014
That's Krafty!
Hello again and welcome to my second post today which is to tell you about the new challenge today over at the That's Crafty challenge blog which is - wait for it! - THAT'S KRAFTY.
That's right, we want to see your creations using kraft card which I have to say is a favourite of mine and here's my inspiration which is a fairly clean and simple creation ( well for me anyway :) ).
I've used a kraft card blank and stamped directly on the card (I was feeling quite brave at the time). On the right hand side I stamped the largest butterfly and the moth from the Kaisercraft Butterflies Set using Archival Watering Can ink.
On the left side, I stamped the Kaisercraft Script several times with Archival Olive ink.
I stamped the sentiment from the Stamp-It Australia Time To Dream Unmounted Stamp Set on a scrap of kraft card with the Watering Can ink, cut it to a square panel and added a black mat before adding to the card.
And that's it - done!
Hope you can enter as the prize for our randomly drawn winner is a £20 voucher for the online shop. Good luck!
Have a great weekend.
Fliss xx
That's right, we want to see your creations using kraft card which I have to say is a favourite of mine and here's my inspiration which is a fairly clean and simple creation ( well for me anyway :) ).
I've used a kraft card blank and stamped directly on the card (I was feeling quite brave at the time). On the right hand side I stamped the largest butterfly and the moth from the Kaisercraft Butterflies Set using Archival Watering Can ink.
On the left side, I stamped the Kaisercraft Script several times with Archival Olive ink.
I stamped the sentiment from the Stamp-It Australia Time To Dream Unmounted Stamp Set on a scrap of kraft card with the Watering Can ink, cut it to a square panel and added a black mat before adding to the card.
And that's it - done!
Hope you can enter as the prize for our randomly drawn winner is a £20 voucher for the online shop. Good luck!
Have a great weekend.
Fliss xx
Labels:
Kaisercraft,
Stamp-It,
That's Crafty
Feeling Blue
Hello folks from a very tired Fliss as I've had a very busy time with work and stuff over the last couple of weeks practically falling asleep whilst watching TV yesterday. I'm definitely looking forward to the weekend and hopefully a bit of a rest..
Anyhow, enough waffle and on to the first post today which is to tell you about the project I have today over at That's Crafty which I was rather late in sending to poor Laura yesterday so apologies here for that!
You can probably see the reason for my title now as I decided to go monochrome with shades of blue for a vintage style card. All the deets are over at the blog as usual.
Back in a bit to let you know about the new challenge we have for you today over at the That's Crafty challenge blog and I think you'll love it too.
Fliss xx
Anyhow, enough waffle and on to the first post today which is to tell you about the project I have today over at That's Crafty which I was rather late in sending to poor Laura yesterday so apologies here for that!
You can probably see the reason for my title now as I decided to go monochrome with shades of blue for a vintage style card. All the deets are over at the blog as usual.
Back in a bit to let you know about the new challenge we have for you today over at the That's Crafty challenge blog and I think you'll love it too.
Fliss xx
Labels:
Deep Red,
Papermania,
Stampendous,
That's Crafty,
Vintage Style
Monday, 12 May 2014
It's A Hoot At Make My Monday
Hello all and sorry about my post title which I couldn't resist because our theme this week at Make My Monday chosen by Laura is OWLS :)
We also have 3 very creative new Design Team members showing off their first makes today so it's a big welcome from me to Joan, Marina and Sue. Great to have you with us ladies and looking forward to getting to know you.
Here's my challenge inspiration which is a little wall hanging featuring my favourite owl stamp which I've had for many years and could never part with as he's so cute.
I made the wall hanging from some recycled grey board which I covered with some tan coloured paper after punching holes at the top and adding natural twine to form the hanger.
I then made a background paper using an elderly and much treasured PSX ivy stamp which I repeat stamped in various shades of green VersaMagic chalk inks. I distressed the edges with a craft knife and emery board before attaching to the wall panel.
I then made a textured panel with recycled corrugated packaging painted with shades of blue and green acrylic paints and then sprinkled on some Ranger Tarnished Gold embossing powder whilst the paint was still damp and heated it to melt the powder. I sanded the edges lightly with the emery board.
I stamped the owl (Tattered Angels) with Memories Creamy Coffee chalk ink on smooth cartridge paper and when dry, coloured him with Aquamarkers. I trimmed the image to a panel, distressed the edges and inked them lightly then added tan and brown mats, also with distressed edges. I attached the panel to the corrugated background with square antique copper brads to make sure it stayed put as it had buckled slightly after the paint was applied.
I then die cut some ivy leaves from an X Cut leaf set (really fabulous as it produces beautiful embossed leaves of many types) and coloured these with Peeled Paint and Forest Moss Distress inks.
Have a great week.
Hugs,
Fliss xx
PS: It's turned really cold again so the heating has gone back on as we had hail this morning!
We also have 3 very creative new Design Team members showing off their first makes today so it's a big welcome from me to Joan, Marina and Sue. Great to have you with us ladies and looking forward to getting to know you.
Here's my challenge inspiration which is a little wall hanging featuring my favourite owl stamp which I've had for many years and could never part with as he's so cute.
I made the wall hanging from some recycled grey board which I covered with some tan coloured paper after punching holes at the top and adding natural twine to form the hanger.
I then made a background paper using an elderly and much treasured PSX ivy stamp which I repeat stamped in various shades of green VersaMagic chalk inks. I distressed the edges with a craft knife and emery board before attaching to the wall panel.
I then made a textured panel with recycled corrugated packaging painted with shades of blue and green acrylic paints and then sprinkled on some Ranger Tarnished Gold embossing powder whilst the paint was still damp and heated it to melt the powder. I sanded the edges lightly with the emery board.
I stamped the owl (Tattered Angels) with Memories Creamy Coffee chalk ink on smooth cartridge paper and when dry, coloured him with Aquamarkers. I trimmed the image to a panel, distressed the edges and inked them lightly then added tan and brown mats, also with distressed edges. I attached the panel to the corrugated background with square antique copper brads to make sure it stayed put as it had buckled slightly after the paint was applied.
I then die cut some ivy leaves from an X Cut leaf set (really fabulous as it produces beautiful embossed leaves of many types) and coloured these with Peeled Paint and Forest Moss Distress inks.
Have a great week.
Hugs,
Fliss xx
PS: It's turned really cold again so the heating has gone back on as we had hail this morning!
Labels:
Make My Monday,
PSX,
Recycling,
Wall Art,
X Cut
Thursday, 8 May 2014
Smarter Than You Think
Hello folks, I hope you've all had a good week and are ready for the weekend as I most definitely am although I have to do some work tomorrow to finish something off - no rest for the wicked you might say!
Today's post is to tell you about the project that I have for you over at That's Crafty which this week is something rather different as I've been experimenting with ways to get the look of parchment work without spending ages on it - I'm too impatient you see!
Here's a peek and you'll find all the details over at the blog as usual.
A slightly later post than this should be too as try as I might (at least 5 times!) I couldn't get the pic to upload last night!
Have a great day and a lovely weekend.
Hugs,
Fliss xx
Today's post is to tell you about the project that I have for you over at That's Crafty which this week is something rather different as I've been experimenting with ways to get the look of parchment work without spending ages on it - I'm too impatient you see!
Here's a peek and you'll find all the details over at the blog as usual.
A slightly later post than this should be too as try as I might (at least 5 times!) I couldn't get the pic to upload last night!
Have a great day and a lovely weekend.
Hugs,
Fliss xx
Labels:
Artistic Outpost,
Studio 12,
That's Crafty
Monday, 5 May 2014
Seasonal Flower Colours At Make My Monday
Hello there folks and hope you're all enjoying the long weekend or at least those of you in the UK. It's been quite sunny here too although colder but so lovely to see the sunshine.
Lots of nature to see as well as our garden is full of birds and their babies and yesterday afternoon we saw some fox cubs playing in our next door neighbour's garden but sadly too far away to take any photos. You will see a pic at the end of the post of our own 2 little dears though so do read on for this.
We have a new challenge for you today over at Make My Monday with a theme chosen by Suzi B of Seasonal Flower Colours with a lovely photo inspiration which you can see over at the blog.
Not much stamping this week as I couldn't find any stamps that quite fit the colour theme so the lovely pot of lavender from the Polka Doodles Sundae Of Seasons CD, although not exactly seasonal :), came to the rescue.
I went for a simple layered background with some trellis patterned papers and embossed some toning card panels with a Creative Expressions lattice folder. The sentiment is a Catslife Press stamp which I stamped with Memento Grape Jelly, die cut with a Nestabilities circle die and inked up with lilac and purple.
Now for the pic of our 2 little cuties which I hope you like:
The one stuffing her face is Rosie and the little fella keeping watch while his sister eats is Dill. They both love the patch where you can see them as it's close to the house so they can make a bolt for it if anything scares them - this happens quite a lot as they're Netherland Dwarfs and rather nervy!
Have a great day.
Hugs,
Fliss xx
Lots of nature to see as well as our garden is full of birds and their babies and yesterday afternoon we saw some fox cubs playing in our next door neighbour's garden but sadly too far away to take any photos. You will see a pic at the end of the post of our own 2 little dears though so do read on for this.
We have a new challenge for you today over at Make My Monday with a theme chosen by Suzi B of Seasonal Flower Colours with a lovely photo inspiration which you can see over at the blog.
Not much stamping this week as I couldn't find any stamps that quite fit the colour theme so the lovely pot of lavender from the Polka Doodles Sundae Of Seasons CD, although not exactly seasonal :), came to the rescue.
I went for a simple layered background with some trellis patterned papers and embossed some toning card panels with a Creative Expressions lattice folder. The sentiment is a Catslife Press stamp which I stamped with Memento Grape Jelly, die cut with a Nestabilities circle die and inked up with lilac and purple.
Now for the pic of our 2 little cuties which I hope you like:
The one stuffing her face is Rosie and the little fella keeping watch while his sister eats is Dill. They both love the patch where you can see them as it's close to the house so they can make a bolt for it if anything scares them - this happens quite a lot as they're Netherland Dwarfs and rather nervy!
Have a great day.
Hugs,
Fliss xx
Labels:
Make My Monday,
Polka Doodles
Friday, 2 May 2014
Spring Is In The Air
Back again folks and it's time to tell you about the new challenge we have for you today over at That's Crafty Challenge Blog and the theme is a fab one - Spring.
I absolutely love this theme as Spring is a favourite time of year to me with all the new leaves and blossom appearing.
I've taken inspiration from my memories of the pots of pansies my dear Mum always had in her garden in Spring and Summer.
As you can see, there are pansies galore on my little wall hanging panel and I've chosen my Mum's favourite colours for them too.
I used a thick chipboard book page to make the hanging and covered it with some paper from my stash which was ready coloured with Gelatos. Before I attached it, I embossed the left side with an Anna Griffin embossing folder.
I stamped the pansy border and the gorgeous lady with Archival coffee ink and coloured them with Aquamarkers. I then cut the border out completely and partially cut the lady out, leaving the right hand edge straight.
I embossed a further scrap of Gelato coloured card with a trellis folder and added the lady image to it. I assembled the wall hanging as you see, adding the text which I stamped with alphabet stamps using the brown ink.
I used:
Stamps:
Stampendous Spring Gal
Deep Red Cling Set - Pansy Borders
Alphabet Stamps
Gelato Design Color Kit
Smooth Stamping Card
Aquamarkers
Creative Expressions Lattice Embossing Folder
Cuttlebug Anna Griffin Floral Bouquet Embossing Folder
Hope you can enter although you must read the rules first to be in with a chance of winning a £20 voucher to the shop.
Good luck!
Fliss xx
I absolutely love this theme as Spring is a favourite time of year to me with all the new leaves and blossom appearing.
I've taken inspiration from my memories of the pots of pansies my dear Mum always had in her garden in Spring and Summer.
As you can see, there are pansies galore on my little wall hanging panel and I've chosen my Mum's favourite colours for them too.
I used a thick chipboard book page to make the hanging and covered it with some paper from my stash which was ready coloured with Gelatos. Before I attached it, I embossed the left side with an Anna Griffin embossing folder.
I stamped the pansy border and the gorgeous lady with Archival coffee ink and coloured them with Aquamarkers. I then cut the border out completely and partially cut the lady out, leaving the right hand edge straight.
I embossed a further scrap of Gelato coloured card with a trellis folder and added the lady image to it. I assembled the wall hanging as you see, adding the text which I stamped with alphabet stamps using the brown ink.
I used:
Stamps:
Stampendous Spring Gal
Deep Red Cling Set - Pansy Borders
Alphabet Stamps
Gelato Design Color Kit
Smooth Stamping Card
Aquamarkers
Creative Expressions Lattice Embossing Folder
Cuttlebug Anna Griffin Floral Bouquet Embossing Folder
Hope you can enter although you must read the rules first to be in with a chance of winning a £20 voucher to the shop.
Good luck!
Fliss xx
Fairy Happy Birthday For That's Crafty
Hello everyone, hope you're all well and have had a good week. Mine has been really busy at work so you can guess who's looking forward to the Bank Holiday weekend.
My first post of today is to tell you that I have a project and tutorial on how I created it over at That's Crafty which I hope you like. There's also a little tip for making your own background paper which will save on time and ink so do hop on over if you'd like to see what it is.
Quite a girly card as you see as I'm trying to get ahead with the birthday cards I need in the next few weeks.
I'll be back a bit later with details of our new challenge over at the That's Crafty challenge blog and I just loved the theme and think you will too when you see what it is.
See you later!
Hugs,
Fliss xx
My first post of today is to tell you that I have a project and tutorial on how I created it over at That's Crafty which I hope you like. There's also a little tip for making your own background paper which will save on time and ink so do hop on over if you'd like to see what it is.
Quite a girly card as you see as I'm trying to get ahead with the birthday cards I need in the next few weeks.
I'll be back a bit later with details of our new challenge over at the That's Crafty challenge blog and I just loved the theme and think you will too when you see what it is.
See you later!
Hugs,
Fliss xx
Labels:
Aquamarkers,
IndigoBlu,
Stampendous,
That's Crafty,
Vintage Style
Monday, 28 April 2014
A Nice Cup Of Tea
Good morning everyone and welcome to my post for our new challenge over at Make My Monday today which has a theme chosen by Jacqueline who would like to see your creations involving Food and Drink.
I decided on my favourite daytime tipple, a lovely cuppa as I need about 2 mugs full to get me going in the morning!
Here's what I made although it's a little more dainty than a mug!
I turned to my Kanban damask tea and coffee stamp set and stamped the cup on blue card with VersaFine Majestic Blue ink. I then cut the cup and saucer out.
I then stamped a Hero Arts flourish image on white card with VesaColor Sky Blue ink and die cut into a frilly panel with an X Cut die.
I embossed a panel of blue card with the Cuttlebug Victoria folder and stuck this to my square card blank.
I stamped the tea text from the stamp set directly on the die cut panel and added the cup then stuck this to the card to finish.
As you see, quite a simple creation for me and I hope you like it.
Have a great week.
Hugs,
Fliss xx
I decided on my favourite daytime tipple, a lovely cuppa as I need about 2 mugs full to get me going in the morning!
Here's what I made although it's a little more dainty than a mug!
I turned to my Kanban damask tea and coffee stamp set and stamped the cup on blue card with VersaFine Majestic Blue ink. I then cut the cup and saucer out.
I then stamped a Hero Arts flourish image on white card with VesaColor Sky Blue ink and die cut into a frilly panel with an X Cut die.
I embossed a panel of blue card with the Cuttlebug Victoria folder and stuck this to my square card blank.
I stamped the tea text from the stamp set directly on the die cut panel and added the cup then stuck this to the card to finish.
As you see, quite a simple creation for me and I hope you like it.
Have a great week.
Hugs,
Fliss xx
Labels:
Hero Arts,
Kanban,
Make My Monday
Sunday, 27 April 2014
Nature's Beauty
My frame is inspired by the latest challenge at Crafty Individuals which is Nature's Beauty so how could I resist when I love nature so much. The post is a bit picture heavy to show the detail and I hope you like it.
I started off with a blank papier mache frame which I decorated using my Shabby Chic Peeloff Technique which you can find HERE. It's very easy and this time I used a combination of flourish and daisy peeloffs - the daisies were gold and the flourishes copper but I bet you'd never guess that if I hadn't told you!
For the frame, I used Wild Honey and Vintage Photo Distress inks after 2 coats of gesso as the frame was kraft coloured. After using my technique, I then stamped on a daisy from CI-206 Flower Heads with Palette Raw Sienna ink which is permanent like StazOn.I then rubbed some Creative Expressions Cast Bronze Gilding Wax.
The central panel was made by colouring a piece of thick, smooth cartridge paper with Distress Inks applied with an acrylic block - I used Crushed Olive, Wild Honey and Spiced Marmalade and smooshed the ink around on the paper whilst it was still wet.
I stamped the silhouette meadow image - CI-367 - twice with VersaFine Olympia Green ink and stamped some of the butterflies from CI-231 on scrap cartridge paper with the same green. I cut these out and added them to the panel after sticking it in the frame.
I then sanded the raised peeloff elements slightly to knock off a little of the paint and embossing for a vintage look.
Thanks to everyone at Crafty Individuals for inspiring me.
Hugs,
Fliss xx
Friday, 25 April 2014
Botanical For That's Crafty
Hello there everyone and welcome to today's post which is to let you all know about the project I have today over at That's Crafty which is nature themed, something which is a real favourite of mine.
I chose to use Spring shades too as the weather has been mostly sunny this week and Spring has definitely been in the air.
We took a lovely walk in Arundel on Easter Monday and saw ducks with ducklings and also moorhens with tiny babies too. We also saw a moorhen of a different type with the most amazing big blue feet which looked so funny on a small water fowl too.
I hope you like what I created and as usual you'll find out how I made it if you hop on over to the blog.
Have a great day and a lovely weekend.
Hugs,
Fliss xx
I chose to use Spring shades too as the weather has been mostly sunny this week and Spring has definitely been in the air.
We took a lovely walk in Arundel on Easter Monday and saw ducks with ducklings and also moorhens with tiny babies too. We also saw a moorhen of a different type with the most amazing big blue feet which looked so funny on a small water fowl too.
I hope you like what I created and as usual you'll find out how I made it if you hop on over to the blog.
Have a great day and a lovely weekend.
Hugs,
Fliss xx
Labels:
Aquamarkers,
Distress Inks,
Papermania,
That's Crafty
Monday, 21 April 2014
Distress It!
Hello there folks and a Happy Easter to you all. I hope you had a lovely time and didn't eat too much chocolate!
I'm here now with a slightly late post for the new challenge today over at Make My Monday which was chosen by former team mate Jan and involves one of my absolute favourite techniques - Distressing.
I have a tutorial to share too, so that you can see how I turned something that has been in my stash for many years, unused as I tend to prefer stamping but this is all about how you can make a humble Peel Off look like it isn't a peel off! I think I'll be using this technique quite a lot too and you may need a cuppa before you read on although I promise it's not too long.
The finished card is above and you'll find the background paper steps below.
Step 1
For this you need a piece of smooth thick paper or watercolour paper cut to fit your chosen card blank and some peel offs. I chose corner ones but you could use flowers or patterned peel offs to make a frame shape.
As you can see, I placed the peel off in the corners of my paper.
Step 2
For this step you need some gesso which I brushed roughly all over. You don't have to be precise with this as it gives a better shabby chic effect if the coverage is quite textured.
Step 3
This step takes the most time. You need some Distress inks - I used Tattered Rose, Wild Honey and Frayed Burlap. I applied the 2 lighter shades with a sponge and then added just a touch of the brown which you can see inked the rougher areas more. I then stamped a pattern design (Kaisercraft Lattice) all over with the Wild Honey to add more texture.
I heat embossed the paper with clear detail embossing powder. I distressed the edges and the peel off corners gently with an emery board and added Vintage Photo Distress ink round the edges.
If you click on the photo below, you'll see that sanding some of the paint off the peel offs gives them a rather distressed look like rusted metal.
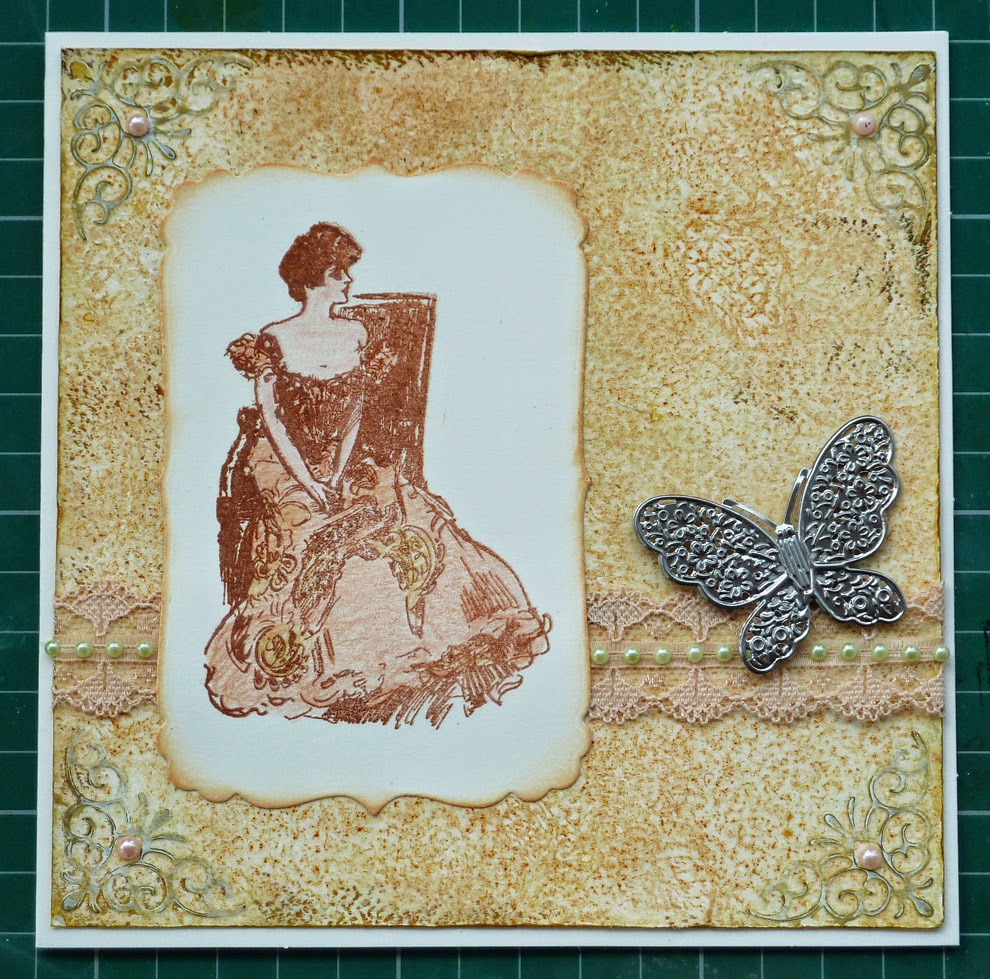
As you can see on my card above, the addition of some pearls and lace together with the filigree butterfly and the lovely Gibson lady (Flonzcraft), the paper gives a soft vintage feel.
Hoping that you like this and please do let me know what you think.
Hugs,
Fliss xx
PS: I'd also like to enter my tutorial in the current Mixed Media Mayhem at Quirky Crafts Challenges as you can see from the card and tutorial quite a few things came into play. Hope that's OK with you ladies :)
I'm here now with a slightly late post for the new challenge today over at Make My Monday which was chosen by former team mate Jan and involves one of my absolute favourite techniques - Distressing.
I have a tutorial to share too, so that you can see how I turned something that has been in my stash for many years, unused as I tend to prefer stamping but this is all about how you can make a humble Peel Off look like it isn't a peel off! I think I'll be using this technique quite a lot too and you may need a cuppa before you read on although I promise it's not too long.
The finished card is above and you'll find the background paper steps below.
Step 1
For this you need a piece of smooth thick paper or watercolour paper cut to fit your chosen card blank and some peel offs. I chose corner ones but you could use flowers or patterned peel offs to make a frame shape.
As you can see, I placed the peel off in the corners of my paper.
Step 2
For this step you need some gesso which I brushed roughly all over. You don't have to be precise with this as it gives a better shabby chic effect if the coverage is quite textured.
Step 3
This step takes the most time. You need some Distress inks - I used Tattered Rose, Wild Honey and Frayed Burlap. I applied the 2 lighter shades with a sponge and then added just a touch of the brown which you can see inked the rougher areas more. I then stamped a pattern design (Kaisercraft Lattice) all over with the Wild Honey to add more texture.
I heat embossed the paper with clear detail embossing powder. I distressed the edges and the peel off corners gently with an emery board and added Vintage Photo Distress ink round the edges.
If you click on the photo below, you'll see that sanding some of the paint off the peel offs gives them a rather distressed look like rusted metal.
As you can see on my card above, the addition of some pearls and lace together with the filigree butterfly and the lovely Gibson lady (Flonzcraft), the paper gives a soft vintage feel.
Hoping that you like this and please do let me know what you think.
Hugs,
Fliss xx
PS: I'd also like to enter my tutorial in the current Mixed Media Mayhem at Quirky Crafts Challenges as you can see from the card and tutorial quite a few things came into play. Hope that's OK with you ladies :)
Friday, 18 April 2014
Black and White with a Splash
Hello again and welcome to my second post of the day which is about our new challenge over at the That's Crafty Challenge Blog which this time has the theme of Black and White with a Splash (in my case a splash of red) of whichever colour takes your fancy.
Here's my inspiration which I hope you'll like.
As you can see it's hearts all the way! I made the background first by stamping the honeycomb design in opposite corners with red ink and then use the checkered stamp to add the black border.
I then die cut some hearts from black and white card and stamped one white heart with black checks and the larger with red.
I added these to my card and finished off with text stamped in black.
I used:
Kaisercraft Clear Stamps - Honeycomb, Arty, You!
Archival Jet Black Ink
VersaFine Satin Red Ink
White Stamping Card
Black Card
X Cut Nesting Dies - Homespun Heart
Good kuck to all who enter and hoping those eligible do for a prize of a £20 voucher for the online shop.
Have a great weekend.
Hugs,
Fliss xx
Here's my inspiration which I hope you'll like.
As you can see it's hearts all the way! I made the background first by stamping the honeycomb design in opposite corners with red ink and then use the checkered stamp to add the black border.
I then die cut some hearts from black and white card and stamped one white heart with black checks and the larger with red.
I added these to my card and finished off with text stamped in black.
I used:
Kaisercraft Clear Stamps - Honeycomb, Arty, You!
Archival Jet Black Ink
VersaFine Satin Red Ink
White Stamping Card
Black Card
X Cut Nesting Dies - Homespun Heart
Good kuck to all who enter and hoping those eligible do for a prize of a £20 voucher for the online shop.
Have a great weekend.
Hugs,
Fliss xx
Labels:
Kaisercraft,
That's Crafty,
X Cut
Smile
Good morning folks and welcome to the first post of today which is to tell you about this weeks' project for That's Crafty which is another bright and sunny creation which is really quick to make if you're short on time as I've been this week.
You'll find all the details over at the blog as usual and I hope you'll pop over to visit as the Design Team added some really beautiful projects over the last week.
I'll be back shortly as a new challenge starts at 8am today over at the That's Crafty Challenge Blog so see you in a bit.
Hugs,
Fliss xx
You'll find all the details over at the blog as usual and I hope you'll pop over to visit as the Design Team added some really beautiful projects over the last week.
I'll be back shortly as a new challenge starts at 8am today over at the That's Crafty Challenge Blog so see you in a bit.
Hugs,
Fliss xx
Labels:
Distress Inks,
Indigo Blu,
Kaisercraft,
That's Crafty
Monday, 14 April 2014
Mythical Creatures
Hello there, a slight case of better late than never with this post as I didn't have enough time to do it yesterday after my return from Kent as I had to get ready for today's return to work.
Our new challenge over at Make My Monday today has the theme of Mythical Creatures chosen by Rosie and I decided on a favourite undersea mythical creature of mine as you'll see from my inspiration below.
I inked up my Santoro mermaid image with VersaFine Olympia Green and stamped her on smooth cartridge paper then coloured her with Aquamarkers. I then die cut the image to a circular panel.
The background paper is the second of my papers made with my watery effect technique which I'll be sharing as a tutorial shortly as it makes 2 papers at once - always great to get 2 for the price of 1!
For the sentiment, I inked up part of a Tim Holtz stamp with the green ink and cut round it after stamping.
Have a great week and will be round to visit soon.
Hugs,
Fliss xx
Our new challenge over at Make My Monday today has the theme of Mythical Creatures chosen by Rosie and I decided on a favourite undersea mythical creature of mine as you'll see from my inspiration below.
I inked up my Santoro mermaid image with VersaFine Olympia Green and stamped her on smooth cartridge paper then coloured her with Aquamarkers. I then die cut the image to a circular panel.
The background paper is the second of my papers made with my watery effect technique which I'll be sharing as a tutorial shortly as it makes 2 papers at once - always great to get 2 for the price of 1!
For the sentiment, I inked up part of a Tim Holtz stamp with the green ink and cut round it after stamping.
Have a great week and will be round to visit soon.
Hugs,
Fliss xx
Labels:
Make My Monday
Friday, 11 April 2014
The Gift Of Life
Hello peops, I'm hoping that Mr Blogger has played nice and published this post for I'm currently in Kent on a few days much needed break.
I have a project today over at That's Crafty which is another rather bright creation which I hope you like although you might need sunglasses!
You'll find all the details over at the blog as always and I hope you decide to pop over as my team mates have been sharing some amazing creativity which is well worth the trip.
Be good and see you next week!
Hugs,
Fliss xx
I have a project today over at That's Crafty which is another rather bright creation which I hope you like although you might need sunglasses!
You'll find all the details over at the blog as always and I hope you decide to pop over as my team mates have been sharing some amazing creativity which is well worth the trip.
Be good and see you next week!
Hugs,
Fliss xx
Labels:
Distress Inks,
Gelatos,
Kaisercraft,
Prima,
That's Crafty,
Wendy Vecchi
Monday, 7 April 2014
Easter Wishes
Hello folks, I hope you all had a good weekend with hopefully some sunshine as we did. Not that I saw much of it as I was running around trying to get things done before we go away for a few days as I'm working up to the day before and will only have time for packing the evening before we go. I can't tell you how much I'm looking forward to it!
We have a new challenge for you today over at Make My Monday which as a certain weekend is fast looming is Easter so we would like to see creations of any sort with Easter in mind.
I didn't have any stamps that fit the bill so I had to resort to the internet and found this rather sweet vintage postcard featuring some very cute bunnies so how could I resist!
It needed a simple background so I chose to echo the colours in the postcard with softer green and yellow card which I embossed with a Crafts Too folder.
I assembled the card as you see, adding some toning ribbon and flowers to finish.
Have a great day.
Hugs,
Fliss xx
We have a new challenge for you today over at Make My Monday which as a certain weekend is fast looming is Easter so we would like to see creations of any sort with Easter in mind.
I didn't have any stamps that fit the bill so I had to resort to the internet and found this rather sweet vintage postcard featuring some very cute bunnies so how could I resist!
It needed a simple background so I chose to echo the colours in the postcard with softer green and yellow card which I embossed with a Crafts Too folder.
I assembled the card as you see, adding some toning ribbon and flowers to finish.
Have a great day.
Hugs,
Fliss xx
Labels:
Make My Monday
Friday, 4 April 2014
Spinning Around
Hello again, I'm back with my promised news of our new challenge over at That's Crafty Challenge Blog which this time has the theme of You Spin Me Right Round so we want to see your creations using circles.
In my case, the first thing that sprang to mind rather gives my age away as it was The Windmills Of Your Mind by Noel Harrison. I've made a wall hanging piece with rather a lot of circles as you'll see.
The paper I used began with another of my first creation with the Stampendous Creative Palette a few weeks back (I still have one whole piece and some bits left!). I stamped on the paper with a fabulous background set I recently acquired designed by Nathalie Kalbach for Stampendous called Wired. I used various Distress inks (see below).
I then used the stencil that comes with the stamp set to add the orange circles and then attached the paper to some recycled board, using some orange twine to make the hanger. I then chose some chit chat stickers to spell out some creative thoughts in a circle (I used one of the shapes from my circle cutter for the placement).
I used:
Stampendous NK Studio stamp set - Wired
Distress Inks - Seedless Preserves, Stormy Sky, Ripe Persimmon
Tim Holtz Chit Chat Stickers
The randomly drawn winner will receive a £20 voucher to the online shop so don't forget you have to be in it to win it! Good luck!
Have a great weekend,
Hugs,
Fliss xx
In my case, the first thing that sprang to mind rather gives my age away as it was The Windmills Of Your Mind by Noel Harrison. I've made a wall hanging piece with rather a lot of circles as you'll see.
The paper I used began with another of my first creation with the Stampendous Creative Palette a few weeks back (I still have one whole piece and some bits left!). I stamped on the paper with a fabulous background set I recently acquired designed by Nathalie Kalbach for Stampendous called Wired. I used various Distress inks (see below).
I then used the stencil that comes with the stamp set to add the orange circles and then attached the paper to some recycled board, using some orange twine to make the hanger. I then chose some chit chat stickers to spell out some creative thoughts in a circle (I used one of the shapes from my circle cutter for the placement).
I used:
Stampendous NK Studio stamp set - Wired
Distress Inks - Seedless Preserves, Stormy Sky, Ripe Persimmon
Tim Holtz Chit Chat Stickers
The randomly drawn winner will receive a £20 voucher to the online shop so don't forget you have to be in it to win it! Good luck!
Have a great weekend,
Hugs,
Fliss xx
Labels:
Distress Inks,
Stampendous,
That's Crafty,
Tim Holtz Products,
Wall Art
Harmony
Hello peops, hope you've all had a good week and haven't got too covered in the Sahara dust cloud. In my case, it's mostly my car that suffered and on the way home from work yesterday we had a rather smoggy cloud in the distance.
This is my first post of the two today to let you know that I have a project at That's Crafty today that you might need sunglasses for as as you see, it's quite bright!
All of the details of how I made my little canvas are over at the blog if you would like to pop over for a peek.
I'll be back in a bit with news of our new challenge over at the That's Crafty Challenge Blog so in the meantime, be good!
Hugs,
Fliss xx
This is my first post of the two today to let you know that I have a project at That's Crafty today that you might need sunglasses for as as you see, it's quite bright!
All of the details of how I made my little canvas are over at the blog if you would like to pop over for a peek.
I'll be back in a bit with news of our new challenge over at the That's Crafty Challenge Blog so in the meantime, be good!
Hugs,
Fliss xx
Labels:
Artistic Outpost,
Canvasses,
Deep Red,
Gelatos,
That's Crafty
Subscribe to:
Posts (Atom)