Good morning everyone and Monday is here again! The weekend seemed to disappear really fast although I did fit in some crafting along with all the other things happening.
Today sees the last of Suzanne's February theme of Romance over at Make My Monday and this week we would like to see your romantic creations with Diamonds and Flourishes - diamonds are a girl's best friend, right?
I was a bit short of time so I raided my experimental box of bits and challenged myself to make a card from some bits in there. This is what I came up with and the bits you see were made as follows:
The deep red paper is Vaseline resist technique using Fired Brick and Aged Mahogany Distress inks and a Viva Decor large corner stamp.
The flourish paper is simply a Viva Decor flourish stamped all over buff card with Victorian Velvet Distress ink.
The ivory paper mat was made by embossing a Chocolate Baroque damask background on parchment paper with peach embossing powder for the resist and was then rubbed with Victorian Velvet DI.
The lovely lady is a Rubber Stampede stamp I've had for many years and I stamped her with Imperial Purple VersaFine ink and trimmed to leave a white border. I assembled the card as you see adding flourishes and flowers die cut with Marianne Design dies and clear gems to accent.
Our sponsor for February has been Marianne Design and there's still a chance to win the fabulous prize of Marianne goodies. You'll find all the details over on the Challenge blog together with an array of fabulous samples from the Design Team. We've had to say goodbye to Cath too due to various problems she's had over the last few months and I'd like to wish her well here.
Some challenges for my card:
Patties Creations - Vintage
Moving Along With The Times - Lots Of Layers
Thanks for looking and have a good week.
Hugs, Fliss xx
Monday, 27 February 2012
Sunday, 26 February 2012
A Bit Of Alice
Good morning folks, hope you're all having a great weekend so far. Mine has been quite crafty as we have a new challenge for you today over at Fashionable Stamping Challenges and this fortnight the theme is Make It For A Child.
This one was a bit tricky for me as most of the children in the family are now grown and I don't have much stuff that isn't digital. Then I remembered my Alice stamps and this is the result!
Lots of pics here as my wall hanging is around 30cm square in size and as you can see it's quite bright!
Ingredients used:
Stamps - Polka Doodles Wonderland rubber stamp set
The Artistic Stamper steampunk butterfly and snail
Anita's distressed stripe stamp
Inks - Distress Inks in Shabby Shutters, Tumbled Glass, Stormy Sky, Worn Lipstick and Ripe Persimmon.
VersaColor Lilac
Memento Tuxedo Black
Papers from Polka Doodles Wonderland CD
Fuchsia Pink Acrylic Paint
Matte Clear Embossing Powder
Promarkers
Embossing Folders - Cuttlebug polka dots and textile , Papermania floral and triboss squares
Die Cutting Sets - Papermania hearts, squares and flowers, Nestabilities circles and scalloped circles
I used the black and white option papers from the CD and coloured them with Distress inks and the lilac. I then embossed the squares for texture.
I stamped the images and coloured with Promarkers then cut them out and assembled them using selected die cut shapes, also cut from black and white papers then inked and embossed.
I made embellishments by stamping white card with the checks and stripes stamps and black ink and die cut flower shapes from this. The butterflies were stamped on striped paper and the cute snail on white and then cut out.
The frame is painted with the pink paint and embossed in places with the checks stamp and clear matte powder for added texture.
The Design Team have again excelled themselves with an amazing array of very different projects so do pop over for a stroll down the catwalk, you will be so inspired!
A few challenges I found for my wall hanging:
2 Sisters - Anything Goes
Dies To Die For - Anything Goes (with a die cut)
Our Creative Corner - Over The Edge
Crafty Ann's - Bold and Bright
Have a great day and thanks for looking.
Hugs, Fliss xx
This one was a bit tricky for me as most of the children in the family are now grown and I don't have much stuff that isn't digital. Then I remembered my Alice stamps and this is the result!
Lots of pics here as my wall hanging is around 30cm square in size and as you can see it's quite bright!
Ingredients used:
Stamps - Polka Doodles Wonderland rubber stamp set
The Artistic Stamper steampunk butterfly and snail
Anita's distressed stripe stamp
Inks - Distress Inks in Shabby Shutters, Tumbled Glass, Stormy Sky, Worn Lipstick and Ripe Persimmon.
VersaColor Lilac
Memento Tuxedo Black
Papers from Polka Doodles Wonderland CD
Fuchsia Pink Acrylic Paint
Matte Clear Embossing Powder
Promarkers
Embossing Folders - Cuttlebug polka dots and textile , Papermania floral and triboss squares
Die Cutting Sets - Papermania hearts, squares and flowers, Nestabilities circles and scalloped circles
I used the black and white option papers from the CD and coloured them with Distress inks and the lilac. I then embossed the squares for texture.
I stamped the images and coloured with Promarkers then cut them out and assembled them using selected die cut shapes, also cut from black and white papers then inked and embossed.
I made embellishments by stamping white card with the checks and stripes stamps and black ink and die cut flower shapes from this. The butterflies were stamped on striped paper and the cute snail on white and then cut out.
The frame is painted with the pink paint and embossed in places with the checks stamp and clear matte powder for added texture.
The Design Team have again excelled themselves with an amazing array of very different projects so do pop over for a stroll down the catwalk, you will be so inspired!
A few challenges I found for my wall hanging:
2 Sisters - Anything Goes
Dies To Die For - Anything Goes (with a die cut)
Our Creative Corner - Over The Edge
Crafty Ann's - Bold and Bright
Have a great day and thanks for looking.
Hugs, Fliss xx
Thursday, 23 February 2012
Hello Cupcake!
Hello folks, hope you're having a great week and have the sunshine that we have down south today. I have a card to share with you that was quite a challenge for me and came about because vintage challenge blog Sugar Creek Hollow has a sketch challenge this week with the added extra that really did challenge me - to use a cute image - eek! As you know, that's not something I do that often so a lot of thought went into this card.
I've used the cute Molly Bloom stamp and the cake and I stamped them with Memento Rich Cocoa and coloured them with Promarkers. I set the images on a mat of green check paper (Polka Doodles Pretty Sweet CD) cut out with a Papermania die and inked with umber VersaColor.
I added this to a mat I made by scanning one of my precious collection of vintage lace doilies, printing this out on parchment paper, cutting it out and embossing it in parts to bring out the beautiful raised lace flowers.
I covered the kraft card blank with Magnolia red cherries paper then added a central border of Nitwits Collection red swirl stitched paper with crochet lace along the bottom edge.
I added 2 little panels of green cross stitch fabric, trimmed with pinking shears and embroidered with large crosses using red floss. I finished off with a ticket sentiment from the new Candy Doodles Collectors Edition CD.
Challenges for my card:
Sugar Creek Hollow - Sketch and Cute
Papercraft Star - Photo Inspiration and Something From The Kitchen (cakes are frequently found in mine as I love baking!)
Simon Says Stamp - Use 3 Different Papers
Thanks for looking.
Hugs, Fliss xx
I've used the cute Molly Bloom stamp and the cake and I stamped them with Memento Rich Cocoa and coloured them with Promarkers. I set the images on a mat of green check paper (Polka Doodles Pretty Sweet CD) cut out with a Papermania die and inked with umber VersaColor.
I added this to a mat I made by scanning one of my precious collection of vintage lace doilies, printing this out on parchment paper, cutting it out and embossing it in parts to bring out the beautiful raised lace flowers.
I covered the kraft card blank with Magnolia red cherries paper then added a central border of Nitwits Collection red swirl stitched paper with crochet lace along the bottom edge.
I added 2 little panels of green cross stitch fabric, trimmed with pinking shears and embroidered with large crosses using red floss. I finished off with a ticket sentiment from the new Candy Doodles Collectors Edition CD.
Challenges for my card:
Sugar Creek Hollow - Sketch and Cute
Papercraft Star - Photo Inspiration and Something From The Kitchen (cakes are frequently found in mine as I love baking!)
Simon Says Stamp - Use 3 Different Papers
Thanks for looking.
Hugs, Fliss xx
Labels:
Polka Doodles,
Vintage Style
Monday, 20 February 2012
Victorian Romance At Make My Monday
Morning folks, Monday is here again so we have a new challenge for you over at Make My Monday. We're continuing with Suzanne's February theme of Romance and this week would like to see your creations inspired by Victorian Romance.
My card for this challenge was inspired by Victorian Valentine cards which quite often involved flowers and bright colours.
As you can see, my card is quite bright and the colours I chose came from the gorgeous cherub image which came from the wonderful Graphics Fairy.
I made my own background paper by partially embossing a square of pale lilac parchment card with a Papermania embossing folder and then swiping blue ink over the raised areas. I sponged the same ink on the flat side panel and stamped on a tiny Anna Griffin flourish with a darker blue ink.
I cut a large heart shape out of red card and embossed this with the same folder. I added the cut out cherub image and some roses from the Dezinaworld flower set. I inked the edges of the roses with dark purple ink.
I made a greeting panel with a Marianne Design die cut heart, adding a further rose and a computer generated sentiment which I cut out round the letters and then inked to soften the colour.
Don't forget that we have a wonderful sponsor this month in Marianne Design and here's a reminder of the gorgeous prize on offer.
Challenges for my card:
One Stop Craft - Create Your Own Background
C.R.A.F.T. - No Designer Papers (I made my own background)
Ruby's Rainbow - Vintage
Sisterhood Of Crafters - Valentine
Thanks for looking and have a great week.
Hugs, Fliss xx
My card for this challenge was inspired by Victorian Valentine cards which quite often involved flowers and bright colours.
As you can see, my card is quite bright and the colours I chose came from the gorgeous cherub image which came from the wonderful Graphics Fairy.
I made my own background paper by partially embossing a square of pale lilac parchment card with a Papermania embossing folder and then swiping blue ink over the raised areas. I sponged the same ink on the flat side panel and stamped on a tiny Anna Griffin flourish with a darker blue ink.
I cut a large heart shape out of red card and embossed this with the same folder. I added the cut out cherub image and some roses from the Dezinaworld flower set. I inked the edges of the roses with dark purple ink.
I made a greeting panel with a Marianne Design die cut heart, adding a further rose and a computer generated sentiment which I cut out round the letters and then inked to soften the colour.
Don't forget that we have a wonderful sponsor this month in Marianne Design and here's a reminder of the gorgeous prize on offer.
Challenges for my card:
One Stop Craft - Create Your Own Background
C.R.A.F.T. - No Designer Papers (I made my own background)
Ruby's Rainbow - Vintage
Sisterhood Of Crafters - Valentine
Thanks for looking and have a great week.
Hugs, Fliss xx
Labels:
Dezinaworld,
Graphics Fairy,
Make My Monday,
Marianne Design,
Papermania
Friday, 17 February 2012
1-2-3-A Recipe
Good morning folks, it's Friday again (where did the last week go?) so we have another challenge for you over at Polka Doodles which has a theme this week chosen by Anne.
The theme is a Recipe Challenge - 1 Image, 2 Papers and 3 Embellishments so that should give you plenty of scope for your creations.
I was slightly naughty with my embellishments which ended up being lace, pearls and braid as nothing else would work. I know the lace and braid are a little similar but I like them!
The pretty papers and image on my card are from the A Double Sprinkle of Kraft CD which I love for the vintage style papers.
I printed the little girl out on white card and coloured her with Crayola Blendables which I love at the moment for their very textured look. Her dress has quite a denim look I think.
I covered a scalloped edge card blank with the flowery and striped papers and added crochet lace, pearls and braid to make a central border.
I die cut the image panel and then made a die cut scalloped mat from the same striped paper which I turned round to make a contrast. A scallop matted sentiment finishes off the card.
We have some wonderful candy this week from Marianne Design so do pop over for a look as well as inspiration from the rest of the Design Team.
Here are some challenges I found for my card:
Incy Wincy Designs - A Recipe - 3 Embellishments, 2 Papers, 1 Image
Paper Creations Ink - A Recipe - 1 Image, 2 Papers, 3 Embellishments
Little Darlings - Favourite Embellishments
Have a lovely weekend everyone,
Fliss xx
The theme is a Recipe Challenge - 1 Image, 2 Papers and 3 Embellishments so that should give you plenty of scope for your creations.
I was slightly naughty with my embellishments which ended up being lace, pearls and braid as nothing else would work. I know the lace and braid are a little similar but I like them!
The pretty papers and image on my card are from the A Double Sprinkle of Kraft CD which I love for the vintage style papers.
I printed the little girl out on white card and coloured her with Crayola Blendables which I love at the moment for their very textured look. Her dress has quite a denim look I think.
I covered a scalloped edge card blank with the flowery and striped papers and added crochet lace, pearls and braid to make a central border.
I die cut the image panel and then made a die cut scalloped mat from the same striped paper which I turned round to make a contrast. A scallop matted sentiment finishes off the card.
We have some wonderful candy this week from Marianne Design so do pop over for a look as well as inspiration from the rest of the Design Team.
Here are some challenges I found for my card:
Incy Wincy Designs - A Recipe - 3 Embellishments, 2 Papers, 1 Image
Paper Creations Ink - A Recipe - 1 Image, 2 Papers, 3 Embellishments
Little Darlings - Favourite Embellishments
Have a lovely weekend everyone,
Fliss xx
Labels:
Marianne Design,
Polka Doodles
Tuesday, 14 February 2012
Hearts Galore
Hello everyone, hope you're having a good week so far. First up are apologies from me for my lack of visiting the last week or so. I'm up to my eyes in work again and have struggled to find time for my DT commitments, let alone doing any blogging. Hopefully this won't continue for too long and I'll pop over as soon as I can so catch up with you all.
I did find a little time to do some all important crafting though - my hubby's Valentine card! He doesn't like anything too fussy, frilly or pink so here's what I came up with and I'm very happy to say that he loves it.
I used a favourite Tim Holtz texture fades embossing folder and inked the panel with Barn Door, Fired Brick, Seedless Preserves and Vintage Photo Distress inks.
I made a second panel with kraft card embossed with the Papermania squared pattern Triboss folder. I added both panels to the buff card blank, overlapping them.
I then die cut a heart shape from kraft card using the Papermania hearts set and stamped on this with Gathered Twigs and Fired Brick DIs and a Viva Decor flourish stamp. I added this to the card with foam tape.
I embossed a scrap of card with the Cuttlebug polka dot folder then inked this with Fired Brick and Seedless Preserves DI and swiped Gathered Twigs over the raised areas. I then used the smallest heart die to cut out the tiny hearts which I set on the raised squares.
I finished off with computer generated text, printed on kraft card and lightly stamped with the flourish and brown ink.
I'd like to enter my card in the following challenges:
Sugar Creek Hollow - Masculine Valentine
Simon Says Stamp And Show - Anything Goes
Ooh La La Creations - Be My Valentine
The Sunday Stamper - I Will Always Love You (in tribute to Whitney Houston -such sad news)
Happy Valentine's Day everyone and hope you've had a lovely day.
Fliss xx
I did find a little time to do some all important crafting though - my hubby's Valentine card! He doesn't like anything too fussy, frilly or pink so here's what I came up with and I'm very happy to say that he loves it.
I used a favourite Tim Holtz texture fades embossing folder and inked the panel with Barn Door, Fired Brick, Seedless Preserves and Vintage Photo Distress inks.
I made a second panel with kraft card embossed with the Papermania squared pattern Triboss folder. I added both panels to the buff card blank, overlapping them.
I then die cut a heart shape from kraft card using the Papermania hearts set and stamped on this with Gathered Twigs and Fired Brick DIs and a Viva Decor flourish stamp. I added this to the card with foam tape.
I embossed a scrap of card with the Cuttlebug polka dot folder then inked this with Fired Brick and Seedless Preserves DI and swiped Gathered Twigs over the raised areas. I then used the smallest heart die to cut out the tiny hearts which I set on the raised squares.
I finished off with computer generated text, printed on kraft card and lightly stamped with the flourish and brown ink.
I'd like to enter my card in the following challenges:
Sugar Creek Hollow - Masculine Valentine
Simon Says Stamp And Show - Anything Goes
Ooh La La Creations - Be My Valentine
The Sunday Stamper - I Will Always Love You (in tribute to Whitney Houston -such sad news)
Happy Valentine's Day everyone and hope you've had a lovely day.
Fliss xx
Labels:
Distress Inks,
Male Cards,
Vintage Style,
Viva Decor
Monday, 13 February 2012
Hearts and Flowers
Good morning folks, hope that you all had a good weekend and are managing to keep warm in this rather chilly spell of weather.
Monday is here again so we have a new challenge for you over at Make My Monday. We're continuing with Suzanne's lovely theme for the month of February which is (what else??!) Romance and this week it's all about Hearts and Flowers.
I've been playing yet again with my Vintage Blue set of stamps by Glitz Design which I think you'll agree is just perfect for romantic cards.
I made the background paper by inking it up with Tattered Rose and a little Victorian Velvet Distress inks then stamped the lovely rose design on with the Victorian Velvet. This stamp is quite large so it makes a background really quickly which is just as well here as my card base is 8x8.
I next made a central border by stamping Hampton Arts distressed stripes with first Victorian Velvet and then VersaFine Crimson Red. When this was dry, I sponged on some Tattered Rose to deepen the colour.
I hand cut the heart from white card and stamped on the rose with the crimson ink. I then masked off part of the text image from set set with masking tape as I wanted just the text. I inked the stamp up with crimson ink, peeled off the masking tape and then stamped the text on the heart. I inked the edges with the Tattered Rose DI.
I stamped the little birds from the set with crimson ink and cut these out. I then assembled the card as you see adding a lace border cut with a Marianne Designs lace border die.
A quick reminder that our February sponsor is Marianne Design and here's the lovely prize on offer this month.
We can't wait to see what you come up with this week as the entries for the last challenge were amazing and we had such difficulty choosing a top 3.
Challenges for my card:
Addicted To Stamps - Valentine's Day/Love
Creative Inspirations Paint - Hearts
Dream Valley Challenges - Valentine
The Squirrel & the Fox - Valentine's Day
Rogue Redhead Designs - Use A Stamped Background (everything on my card is stamped)
Stamp, Scrap & Doodle - Red, White, Pink
Have a great week and thanks for looking.
Fliss xx
Monday is here again so we have a new challenge for you over at Make My Monday. We're continuing with Suzanne's lovely theme for the month of February which is (what else??!) Romance and this week it's all about Hearts and Flowers.
I've been playing yet again with my Vintage Blue set of stamps by Glitz Design which I think you'll agree is just perfect for romantic cards.
I made the background paper by inking it up with Tattered Rose and a little Victorian Velvet Distress inks then stamped the lovely rose design on with the Victorian Velvet. This stamp is quite large so it makes a background really quickly which is just as well here as my card base is 8x8.
I next made a central border by stamping Hampton Arts distressed stripes with first Victorian Velvet and then VersaFine Crimson Red. When this was dry, I sponged on some Tattered Rose to deepen the colour.
I hand cut the heart from white card and stamped on the rose with the crimson ink. I then masked off part of the text image from set set with masking tape as I wanted just the text. I inked the stamp up with crimson ink, peeled off the masking tape and then stamped the text on the heart. I inked the edges with the Tattered Rose DI.
I stamped the little birds from the set with crimson ink and cut these out. I then assembled the card as you see adding a lace border cut with a Marianne Designs lace border die.
A quick reminder that our February sponsor is Marianne Design and here's the lovely prize on offer this month.
We can't wait to see what you come up with this week as the entries for the last challenge were amazing and we had such difficulty choosing a top 3.
Challenges for my card:
Addicted To Stamps - Valentine's Day/Love
Creative Inspirations Paint - Hearts
Dream Valley Challenges - Valentine
The Squirrel & the Fox - Valentine's Day
Rogue Redhead Designs - Use A Stamped Background (everything on my card is stamped)
Stamp, Scrap & Doodle - Red, White, Pink
Have a great week and thanks for looking.
Fliss xx
Labels:
Distress Inks,
Glitz Design,
Make My Monday,
Vintage Style
Sunday, 12 February 2012
Monochromatic With One Other Colour
Good morning folks, hope you're all having a lovely weekend. I'm here today with details of a new challenge over at Fashionable Stamping Challenges and this fortnight the strut down the catwalk is all about Monochrome with the addition of a splash of Contrast Colour.
For my inspiration, I chose shades of purple with a splash of green as I really love this particular combination.
It's not that easy to see in the photo but for my background paper and also the main heart shape, I used pale lilac parchment card. For the background paper, I stamped on a Prima flourish with lilac ink.
The heart was cut out with a Papermania die and I embossed the top right corner with a Papermania embossing folder and sponged on lilac and green ink.
I stamped the vintage couple image (I've had this for years and have no idea of the make) with Imperial Purple VersaFine ink on lilac parchment card and stuck this to the heart with foam tape, trimming off the excess to keep the heart shape. I added this to a purple hand cut mat and added a further partial mat of green dotty paper which was from my scraps box.
I added a panel of purple card embossed with the same folder and a further scrap of the green paper trimmed with an X Cut border die. The sentiment is by Penny Black and I finished off by adding some tiny green pearls to the heart.
The Design Team have made some stunning creations in many different colour combinations to inspire you, so do hop over for real treat.
Challenges for my card:
Crafting For All Seasons - Love Is In The Air
4 Crafty Chicks - Valentines/Love
Do You Stack Up? - Love
Rainbow Lady's - Have A Heart
Card Crafters Circle - Valentine
Card Makin' Mamas - Valentine
Crafty Catz - Valentine
Simon Says Stamp - Love Is In The Air
Fussy and Fancy - With All My Heart
Glitter Geeks - To The One I Love
Happy Sunday and thanks for looking
Fliss xx
For my inspiration, I chose shades of purple with a splash of green as I really love this particular combination.
It's not that easy to see in the photo but for my background paper and also the main heart shape, I used pale lilac parchment card. For the background paper, I stamped on a Prima flourish with lilac ink.
The heart was cut out with a Papermania die and I embossed the top right corner with a Papermania embossing folder and sponged on lilac and green ink.
I stamped the vintage couple image (I've had this for years and have no idea of the make) with Imperial Purple VersaFine ink on lilac parchment card and stuck this to the heart with foam tape, trimming off the excess to keep the heart shape. I added this to a purple hand cut mat and added a further partial mat of green dotty paper which was from my scraps box.
I added a panel of purple card embossed with the same folder and a further scrap of the green paper trimmed with an X Cut border die. The sentiment is by Penny Black and I finished off by adding some tiny green pearls to the heart.
The Design Team have made some stunning creations in many different colour combinations to inspire you, so do hop over for real treat.
Challenges for my card:
Crafting For All Seasons - Love Is In The Air
4 Crafty Chicks - Valentines/Love
Do You Stack Up? - Love
Rainbow Lady's - Have A Heart
Card Crafters Circle - Valentine
Card Makin' Mamas - Valentine
Crafty Catz - Valentine
Simon Says Stamp - Love Is In The Air
Fussy and Fancy - With All My Heart
Glitter Geeks - To The One I Love
Happy Sunday and thanks for looking
Fliss xx
Friday, 10 February 2012
February Madness At Polka Doodles
Hello everyone, a really quick post from me today with no card as I'm up to my eyes in DT work at the moment.
I just thought I should let you all know about the Polka Doodles CD Madness weekend offer in case you aren't on the mailing list. From today until Sunday, all CDs are an amazing £10 so now is the time to add to your collection!!!
So what are you waiting for - hop on over if you're interested as there's sure to be a bit of a mad rush to grab a bargain.
Also, Nikky will be on Create and Craft in just over a week so don't forget to save the date.
That's all for now except to wish you all a lovely weekend with hopefully no more of the white stuff.
Fliss xx
I just thought I should let you all know about the Polka Doodles CD Madness weekend offer in case you aren't on the mailing list. From today until Sunday, all CDs are an amazing £10 so now is the time to add to your collection!!!
So what are you waiting for - hop on over if you're interested as there's sure to be a bit of a mad rush to grab a bargain.
Also, Nikky will be on Create and Craft in just over a week so don't forget to save the date.
That's all for now except to wish you all a lovely weekend with hopefully no more of the white stuff.
Fliss xx
Labels:
Polka Doodles
Monday, 6 February 2012
Love Letters
Good morning everyone, hoping you all had a good weekend and are surviving the white stuff - not that we have any here as being right down on the South coast, we often get missed out.
We have a new challenge for you over at Make My Monday and as it's the start of a new month, we also have a new theme which is of course Romance. This week we would like to see your creations with the theme of Love Letters - script or verse.
We have a fabulous sponsor for this month too so read on for all the details.
I can't tell you how much I enjoyed making my card which is my favourite vintage collage style.
I used my Easy Inking Technique to make the patchwork style background and made it extra grungy by adding a darker ink round the edges. I used Victorian Velvet with Fired Brick on the edges and Tattered Rose with Aged Mahogany. I then stamped on a rose (masking the edges as the stamp is bigger than the squares) with VersaFine Imperial Purple and a heart with VersaFine Crimson Red. The stamps are from a clear set by Glitz called Vintage Blue. I tore all the edges.
I then made my own heart shape and partially embossed this with the Cuttlebug Roses folder. I inked the raised area with Tattered Rose and partially stamped on the rose design with the crimson ink. I inked round the edge with violet ink.
I stamped the adorable little boy (Lost Coast Designs) with Imperial Purple and cut him out. I die cut some flourish style leaf fronds (Marianne Design) and inked these with Fired Brick.
I made a faux love letter by stamping the postmark from the Glitz set and Hero Arts Old French Writing with purple ink, tearing the edges and inking with lilac ink.
I assembled the card as you see.
Now for the exciting news on our February sponsor which I'm thrilled to say is Marianne Design and I really wish I could win the fabulous prize.
All you have to do for a chance to win this gorgeous set is to enter some of our challenges this month and as the theme is such a great one, that shouldn't be to difficult!
Challenges for my card:
The Artistic Stamper February Challenge - Hearts
The Cheerful Stamp Pad - Romance Is In The Air
Truly Scrumptious - Love and Hearts
The Sunday Stamper - Heart On My Sleeve
Thanks for looking and have a great week.
Fliss xx
We have a new challenge for you over at Make My Monday and as it's the start of a new month, we also have a new theme which is of course Romance. This week we would like to see your creations with the theme of Love Letters - script or verse.
We have a fabulous sponsor for this month too so read on for all the details.
I can't tell you how much I enjoyed making my card which is my favourite vintage collage style.
I used my Easy Inking Technique to make the patchwork style background and made it extra grungy by adding a darker ink round the edges. I used Victorian Velvet with Fired Brick on the edges and Tattered Rose with Aged Mahogany. I then stamped on a rose (masking the edges as the stamp is bigger than the squares) with VersaFine Imperial Purple and a heart with VersaFine Crimson Red. The stamps are from a clear set by Glitz called Vintage Blue. I tore all the edges.
I then made my own heart shape and partially embossed this with the Cuttlebug Roses folder. I inked the raised area with Tattered Rose and partially stamped on the rose design with the crimson ink. I inked round the edge with violet ink.
I stamped the adorable little boy (Lost Coast Designs) with Imperial Purple and cut him out. I die cut some flourish style leaf fronds (Marianne Design) and inked these with Fired Brick.
I made a faux love letter by stamping the postmark from the Glitz set and Hero Arts Old French Writing with purple ink, tearing the edges and inking with lilac ink.
I assembled the card as you see.
Now for the exciting news on our February sponsor which I'm thrilled to say is Marianne Design and I really wish I could win the fabulous prize.
All you have to do for a chance to win this gorgeous set is to enter some of our challenges this month and as the theme is such a great one, that shouldn't be to difficult!
Challenges for my card:
The Artistic Stamper February Challenge - Hearts
The Cheerful Stamp Pad - Romance Is In The Air
Truly Scrumptious - Love and Hearts
The Sunday Stamper - Heart On My Sleeve
Thanks for looking and have a great week.
Fliss xx
Labels:
Easy Inking Technique,
Make My Monday
Friday, 3 February 2012
Show A Little Love
Good morning folk from a very chilly South coast, the coldest morning yet as it's a brrrrr -5 here today. It is sunny though so it might yet warm up past freezing!
This week's challenge over at Polka Doodles is all about love as we'd like to see a creation with Hearts on it. Although Valentine's Day is looming really fast, you don't have to make a Valentine, just something love themed which is what I have done for my inspiration.
I've gone for a favourite pink and green colour combination and chose a cute digital stamp together with some of the gorgeous rosebud papers from the Pretty Sweet CD. I used a scalloped card blank which I covered with some green dotty paper from the Pretty Tuff CD.
I coloured the sweet image with a selection of Promarkers, cut the panel out with a Papermania scalloped rectangle die and inked the edges pink. I cut out 2 hearts with a Papermania heart die and inked the edges of these.
I used the Marianne round doily die to cut a doily shape from a scrap of kraft textured paper (A Double Sprinkle Of Kraft CD). I assembled the card as you see, tearing the edges of the pink rosebud paper for a shabby effect and finishing off with a pink bow recycled from my daughter's birthday cake.
You have until 12 noon on Sunday 12 February to show us some love and this week there is a great prize so click HERE for all the details.
Challenges for my card:
Crafty Sentiments - Punches &/Or Dies
My Craft Spot - Anything Goes
Cardmadfairy's Digi Days - Hearts
Thanks for looking.
Fliss xx
This week's challenge over at Polka Doodles is all about love as we'd like to see a creation with Hearts on it. Although Valentine's Day is looming really fast, you don't have to make a Valentine, just something love themed which is what I have done for my inspiration.
I've gone for a favourite pink and green colour combination and chose a cute digital stamp together with some of the gorgeous rosebud papers from the Pretty Sweet CD. I used a scalloped card blank which I covered with some green dotty paper from the Pretty Tuff CD.
I coloured the sweet image with a selection of Promarkers, cut the panel out with a Papermania scalloped rectangle die and inked the edges pink. I cut out 2 hearts with a Papermania heart die and inked the edges of these.
I used the Marianne round doily die to cut a doily shape from a scrap of kraft textured paper (A Double Sprinkle Of Kraft CD). I assembled the card as you see, tearing the edges of the pink rosebud paper for a shabby effect and finishing off with a pink bow recycled from my daughter's birthday cake.
You have until 12 noon on Sunday 12 February to show us some love and this week there is a great prize so click HERE for all the details.
Challenges for my card:
Crafty Sentiments - Punches &/Or Dies
My Craft Spot - Anything Goes
Cardmadfairy's Digi Days - Hearts
Thanks for looking.
Fliss xx
Labels:
Marianne Design,
Papermania,
Polka Doodles,
Promarkers
Wednesday, 1 February 2012
Candy Winner!!!
Hello folks, it's now time for me to announce the winner of my blog candy. I would like to thank everyone who left a comment and especially those of you that chose to become followers. It's so lovely to see you all and to have read the kind comments that some of you have left on my artwork.
The winner is Warna Warni
I did try to get the random number thingy on here but it wouldn't stay at the same number so I had to remove it - sorry!
The winner is Warna Warni
I did try to get the random number thingy on here but it wouldn't stay at the same number so I had to remove it - sorry!
Many congratulations and if you will email me your address, I'll pop the candy in the post.
Commiserations to everyone else but unfortunately there can only be one winner. Keep an eye out for more candy which might be happening very soon.
Hugs, Fliss xx
Tuesday, 31 January 2012
Who Wants Candy!!!
THANK YOU SO MUCH TO EVERYONE WHO ENTERED
THE WINNER WILL BE POSTED LATER TODAY
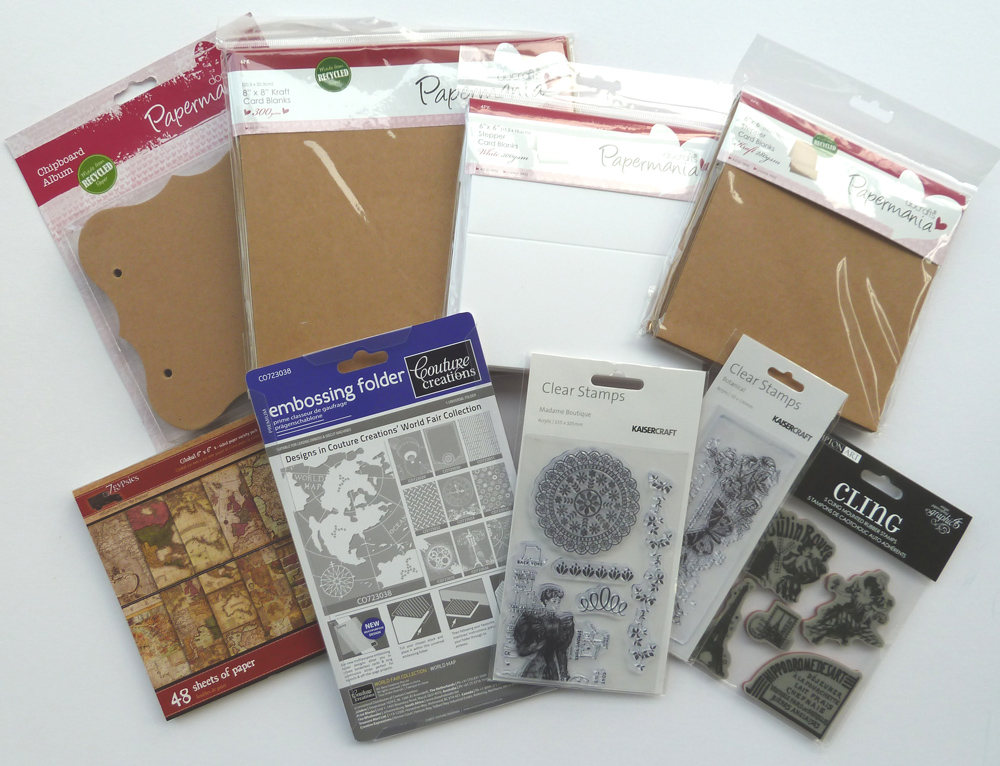
I'm back again with my second post of the day with a subject I know will please you that has come about as I finally have all the bits for the candy I promised after reaching 500 posts on Christmas Eve. I took advantage of some of the free postage on offer to order some of the things as we don't have much left in the way of craft shops left locally due to the recession and I really wanted to share some vintage style goodies which I'm sure you all know how much I love.
I'm sure you're champing at the bit to see what I have for you so here's the pic:
Here's what I have included:
Papermania shaped chipboard album (I find these really great for wall hangings)
Pack 8 x 8 kraft card blanks
Pack 6 x 6 white front step card blanks
Pack 6 x 6 kraft front step card blanks
Pack 6 x 6 7 Gypsies Global paper
Couture Creations World Map embossing folder
Kaisercraft Madame Boutique clear stamp set
Kaisercraft Botanical clear stamp
Graphic 45 Curtain Call 2 cling stamp set
Please leave a comment below if you'd like a chance to win and please feel free to put the pic on your blog to spread the word if you like. You have until 31 January to join in and I'll make the draw on 1 February.
Thank you all for following my artwork and for leaving me such lovely comments.
Big hugs and good luck, Fliss xx
Labels:
Blog Candy
Monday, 30 January 2012
All Of A Flutter
Good morning folks, hope you all had a lovely weekend. It's time for the next challenge over at Make My Monday and it's the last of our January Nature challenges, This week we would like to see your creations with Butterflies And/Or Dragonflies which is why we're all of a flutter lol.
I'm down in the meadow again with my card which also features my use of natural kraft file dividers for crafting as they're so much cheaper than kraft card.
I stamped the wild flowers (The Stamp Bug's Alpine Flowers UM016 and Alpine Meadow UM017) with Memento inks in shades of green, pink and purple. I then over stamped with versamark and embossed with white detail powder.
I stamped the butterflies (Hero Arts) with brown ink, coloured with pencils and cut them out. I assembled the card as you see on a Craftwork Cards scalloped card blank. Simples!
The Design Team have created a beautiful array of samples to inspire you so do pop over for a peek. Hope to see you there as the theme is sure to be a popular one.
Challenges for my card:
Crafty Catz - Things With Wings
Crafting When We Can - Something NOT Intended For Crafting (file dividers)
Quirky Crafts - Make A Scene
Have a great week.
Hugs, Fliss xx
I'm down in the meadow again with my card which also features my use of natural kraft file dividers for crafting as they're so much cheaper than kraft card.
I stamped the wild flowers (The Stamp Bug's Alpine Flowers UM016 and Alpine Meadow UM017) with Memento inks in shades of green, pink and purple. I then over stamped with versamark and embossed with white detail powder.
I stamped the butterflies (Hero Arts) with brown ink, coloured with pencils and cut them out. I assembled the card as you see on a Craftwork Cards scalloped card blank. Simples!
The Design Team have created a beautiful array of samples to inspire you so do pop over for a peek. Hope to see you there as the theme is sure to be a popular one.
Challenges for my card:
Crafty Catz - Things With Wings
Crafting When We Can - Something NOT Intended For Crafting (file dividers)
Quirky Crafts - Make A Scene
Have a great week.
Hugs, Fliss xx
Labels:
Craftwork Cards,
Hero Arts,
Make My Monday,
The Stamp Bug
Sunday, 29 January 2012
Make It A Guy Thing With FSC
Morning folks, it's time for another strut down the catwalk over a Fashionable Stamping Challenges and I can't believe how fast the last 2 weeks have flown by. They always say that time flies when you're having fun but in my case it was tax paperwork so definitely not fun!!!
The challenge for this fortnight is to make something for the men and boys in your life with a theme of Make It A Guy Thing. Lots of scope with this one, especially with a certain romantic day looming up very fast.
As you can see, I decided to go vintage for my creation, largely as my new Creative Expressions Vintage Games set deserved an inking up.
I made the background paper by sponging with Wild Honey and Vintage Photo Distress inks, stamping on the playing cards and numbers with Aged Mahogany, then tearing the edges to distress them. I attached the paper to an 8x8 kraft card blank.
I next made a panel which I inked with my largest acrylic block and my Easy Inking Technique using Scattered Straw ink, then stamped on the squares with Vintage Photo. I tore the edges and inked them with Gathered Twigs.
I made a further panel using the Papermania Triboss squared folder and inked this with Wild Honey, Vintage Photo and Fired Brick inks.
I stamped the chess pieces repeatedly along a strip of white card, inked this with Fired Brick , added detail with Promarkers and cut out along the top. roughly following the line of the chess pieces.
I stamped the man from Paper Artsy Man Of Numbers Plate 5 with Archival Coffee ink and the life text from the games set with the same ink. I cut these both out.
I assembled the card as you see, adding a stamped and gold embossed crown to finish.
The Design Team have once again excelled themselves with a fabulous array of masculine creations so do hop over for a look and prepare to be inspired!
Challenges for my card:
Craft Your Days Away - Distressing
Drunken Stampers - Use Something New
Patties Creations - Embossing
Stampin' For The Weekend - Embossing
Mark's Finest Papers - Cards With At Least 4 Layers
Thanks for looking,
Fliss xx
The challenge for this fortnight is to make something for the men and boys in your life with a theme of Make It A Guy Thing. Lots of scope with this one, especially with a certain romantic day looming up very fast.
As you can see, I decided to go vintage for my creation, largely as my new Creative Expressions Vintage Games set deserved an inking up.
I made the background paper by sponging with Wild Honey and Vintage Photo Distress inks, stamping on the playing cards and numbers with Aged Mahogany, then tearing the edges to distress them. I attached the paper to an 8x8 kraft card blank.
I next made a panel which I inked with my largest acrylic block and my Easy Inking Technique using Scattered Straw ink, then stamped on the squares with Vintage Photo. I tore the edges and inked them with Gathered Twigs.
I made a further panel using the Papermania Triboss squared folder and inked this with Wild Honey, Vintage Photo and Fired Brick inks.
I stamped the chess pieces repeatedly along a strip of white card, inked this with Fired Brick , added detail with Promarkers and cut out along the top. roughly following the line of the chess pieces.
I stamped the man from Paper Artsy Man Of Numbers Plate 5 with Archival Coffee ink and the life text from the games set with the same ink. I cut these both out.
I assembled the card as you see, adding a stamped and gold embossed crown to finish.
The Design Team have once again excelled themselves with a fabulous array of masculine creations so do hop over for a look and prepare to be inspired!
Challenges for my card:
Craft Your Days Away - Distressing
Drunken Stampers - Use Something New
Patties Creations - Embossing
Stampin' For The Weekend - Embossing
Mark's Finest Papers - Cards With At Least 4 Layers
Thanks for looking,
Fliss xx
Saturday, 28 January 2012
Time To Fly
Hello everyone, hoping that you're all having a good weekend so far. Also welcome on board to a few new followers, lovely to see you all and will try and pop over very soon to say hello.
This is a very quick post as we had unexpected visitors this afternoon and my crafting time was cut short as a result.
I have a card to show you that is for my return to creating for the Sunday Stamper challenge which is celebrating its 4th birthday this week. Many congratulations to Hels and a big thanks for her continued inspiration. This week's theme is Eyes and I guess my entry just about qualifies - I did try and do something else but couldn't make the image stamp properly (I'm suffering from a night out last night lol) so I hope this is OK.
The background paper here was made using Vaseline resist technique with a Tim Holtz flourish stamp and Distress inks in Mustard Seed, Spiced Marmalade and Fired Brick.
The image is by Lost Coast Designs and I stamped the panel on Judikins Krome Coat card. I decided not to add colour as I wanted impact.
I finished off with a flower coloured with Promarkers and added a brass stamping flower in the centre.
Hels has generously offered candy for her followers and challenge entrants so if you'd like the details hop on over. There's also a pic on my side bar if you scroll down a little.
Enjoy the rest of your weekend.
Hugs, Fliss xx
This is a very quick post as we had unexpected visitors this afternoon and my crafting time was cut short as a result.
I have a card to show you that is for my return to creating for the Sunday Stamper challenge which is celebrating its 4th birthday this week. Many congratulations to Hels and a big thanks for her continued inspiration. This week's theme is Eyes and I guess my entry just about qualifies - I did try and do something else but couldn't make the image stamp properly (I'm suffering from a night out last night lol) so I hope this is OK.
The background paper here was made using Vaseline resist technique with a Tim Holtz flourish stamp and Distress inks in Mustard Seed, Spiced Marmalade and Fired Brick.
The image is by Lost Coast Designs and I stamped the panel on Judikins Krome Coat card. I decided not to add colour as I wanted impact.
I finished off with a flower coloured with Promarkers and added a brass stamping flower in the centre.
Hels has generously offered candy for her followers and challenge entrants so if you'd like the details hop on over. There's also a pic on my side bar if you scroll down a little.
Enjoy the rest of your weekend.
Hugs, Fliss xx
Labels:
Distress Inks,
Promarkers,
Sunday Stampers,
Vintage Style
Friday, 27 January 2012
Easy Inking Technique
Hello folks, it's time for another tutorial from me which is somewhat overdue I think as it's an age since I last did one.
You won't believe how easy this one is and how versatile it can be and there are quite a lot of pics so you might want a coffee before you start reading.
This one came about because last year I was really inspired by Sir Tim's patchwork inking with ink blending tools and wanted to pass this on to my ladies at a class. As I don't have that many ink blending tools and didn't want them all fighting over them, I improvised with fun foam blocks on Kling-On and it worked really well.
This got me thinking as I love making my own backgrounds (as I'm sure you know!) and wanted a way to create a larger inked area. I managed to drop a rather inky acrylic block on scrap paper and inspiration struck!
Easy Inking Technique
You will need:
A selection of acrylic blocks
Very smooth white cardstock
A selection of Distress inks
Some soft cosmetic sponges
STEP 1 - Add ink to the block by tapping all over and press, inked side down on your card. Remove the block and immediately rub gently over the inked area. As the ink is still wet, the ink will spread over the card.
STEP 2 - Repeat the above step until you have the colour required. I usually do 2 coats and the result will be a shabby chic inky panel. The reason that I specified smooth card is because if the card is very matte it will tend to be more absorbent and the ink will not spread around as much. It still gives a great effect though.
STEP 3 - Stamp a design on your inked panel. I have chosen a large corner design here and stamped on one side only. If you want a completely decorated paper you could turn it and stamp the other corner.
STEP 4 - A bit of Blue Peter here with a panel I made earlier lol. This one has a pretty sprig design stamped around the edges with the same colour ink as the panel and gives a pretty delicate look.
STEP 5 - Another idea here using a small square block to make a pretty patchwork panel with Crushed Olive and Wild Honey Distress inks. In this case you will need to sponge each square as you go to ensure that the earlier squares don't dry out before you sponge them.
STEP 6 - This panel uses a long rectangular block with Crushed Olive and Stormy Sky inks and will make a lovely addition to a masculine card I think.
STEP 7 - A very different idea here as the same technique can be used to make a quick inky panel to stamp on. In this case, I inked all over first with Scattered Straw and then added Crushed Olive at the bottom with Peeled Paint on the very edges of the block. I then added Mustard Seed to the rest, following up with Spiced Marmalade then Worn Lipstick at the top. I inked more heavily round the edges with the pink. I used 3 different sponges so as not to contaminate the inks.
STEP 8 - Here's the panel stamped with some Penny Black grasses. A lovely watercolour effect background.
Here are some cards made with the technique so you can see the finished results.
Both the cards feature papers made with different sized acrylic blocks so you can adapt what you make very easily to suit the card layout. Some of the square blocks make lovely patchwork pieces by simply cutting each square out. The floral panel on my bird card started off as a Shabby Shutters inky panel was stamped all over with a floral sprig using first Crushed Olive then Victorian Velvet.
I hope you've enjoyed this and I'm sure you will see that there are loads of possibilities so do let me know if you make something.
Hugs, Fliss xx

You won't believe how easy this one is and how versatile it can be and there are quite a lot of pics so you might want a coffee before you start reading.
This one came about because last year I was really inspired by Sir Tim's patchwork inking with ink blending tools and wanted to pass this on to my ladies at a class. As I don't have that many ink blending tools and didn't want them all fighting over them, I improvised with fun foam blocks on Kling-On and it worked really well.
This got me thinking as I love making my own backgrounds (as I'm sure you know!) and wanted a way to create a larger inked area. I managed to drop a rather inky acrylic block on scrap paper and inspiration struck!
Easy Inking Technique
You will need:
A selection of acrylic blocks
Very smooth white cardstock
A selection of Distress inks
Some soft cosmetic sponges
STEP 1 - Add ink to the block by tapping all over and press, inked side down on your card. Remove the block and immediately rub gently over the inked area. As the ink is still wet, the ink will spread over the card.
STEP 2 - Repeat the above step until you have the colour required. I usually do 2 coats and the result will be a shabby chic inky panel. The reason that I specified smooth card is because if the card is very matte it will tend to be more absorbent and the ink will not spread around as much. It still gives a great effect though.
STEP 3 - Stamp a design on your inked panel. I have chosen a large corner design here and stamped on one side only. If you want a completely decorated paper you could turn it and stamp the other corner.
STEP 4 - A bit of Blue Peter here with a panel I made earlier lol. This one has a pretty sprig design stamped around the edges with the same colour ink as the panel and gives a pretty delicate look.
STEP 5 - Another idea here using a small square block to make a pretty patchwork panel with Crushed Olive and Wild Honey Distress inks. In this case you will need to sponge each square as you go to ensure that the earlier squares don't dry out before you sponge them.
STEP 6 - This panel uses a long rectangular block with Crushed Olive and Stormy Sky inks and will make a lovely addition to a masculine card I think.
STEP 7 - A very different idea here as the same technique can be used to make a quick inky panel to stamp on. In this case, I inked all over first with Scattered Straw and then added Crushed Olive at the bottom with Peeled Paint on the very edges of the block. I then added Mustard Seed to the rest, following up with Spiced Marmalade then Worn Lipstick at the top. I inked more heavily round the edges with the pink. I used 3 different sponges so as not to contaminate the inks.
STEP 8 - Here's the panel stamped with some Penny Black grasses. A lovely watercolour effect background.
Here are some cards made with the technique so you can see the finished results.
Both the cards feature papers made with different sized acrylic blocks so you can adapt what you make very easily to suit the card layout. Some of the square blocks make lovely patchwork pieces by simply cutting each square out. The floral panel on my bird card started off as a Shabby Shutters inky panel was stamped all over with a floral sprig using first Crushed Olive then Victorian Velvet.
I hope you've enjoyed this and I'm sure you will see that there are loads of possibilities so do let me know if you make something.
Hugs, Fliss xx
Labels:
Easy Inking Technique
Thursday, 26 January 2012
A Love Affair With Chocolate
Hello folks. I hope you're all having a good week so far. We have sunshine here at last after early rain and a big hailstorm. My workload has at last become manageable and I've had time for a bit of crafting.
I have a tag to show you which was actually inspired by the Go Girly theme over at Sugar Creek Hollow this week and to me there is nothing more girly than a love of chocolate combined with my favourite roses.
I've made a tag with the gorgeous vintage Chocolate Lover stamp by The Stampsmith combined with their beautiful rose background stamp.
I made my own large tag and inked this up with Victorian Velvet Distress ink and then stamped on the rose background with VersaFine crimson ink.
I stamped the image panel with Archival coffee ink and cut this out leaving a narrow white border.
I stamped a rose border with a Judikins bolio stamp using the coffee ink and deep rose card. I added this across the centre of the tag and embellished with inked rose lace and pink pearls.
I added rows of braid, lace and pearls at the base of the tag and tied lace through the hole at the top. I then added the image panel with foam tape and finished off with a German gold scrap butterfly.
Challenges for my tag:
The Stampsmith January challenge - TSC26 Tag Art
Sugar Creek Hollow - Go Girly
Before I go, I'd like to say hello and welcome to all my new followers, it's lovely to have you all on board and if anyone hasn't yet seen I have candy, you still have a few days left to enter.
Thanks for looking,
Fliss xx
I have a tag to show you which was actually inspired by the Go Girly theme over at Sugar Creek Hollow this week and to me there is nothing more girly than a love of chocolate combined with my favourite roses.
I've made a tag with the gorgeous vintage Chocolate Lover stamp by The Stampsmith combined with their beautiful rose background stamp.
I made my own large tag and inked this up with Victorian Velvet Distress ink and then stamped on the rose background with VersaFine crimson ink.
I stamped the image panel with Archival coffee ink and cut this out leaving a narrow white border.
I stamped a rose border with a Judikins bolio stamp using the coffee ink and deep rose card. I added this across the centre of the tag and embellished with inked rose lace and pink pearls.
I added rows of braid, lace and pearls at the base of the tag and tied lace through the hole at the top. I then added the image panel with foam tape and finished off with a German gold scrap butterfly.
Challenges for my tag:
The Stampsmith January challenge - TSC26 Tag Art
Sugar Creek Hollow - Go Girly
Before I go, I'd like to say hello and welcome to all my new followers, it's lovely to have you all on board and if anyone hasn't yet seen I have candy, you still have a few days left to enter.
Thanks for looking,
Fliss xx
Labels:
Distress Inks,
The Stampsmith,
Vintage Style
Monday, 23 January 2012
Flowers and Leaves
Good morning everyone, Monday is here again and I don't know where the year is going as it's disappearing so fast at the moment.
We have a new challenge for you over at Make My Monday. Continuing with my Nature theme for the month, this week we would like to see your creations with Flowers and Leaves. As you will see when you look at my card below, the leaves could be as simple as blades of grass.
I decided to go for a walk on the wild side this time with a meadow in mind as I love seeing the wild flowers on countryside walks.
I've also used a new technique to make the background papers and add colour to the image panel by stamping colour on the card using inked up acrylic blocks. I'll be doing a little tutorial on this in a couple of days as you won't believe how quick and easy it is to make an inky background.
Supplies used:
Stamps:
Paper Artsy Hot Pick HP1005
Crafty Individuals Elements CI 206
Hobby Art Butterfly BU16A
Inkadinkado Sentiment 97635 Round Frames
Distress Inks : Shabby Shutters, Crushed Olive, Bundled Sage, Forest Moss, Mustard Seed, Scattered Straw
Cuttlebug Daisies embossing folder
Prisma pencils
Challenges for my card:
Let's Ink It Up - Anything Goes
2 Sisters - Embossing
Challenge Up Your Life -Thanks
Do pop over to see the Design Team makes as they're incredibly varied this week and you're sure to be inspired.
Thanks for looking,
Fliss xx
We have a new challenge for you over at Make My Monday. Continuing with my Nature theme for the month, this week we would like to see your creations with Flowers and Leaves. As you will see when you look at my card below, the leaves could be as simple as blades of grass.
I decided to go for a walk on the wild side this time with a meadow in mind as I love seeing the wild flowers on countryside walks.
I've also used a new technique to make the background papers and add colour to the image panel by stamping colour on the card using inked up acrylic blocks. I'll be doing a little tutorial on this in a couple of days as you won't believe how quick and easy it is to make an inky background.
Supplies used:
Stamps:
Paper Artsy Hot Pick HP1005
Crafty Individuals Elements CI 206
Hobby Art Butterfly BU16A
Inkadinkado Sentiment 97635 Round Frames
Distress Inks : Shabby Shutters, Crushed Olive, Bundled Sage, Forest Moss, Mustard Seed, Scattered Straw
Cuttlebug Daisies embossing folder
Prisma pencils
Challenges for my card:
Let's Ink It Up - Anything Goes
2 Sisters - Embossing
Challenge Up Your Life -Thanks
Do pop over to see the Design Team makes as they're incredibly varied this week and you're sure to be inspired.
Thanks for looking,
Fliss xx
Friday, 20 January 2012
Polka Doodles Sketch Challenge
Good morning folks, it's Friday again and time for a new challenge over at Polka Doodles which this week is another sketch by our head doodler Nikky and it's also our stashbox stamp week which means we use non Polka Doodles stamps with Polka Doodles elements. The theme is to make a birthday card.
Here's the sketch
My card is another owl one as I really love these and took the opportunity to use a gorgeous and very cute Tattered Angels stamp.
All of the papers I've used are from the Pretty Sweet CD as the shabby look combined with some lovely vintage colours are a perfect match (I think) for the little owl.
I stamped the owl with Memento Rich Cocoa ink on white card and decided not to colour him as I wanted more impact. I cut the panel out with a Nestabilities label die and added a paper mat cut from the next size die. I inked the edges with Crushed Olive and Vintage Photo Distress inks.
I made up the card following the sketch and finished off with a sentiment from the Back To Nature CD cut out with the Papermania square parenthesis die set.
The Design Team have again risen to the challenge and created a great variation of cards so do hop over for a look. You have until 12 noon on Sunday 29 January to enter and good luck.
Now for some challenges for my card:
Crafty Purple Frog - Anything Goes
Moving Along With The Times - Things With Wings
Whimsical Wednesdays - Anything Goes
Lollipop Crafts - No Embellishments
Crafty Sentiments - Anything Goes
I'm very sorry to have been neglecting you the last couple of weeks and hope to catch up soon - my days with 8 hours of figure work should be finished by the middle of next week or at least I hope so!
Hugs, Fliss xx
Here's the sketch
My card is another owl one as I really love these and took the opportunity to use a gorgeous and very cute Tattered Angels stamp.
All of the papers I've used are from the Pretty Sweet CD as the shabby look combined with some lovely vintage colours are a perfect match (I think) for the little owl.
I stamped the owl with Memento Rich Cocoa ink on white card and decided not to colour him as I wanted more impact. I cut the panel out with a Nestabilities label die and added a paper mat cut from the next size die. I inked the edges with Crushed Olive and Vintage Photo Distress inks.
I made up the card following the sketch and finished off with a sentiment from the Back To Nature CD cut out with the Papermania square parenthesis die set.
The Design Team have again risen to the challenge and created a great variation of cards so do hop over for a look. You have until 12 noon on Sunday 29 January to enter and good luck.
Now for some challenges for my card:
Crafty Purple Frog - Anything Goes
Moving Along With The Times - Things With Wings
Whimsical Wednesdays - Anything Goes
Lollipop Crafts - No Embellishments
Crafty Sentiments - Anything Goes
I'm very sorry to have been neglecting you the last couple of weeks and hope to catch up soon - my days with 8 hours of figure work should be finished by the middle of next week or at least I hope so!
Hugs, Fliss xx
Labels:
Polka Doodles
Subscribe to:
Posts (Atom)






