Hello there, I'm here today with a little more inspiration for the
current challenge theme of Paper Piecing at Make My Monday chosen by yours truly in the
form of a tag using one of my favourite stamps at the moment, a Prima
doll by the very talented collage artist Julie Nutting. Hope you like
it.
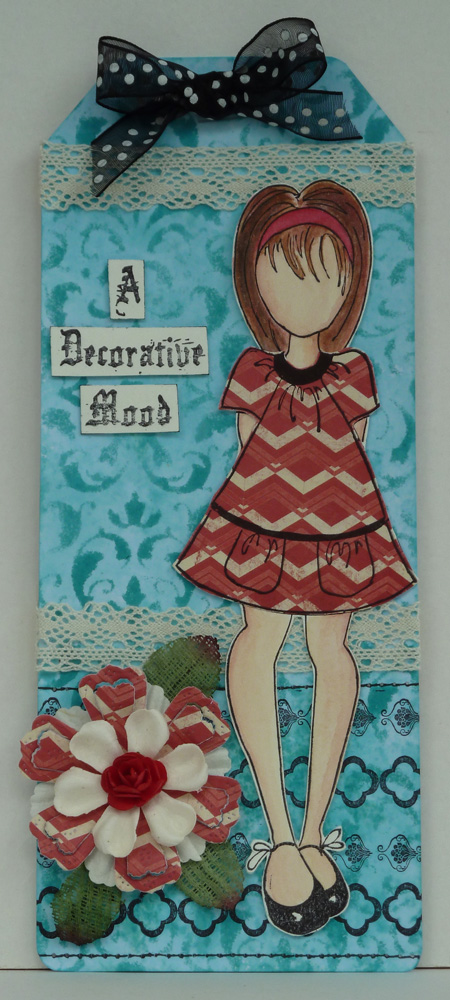
I
made the tag for this myself using the rather natty tag style packaging
that comes with the doll as a pattern to cut my tag from thick white
card. This is mainly because the doll is an amazing 19cm tall so needs
something quite large as a base.
I coloured the tag by applying
Peacock Feathers Distress ink to some crumpled wax paper, spritzing on a
little water then swiping the tag over until it was covered in the
slightly diluted ink. I then applied more of the ink direct from the pad
with a sponge using my favourite Prima stencil - Flourish.
I stamped some of
the borders from the Prima Welcome To Paris cling set with Memories
black ink and added a couple of rows of faux stitching made with theTim
Holtz ruler and a fine black pen.
I stamped the doll on thick
smooth cartridge paper and just the frock element on some Crate Paper
decorated paper from the DIY Shop paper pad with black ink. I coloured
the doll parts with Aquamarkers then cut her out along with the frock
and added the frock to the image with double sided tape.
I made a
layered flower with some plain Prima flowers and a patterned one using
the same paper die cut using a Hot Off The Press Bodacious Blooms die
set. I added a small paper rose to the centre.
I assembled the tag
as you see, adding some cream crochet lace, a dotty black bow and some
Paper Artsy text with some hessian type wired leaves.
I hope you're now inspired to enter if you haven't done so already as it really is very easy to paper piece!
Fliss xx
Some challenges for my Tag:
Die Cuttin' Divas - Anything Goes
Eclectic Ellapu - Anything Goes
Wednesday, 31 July 2013
Monday, 29 July 2013
Paper Piecing Nature
Good morning folks, I hope you've all had a good weekend and better than mine as I spent Saturday morning going back and forth to the opticians after a problem on Friday which looked like a scratch on my left contact lens (meaning I could only see out of one eye all day!) turned out to be a tear which when you know I have gas permeable rather than soft lenses is not good.
In its place I have a continuous wear lens which I have for the next few days until after my check up on Saturday. I've never had soft lenses and although I could get a daily one in, I couldn't get it out again!!!
Anyway, enough waffle and on to this weeks challenge over at Make My Monday which was chosen by me and is the theme of
Paper Piecing
I'm still into doing altered vintage book pages having picked up a rather interesting book in a charity shop when we went to Bournemouth which is all about village life through the seasons.
I tore the edges of the paper making it the size to fit my kraft card blank then sponged on gesso to soften the text but allow it to show through a little.
I then stamped on a leafy sprig from my favourite Hero Arts set with Crushed Olive and Forest Moss Distress inks, smudging a little round the base for a misty effect.
I stamped the large butterfly from the set on to more book page with Memories Art Print Brown ink for my paper pieced element and cut this out. I then sponged on a little Dried Marigold and Spiced Marmalade Distress ink to add contrast colour.
I assembled the card as you see, adding some die cut meadow type flowers by Marianne Design, cut from apricot card and sponged with Spiced Marmalade.
The team mates have risen to the challenge magnificently so do hop over to be inspired.
Have a great week.
Hugs,
Fliss xx
Some challenges for my card:
Creative Inspirations Paint - Anything Goes
Time For Scrap - Walk In The Countryside
Crafts For Eternity Challenge - Anything Goes
Sister Act Card Challenge - Anything Goes
Some challenges for my card:
Creative Inspirations Paint - Anything Goes
Time For Scrap - Walk In The Countryside
Crafts For Eternity Challenge - Anything Goes
Sister Act Card Challenge - Anything Goes
Labels:
Distress Inks,
Hero Arts,
Make My Monday,
Marianne Design,
Nature,
Vintage Style
Friday, 26 July 2013
Florence and Martha For That's Crafty
Hello folks from a very tired Fliss as I'm still struggling with traffic problems on the way to and from work at the moment for various reasons.
A quick post to tell you about my project today over at That's Crafty which is a wall hanging made from my favourite vintage family photo of my Grandmother Martha and her big sister my Great Aunt Florence (known affectionately as Auntie Flo). Sadly I don't remember my Grandmother as she died when I was only 2 years old. Although she wasn't that old by today's standards, she didn't have my mother until she was 37. It's really spooky seeing her photo too as my younger one is the image of her.
Thinking of my dear Auntie Flo brings back childhood memories of going to stay with her at her bungalow in Kempston near Bedford. The bungalow backed on to fields with cows and horses so my brother, sister and I loved visiting her.
This time for a bit of a change, I cropped the figures out of the photo and you'll find all the details of how I made my vintage piece of artwork over at the That's Crafty blog.
Hoping that you all have a lovely weekend.
Hugs, Fliss xx
PS: There will be CANDY soon so keep an eye out as I wouldn't want anyone to miss out!
Many thanks for the heads up on the challenge over at Our Creative Corner go to Alison aka Butterfly from her Words and Pictures blog as she very kindly mentioned that my wall hanging fits the current challenge theme of Captured Memories so I'd really love to enter it there.
Labels:
Kaisercraft,
That's Crafty,
Vintage Style,
Wall Art
Monday, 22 July 2013
Shabby Chic Photo Inspiration
Hello folks, before I go on to our new challenge today at Make My Monday, I need to apologise once again for my lack of visiting which is again due to my job. I had a really busy week last week and due to traffic problems (unexpected contra flow which caused an 8 mile journey to take an hour!) and a power outage at work on the day a crucial payroll had to be run, the net result was no me time!
I did have some good news on Wednesday though as my daughter Sarah got her fashion degree results and we're really proud as she got a first! We're having a celebration soon when my in laws get back from their current break on the Isle of Wight.
Now for the challenge details which this week were chosen by teamie Jan and she's provided a lovely photo as inspiration:
For my card, I chose the frame and flower elements combined with some of the colour and scallop detail.
My background panel was made by inking and spraying a square of card with Distress inks, Brilliance inks and Glimmer Mist and I then embossed it with a Crafters Companion square trellis embossing folder. I then misted on a little Dylusions White Linen ink spray to tone the colour down a little.
I printed out the hydrangea which is one of Teri of Delicious Doodles gorgeous sketch style images on to thick smooth cartridge paper and coloured it with layers of Prismacolor pencil. I tinted the flowers a very pale green as my mother in law had some of these in the garden of her old house (they made the most beautiful green dried flowers in the Autumn too). I cut the image out and added a little colour round the edges with a Sandstone Promarker.
I then die cut the frame from the remaining cartridge paper with the Marianne Design oval set and inked the edges with the VersaMagic Pixie Dust ink. I stamped the sentiment by Hobby Art with VersaFine Smokey Grey ink and die cut this with the small oval from the die set. I inked the edges as before.
I then assembled the card using some pink broderie anglaise and a deeper pink braid.
My fellow teamies as always have made some gorgeous cards to inspire you so do hop over for a peek.
Have a great week.
Hugs,
Fliss xx
Monday, 15 July 2013
Dreaming
Hello everyone, hoping you all had a good weekend and enjoyed some of the current very warm and sunny weather.
We have a new challenge for you today over at Make My Monday with a theme chosen by Caz which is to create something with A Non Inked Stamp by which she means either a new stamp or one in your collection that has never been inked up (I'm sure we all have a few of those!) or if you're not a stamper, A New Decoupage Sheet.
I'm sure you can also guess which option I went for so here's my creation:
I recently acquired this gorgeous Windsong stamp by Paperbag Studios which has been on my wish list for ages.
I stamped the image on thick cartridge paper with Archival coffee ink and then simply trimmed out the panel with some deckle scissors to echo the torn fabric style edge.
I made a patchwork background with some scraps of paper from my bits box in warm shades of yellow and orange with a touch of lime green and sepia. I cut these into squares and added faux stitching with the TIm Holtz Idea-ology ruler and a fine brown pen.
Using another scrap of paper, I die cut most of a doily from it with a Papermania die (as part is hidden behind the image panel, it didn't need to be the whole shape) and inked the edges with some Umber ink for added contrast.
I stamped the dream text (Time To Dream by Stamp-It from Crafters Companion) with the coffee ink on a scrap of cartridge paper and trimmed around it.
I assembled the card as you see on a kraft card blank.
Have a great day.
Hugs, Fliss xx
Some challenges for my card:
Joanna Sheen Challenge - Citrus Colours
Labels:
Make My Monday,
Paper Bag Studios,
Papermania,
Vintage Style
Friday, 12 July 2013
In The Country For That's Crafty
Morning folks, hoping you've all had a lovely sunny week and that you haven't been sneezing with itchy eyes like I have due to the very high pollen count. For some reason it's been the worst I've had in the last 10 years since Sunday and even my trusty homeopathic remedy is struggling to keep it at bay!
Anyway, enough of my troubles and on to my post for this week over at That's Crafty which is kind of a wish I was there - not! I wanted to do something bright and cheery with a scenic look so here's what I came up with.
I'm sure you can see the reason for my title now and I wonder if you're singing in your head like I did which is how the title came about.
If you'd like to see how I made it, you'll find all the details over at That's Crafty and it's easier than you might think as it only uses 2 stamps.
Have a great day and a lovely weekend.
Hugs, Fliss xx
Some challenges for my card:
Lady Anne's Stamp Challenge - Anything Goes
Labels:
Crafty Individuals,
That's Crafty
Monday, 8 July 2013
Flying High With Make My Monday
Hello there everyone, I hope you all had a wonderful weekend in the hot and sunny weather and managed to catch some of the amazing tennis. The men's final was really exciting and I, for one, found that crucial last game really nerve wracking and was sitting on the edge of my seat the whole time. I also loved the ladies doubles final as it was lovely to see one of the Chinese girls laugh when she messed up instead of swearing and making a horrible face!
Today sees a new challenge over at Make My Monday and your hostess this week is Jacqueline who has chosen the theme of BALLOONS which could be either the party or the hot air sort. I decided on the hot air sort as I wanted to give my dies an airing.
Here's what I made:
A fairly simple card this time as I wanted to balloon to stand out.
I made the background by drawing cloud shapes on post it notes and cutting them out to make masts then added them to a square of watercolour paper. I added patches of Distress inks in blue shades to a plastic clipboard, sprayed it with water and pressed on the card to colour it. I then removed the masks to reveal the clouds - you can see where some of the ink seeped round the edges as it gives a fluffy look.
I used a scrap of decorated paper from my bits box to make the balloon. It had a pattern made with a Chocolate Baroque damask background stamp and a Kaleidacolor ink pad. I die cut the balloon and decorative sections with the Paper Mania Build A Scene Hot Air Balloon set. I attached the decorative strips with clear adhesive pads and trimmed where necessary.
The sentiment is from the brand new Polka Doodles CD, Bonbon Belles, and I trimmed the ends to a v shape and coloured it with Mustard Seed Distress ink. I attached it to the card like a banner by sticking at each end only.
Have a great week.
Hugs,
Fliss xx
Some challenges for my card:
One Stop Craft - Anything Goes
Sister Act Card Challenge - Anything Goes
Labels:
Distress Inks,
Make My Monday,
Papermania
Friday, 5 July 2013
Vintage Lacy Background For Polka Doodles
Hi there, I'm here with the details on how I made the pretty lacy look background for my Polka Doodles challenge card this week.
As I really love stamping, what else could I do to make my background and it's really easy when you know how so now's the time to grab a cuppa and read on.
Step 1
It's best to use watercolour paper for this technique as you need something sturdy that won't buckle. Cut a piece that will fit your chosen card blank. The lovely flourish stamp I've used is my favourite from the Daisy Doodle stamp set and I've used Ranger Distress Embossing Ink as it stays wet for a long time. My paper is 8x8 and I stamped the image in the corners first then twice in between and heat embossed the images with the white detail powder. If you want to make a smaller card such as 6x6, you'll probably need to stamp just once between the corners. I've added a bit of colour from the next step so you can see the embossing.
Step 2
Using a craft sheet (or a plastic clipboard as I do), apply a large patch of Victorian Velvet Distress ink and spray with a little water. Using a fairly large paint brush, add a wash all over the over the top of the embossing which will resist the colour.
Step 3
Deepen the colour by applying a further wash of Seedless Preserves Distress ink diluted with water spray as before and then add extra colour to the corners by picking up ink direct from the ink pad with a damp brush.
Step 4
Once the paper has dried, you can then give it some shimmer by applying gold liquid pearls over the embossed area using your finger. Just dab on gently and try not to rub too much. It gives a lovely soft sheen to the embossing and softens the colour a little too.
Step 5
To finish the paper off for my card, I added a little extra embossing across the centre using the same stamp and the gold pearl as I found that the lacy effect of the paper looked better without any added embellishing and hope you agree.
Enjoy!
Fliss xx
Labels:
Girly,
Polka Doodles,
Vintage Style
Create Your Own Background At Polka Doodles
Hello again, I'm back already to tell you about the new challenge today over at Polka Doodles which if you haven't guessed from the title, has a theme chosen by yours truly.
I've made a very girly and lacy looking creation but it's all stamped! Hope you like it.
I'll be back later today with a tutorial on how I made the background, it won't be until I get home though as I ran out of time to do it last night and I do need my sleep at the moment.
Hugs,
Fliss xx
I've made a very girly and lacy looking creation but it's all stamped! Hope you like it.
I'll be back later today with a tutorial on how I made the background, it won't be until I get home though as I ran out of time to do it last night and I do need my sleep at the moment.
Hugs,
Fliss xx
Labels:
Girly,
Polka Doodles,
Vintage Style
Birds Nest For That's Crafty
Hello there, my first post for today concerns my creation for this week over at That's Crafty which is a fairly simple to make card as yet again, I've been really short on time as I'm still trying to get sorted after starting my job last week and as I'm sure you can gather, failing miserably!
I hope you like what I've made and if you'd like to see the instructions, you'll find them over at the blog with a materials list.
Back later!
Fliss xx
I hope you like what I've made and if you'd like to see the instructions, you'll find them over at the blog with a materials list.
Back later!
Fliss xx
Labels:
Paper Artsy,
Stampendous,
That's Crafty
Monday, 1 July 2013
Christmas In July
Hello folks, better late than never with my post for the new challenge at Make My Monday today! I was so busy over the weekend with my younger one home from uni (plus tons of her stuff and washing) plus a secret project too that I had no time to schedule my post yesterday.
This week the theme was chosen by Laura and being Christmas In July, I have to say it made me a bit challenged as well so my creation is rather simple in design.
One of those cards you can mass produce quite quickly as it's just sponged through a circular aperture in a scrap of paper and then toning ink pads used to make the pattern.
I then stamped on the Tim Holtz trees with VersaFine Spanish Moss ink and added the Hero Arts sentiment with VersaColor Raspberry.
Panel added to a kraft card blank and voila - done!
I'm still struggling to keep up with everything and am hoping for light at the end of the tunnel very soon.
Have a great week.
Hugs, Fliss xx
Friday, 28 June 2013
Cherish For That's Crafty
Hello folks, guess who was so tired last night that she forgot to schedule her post for her That's Crafty project today! Apologies yet again for the lack of visiting too which is because I've had no time to myself all week having started my job and getting home too late and very tired so collapsing in front of the TV was the only thing I had energy left to do. Hopefully things will improve as I get used to it as I actually don't feel quite so exhausted today.
Anyway, enough waffle and on to my project which is the card I made for my hubby for our wedding anniversary which was on Wednesday and it's a simple design as he doesn't like fussy and I had to explain how I made the hearts as he thought they were metal.
Hope you like it too and you'll find all the details over at the blog.
Have a great weekend everyone.
Hugs,
Fliss xx
Labels:
Distress Stains,
Kaisercraft,
Stampendous,
That's Crafty
Monday, 24 June 2013
A Summer Scene With Make My Monday
Good morning folks, I'm hoping this post pops as as scheduled as I should now be at work on my first day at my accountancy job so I definitely want Mr Blogger to play nice today!
I'm here with details of the new challenge today over at Make My Monday which is to Create A Summer Scene and as I live just one row of houses back from the seafront what else could I do but a beach scene. We have a long row of beach huts along the front here so they were the main inspiration for my scene. Hope you like it.
I've used the set of stamps that came with the last issue of a stamping magazine (can't remember which one so will add when I can!). I stamped all images and text except the beach huts on to smooth white card and coloured where necessary with Prismacolor pencils and cut them out.
I stamped the beach huts on to wood grain paper from the Polka Doodles Not For Girls CD. I then partially embossed them with the Cuttlebug distressed stripes folder to add some texture and painted on a little Distress Stain in various colours to make them look a little weather worn.
I then coloured a piece of watercolour paper with Distress Stains in shades of Scattered Straw, Mustard Seed, Tumbled Glass, Peacock Feather and Stormy Sky adding some water for a softer effect.
I assembled all the elements as you see to make up my beach scene.
Have a great day.
Hugs,
Fliss xx
Some challenges for my card:
The Corrosive Challenge - Summertime
2 Sisters - Summer Fun
Di's Digi Designs - Summer Fun
Word Play Saturday - Summertime
Labels:
Make My Monday
Friday, 21 June 2013
In The Summertime With Polka Doodles
Hello again and I'm wondering if any of you are now singing as I don't know about you but I can remember a certain song that usually gets played in the summer - showing my age I know!
I made the card from a single 8x8 card blank by cutting it into 2 squares. I folded one square in half to make the card base and die cutting a large circular scallop shape from the other.
I printed out the floral border from the Sugarplum Daisy CD on to cream card and die cut it into a circle. I inked the edges and added it to the scalloped circle.
I covered the base with a leftover piece of green paper from the same CD and then attached the scalloped front.
I printed out some butterflies from the CD, coloured them with Promarkers and cut them out.
I also printed out the cute image from the new Fredericka CD and coloured her with Promarkers, adding detail with Prismacolor pencils then cut her out.
I assembled the card as you see adding some flowers and a sentiment left over from my sample making session when the Sugarplum Daisy CD.
Have a great day and a lovely weekend.
Hugs, Fliss xx
This week the Polka Doodles challenge theme has been chosen by Asha and she would like to see a Summer Birthday Card
I always think of flowers when I think of summer so I've made a shaped card for my inspiration and I hope you like it.I made the card from a single 8x8 card blank by cutting it into 2 squares. I folded one square in half to make the card base and die cutting a large circular scallop shape from the other.
I printed out the floral border from the Sugarplum Daisy CD on to cream card and die cut it into a circle. I inked the edges and added it to the scalloped circle.
I covered the base with a leftover piece of green paper from the same CD and then attached the scalloped front.
I printed out some butterflies from the CD, coloured them with Promarkers and cut them out.
I also printed out the cute image from the new Fredericka CD and coloured her with Promarkers, adding detail with Prismacolor pencils then cut her out.
I assembled the card as you see adding some flowers and a sentiment left over from my sample making session when the Sugarplum Daisy CD.
Have a great day and a lovely weekend.
Hugs, Fliss xx
Labels:
Cute,
Polka Doodles
Flutterby Butterfly For That's Crafty
Good morning everyone and welcome to my first post of today which is all about my project for this week over at That's Crafty which is a quick and simple card which was very necessary as I'm still a very busy bee getting ready to start my job next Monday.
I don't know about you but I really love kraft card so I've used it for my card which I hope you like.
You'll find the list of materials and the instructions over at the That's Crafty blog and I promise you that this time it really is short and sweet lol
I'll be back in a while with my second post which is about the new challenge we have for you today over at Polka Doodles.
See you later!
Fliss xx
Labels:
Kaisercraft,
That's Crafty
Wednesday, 19 June 2013
Anyone For Cricket?
Hello everyone, a quick post from me before The Apprentice starts to share the card I made for my nephew's recent birthday and although he was actually 18, it doesn't say so because I seem to be getting forgetful in my old age lol.
Here it is and it's cricket themed as he's a big fan and quite often goes to Lords to watch matches.
As you can see, a fairly clean and simple design as he's not keen on fussy. The backing paper is from the Polka Doodles Pretty Tuff CD. The digital image is from a really good value CD full of Just Inklined digital stamps and papers and I printed the image out on to thick cartridge paper and coloured it with Aquamarkers. I trimmed it into a panel and added a dark red mat. The finishing touch was a stamped sentiment also added to a red mat.
Hope you're having a good week and have a great day tomorrow.
Hugs, Fliss xx
Some challenges for my card:
Crazy Amigo - Mens' Cards
Top Tip Tuesday - Masculine
Creative Creations - For Dad/Masculine
Get Inky Challenge - Creations For Boys/Men
Labels:
Aquamarkers,
Male Cards,
Polka Doodles
Monday, 17 June 2013
Going Purple With Make My Monday
Hello folks, hoping that you all had a good weekend with at least some good weather. Mine was really busy as I'm madly trying to get ahead before I start my job next week. A wardrobe overhaul is also on the cards as I need to check I have things to wear in an office (having worked from home I have quite a lot of jeans and t shirts as I'm sure you can imagine!)
Anyway, enough waffle and on to the new challenge at Make My Monday which this week is to make something in shades of Purple With Just One Neutral Shade Allowed. I really loved this one as it's a favourite colour of mine and I used to be known as the Purple Queen at the stamp club I went to. I hope you like my card.
As you can see I've made up for the CAS challenge last week and gone right back to my favourite shabby and distressed style.
The background paper was made using Seedless Preserves and Milled Lavender Distress Stains and I sprayed it with water to spread the colour. When it was dry I stamped on a filigree corner by Inkylicious in Lavender Sachet and Iris Palette inks. I stamped it repeatedly for a layered look. I then distressed the edges with an emery board and added it to a square cream card blank.
I stamped the daisies (B Line Designs) with the Lavender Sachet and Iris inks and then added just streaks of colour with Promarkers. I cut them out and shaped them by curling the petals round my decoupage scissor blades.
I stamped the butterfly by Kaisercraft with the Iris ink and added colour with Prismacolor pencils then cut it out and rounded the wings as I did the flower petals. I then stamped the Hero Arts sentiment with the same ink and trimmed to a panel by hand.
I assembled the card as you see adding a cream doily and some purple velvet ribbon.
Have a great day.
Hugs, Fliss xx
Sunday, 16 June 2013
Something New With FSC
Hello folks, hope you're all having a good weekend. I'm here today to tell you about our new challenge over at Fashionable Stamping Challenges where we'd like you to Show Us Something New.
This means you could try a technique that's new to you or use some new stash to make your project.
As I've been stamping for over 15 years now, I must have tried out just about every technique going and although I sometimes manage to come up with a new one myself, I've been so busy lately I had to go for the new stamp option, using one of my latest Inkylicious purchases. Hope you like it and you might need your sunglasses as it's quite bright!
The background paper was created by sponging a square of card with Dried Marigold Distress ink and then stamping on an Inkylicious corner with Picked Raspberry Distress ink. I inked around the edges with Worn Lipstick DI.
I stamped the Inkylicious Vintage Rose image with Spanish Moss VersaFine ink. I added colour with Promarkers and then sponged with Cinnamon, Old Rose and Canary VersaColor inks. I set this on a layered mat with a pink die cut made with a Papermania die and a deep green panel.
I added a pink die cut corner made with the Marianne Design Anja corner and a Dovecraft sentiment stamped with the green ink, sponged as before and added to a deep green mat trimmed with deckle scissors.
My DT sisters have some amazing projects lined up for you on the catwalk so please do pop over for inspiration. Also please don't forget that we are a stamping challenge so there must be stamping on your creation.
Have a lovely Sunday.
Hugs,
Fliss xx
Some challenges for my card :
Crafting Musketeers - Use A Stamped Image
The Alphabet Challenge - I For Image
Friday, 14 June 2013
Elizabeth Goes Steampunk For That's Crafty
Good morning folks, I hope you've all had a good week so far. Mine has been really busy with work which I'm still trying to get out of the way and I have even more reason to do so now as yesterday I had a phone call from the agency dealing with the job I interviewed for last week and guess what - I got the job!
This has gone to prove that if you try hard enough there really are jobs out there and I can't tell you how thrilled I am to have been successful at last!
Now for the actual reason for this post which is to tell you about the project I have over at That's Crafty today which I admit is a little off the wall as the Elizabeth concerned is Elizabeth Bennet and I'm not sure that she would like being steampunked! However, that's exactly what I've done and I hope you like it!
If you'd like to find out how I made my collage, you'll find all the details over at That's Crafty. Hope to see you there.
Have a great day and a lovely weekend.
Hugs, Fliss xx
Tuesday, 11 June 2013
One For Dad With Studio 12
Hello everyone, guess who only remembered she was supposed to be doing her Studio 12 post at lunchtime - oops!
I immediately grabbed by Studio 12 scraps box to see what I could find and with Fathers Day looming fast here in the UK, have rustled up a very quick card with men in mind.
All I did was tear some scraps of paper - the gingery coloured polka dot paper is from the Gingerbread Twist CD and the distressed harlequin design from the All Sewn Up Collection of the Picknix Collection 1 CD - and added these to a kraft card blank with a scrap of vintage music score.
I then added the gorgeous robin digital image from the Gingerbread Twist CD and some text made with my Dymo machine and black tape. Done!
Well, I did say it was quick!
I also want to say sorry to everyone for my lack of visiting lately which is mostly because I'm inundated with work at the moment and the only reason I could do this is because I'm now waiting for a client to get some information to me. I'm not sure quite when the pile will get smaller but hopefully it won't be too long!
Hugs, Fliss xx
Labels:
Polka Doodles,
Studio 12
Subscribe to:
Posts (Atom)