Friday, 11 October 2013

All You Need Is Love

Hello there folks and hope you've all had a good week. Mine has been extremely busy again with work and family stuff so hardly any blogging and crafting apart from DT stuff at the moment. I do have things coming up at the weekend though as tomorrow I'm off to a Crew clothing warehouse sale with my hubby as he loves their stuff and I do although I cringe at the prices so I hope they have some bargains.
Today's post is to let you know about my project over at That's Crafty which is a CAS card as I decided to challenge myself to do one again.


As you can see, unusually for me there's a lot of white space! If you'd like to see the how I made it and what I used, please head on over to the blog.

Have a great day whatever you're doing and a lovely weekend too.
Hugs, Fliss xx

Monday, 7 October 2013

A Little Elegance

Hello there everyone and hope that you all had a good weekend. I'm here today with my inspiration for the new challenge over at Make My Monday with the theme chosen by hostess Suzi B being Elegant Ladies
My card has a little of the ooh la la about it as it features my favourite B Line Designs stamps of a rather elegant French mademoiselle.


Sorry about the pic, it's a bit blurry as my camera didn't like the light. I covered my card blank with some rather pretty paper from a Debbi Moore Shabby Chic CD.
I stamped the Le Brun image with Memories Artprint Brown ink on cream card and coloured her with Copics and Promarkers. I then cut her out and added her to a kraft card mat made with a Papermania die and place a dusky pink mat behind.
I finished off with a butterfly that I found via the ever wonderful Pinterest (if you'd like to see the whole sheet just click on the link on my sidebar and go to my printables board where you'll find the link).

Have a great day and a good week.
Hugs, Fliss xx

Friday, 4 October 2013

Tangerine Dream

Hello there everyone and first up is an apology for my lack of commenting recently which is partly because my younger daughter who's been interning in London phoned me excitedly last Tuesday to say that she's now been offered a job there starting on 1st November so the accommodation hunting is now in full swing.
I'm also really busy on the work front at the moment which means a distinct lack of me time and has cut down on my blogging too apart from my DT duties so I'm so sorry and hoping for more free time soon.
Today's post is to let you know about the project I have today over at That's Crafty which is one where you might need your sunglasses as I decided on something bright and cheery due to the current rather dreary weather.


You'll find the details as always over at the blog and I hope you'll pop on over to see how it came about as it's quite simple to make.
Have a great day and a fab weekend.
Hugs,
Fliss xx

Wednesday, 2 October 2013

Pretty In Pink, Sepia and Cream

Hello there folks, a slightly belated midweek motivation post here for my Vintage Style challenge over at Make My Monday this week as I forgot to take a photo yesterday and the light today went from dull and drizzly to brilliant sunshine (neither of which are liked by my camera) in a short space of time!
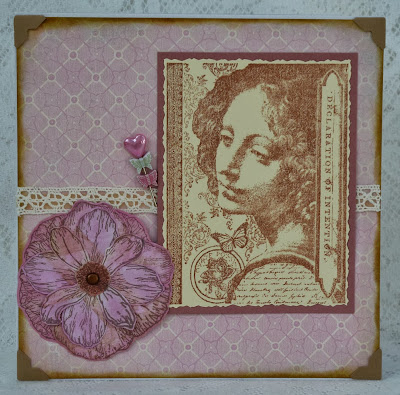
For this card I've gone for pink with my sepia and cream to make a very feminine creation. Without further ado, here it is!


I've used an old favourite Rubber Stampede image stamped with sepia ink on cream card and trimmed with deckle edged scissors. I added this to a mat of dusky pink card.
I covered my card blank with some pretty paper by Melissa Frances that came free with a magazine a while back, having inked the edges with Vintage Photo Distress ink and adding Paperchase kraft paper photo corners before sticking on.
I made the floral decoration by stamping a Papermania layered decoupage wild rose image on pink paper and cut out the pieces, layereing up with a copper brad and inking a little with Victorian Velvet Distress ink.
I added some cream crochet lace to the card, then sticking on the image panel and flower, finishing off with a heart stick pink with some butterflies added.

See you again soon and hope this will encourage some more entries.
Hugs,
Fliss xx

Monday, 30 September 2013

Autumn Glory

Hello there, I'm back again today with a short post and my belated inspiration for the latest Fashionable Stamping Challenges theme chosen by Avril which is my absolute favourite colours being an Autumn born girl so I couldn't miss out on doing something with Autumn Colours.

Here's my card and I hope you like it as much as I enjoyed creating it:


It came about after a little trawl through my bits and pieces box where I came across a piece of watercolour paper stamped with a Hero Arts flower using Spiced Marmalade, Rusty Hinge and Aged Mahogany Distress inks. As it was cream, I sponged on Mustard Seed and Wild Honey DIs for a lovely warm glow.
I then embossed a panel of kraft card with a Darice Autumn leaves folder and swiped Versacolor Paprika over the raised areas. I added this to the paper panel then tied round some rusty gingham ribbon before sticking to the card.
I added some leaves which had been stamped by adding Distress re-inkers to a paper towel to make an ink pad. I cut these out to leave a narrow border and added them with foam tape for dimension.
I finished off with some text in a metal frame I've had for rather a long time! A Junkitz Tim Holtz set in antique copper.

See you again soon.
Hugs, Fliss xx

Some challenges for my card:
Come And Get It Challenges - Fall Colour Challenge
Dream Valley Challenges - Autumn
Pile It On - Leaves
Rogue Redhead Challenges - Autumn Colours

Vintage At Make My Monday

Good morning folks and welcome to my post for this week's challenge over at Make My Monday with a theme chosen by yours truly:

Vintage With Sepia And Cream Plus Optional Pink And /Or Blue

Here's my inspiration which I hope you like:


I've chosen to use one of my favourite Crafty Individuals vintage images which I stamped with Coffee Archival ink and coloured with Promarkers then trimmed to leave a narrow cream border.
I stamped a Viva Decor flourish on a scrap of cream card with the same ink and added this to a kraft card blank along with a blue panel embossed with a Crafts Too folder.
I inked a doily with Versacolor Smoke Blue ink and added this to the card with the image panel together with the B Line Designs text stamped on cream with the coffee ink and some cream and brown lace.

I look forward to seeing all your entries and for some more inspiration hop on over to the blog where the Design Team have some fabulous creations for you.

Have a great day.
Hugs, Fliss xx

Some challenges for my card:
2 Sisters - Anything Goes
A Creative Romance - Fairytale or Winged Creations
Crafts 4 Eternity Recipe Challenge - Anything Goes
Stampin' For The Weekend - Fairies and Fantasy

Friday, 27 September 2013

Little Bird Book Tags For That's Crafty

Hello everyone, sorry it's taken me so long to get back to blogging and many thanks go to those who left me good wishes for my recent holiday which I really do appreciate.
We had a lovely if rather wet time away (not really a surprise in the Lake District!) and had to buy some waterproof trousers on the second day to avoid soaking wet jeans. I'm also now the proud owner of a very pricy Barbour waxed hat as I got fed up with my hood falling in my eyes!
Apologies here for my lack of commenting and also for my non contributing to this week's Polka Doodles challenge for the first time in ages as I had the most terrible headache which took ages to clear and I didn't feel much like crafting. I'll try and make up for it next week.

This is rather a late post with my project for this week for That's Crafty which is a duo of tag style bookmarks and I hope you'll pop on over for the details on how I made them.


I'll be round soon to visit over the weekend and in the meantime, have a great one!

Hugs, Fliss xx

Monday, 16 September 2013

Swirls and Pearls

Hi there, I'm hoping this post will pop up as scheduled as I'm currently on my hols in the Lake District and I'm also hoping for some fine weather!
This week at Make My Monday, the challenge theme is Swirls and Pearls and I opted to ink up one of my favourite stamps, my Audrey Hepburn image by B Line Designs.


I made the background paper by lightly inking card with Shabby Shutters Distress ink and then stamping on a Viva Decor flourish image with Crushed Olive Distress ink.
I stamped the Audrey image with Memories Artprint Brown ink on cream card and added a little colour with pencils then die cut into a circle and added to an olive green scalloped mat.
I then added a pink die cut doily (Papermania die) and pearls.
I finished off with a stamped sentiment.

See you next week!
Hugs,
Fliss xx

Friday, 13 September 2013

One For The Boys

Hello again, my second post of the day is to tell you about the new challenge we have for you today over at Polka Doodles and it will be my last post for a bit, apart from a scheduled one next week as we're off to the Lake District tomorrow for a well earned break.
The challenge over at Polka Doodles is to make something for the men and boys in your life and I decided on a Christmas card as we have several male family members on their own so I need to make some cards to appeal to them and what else could I choose but my favourite snowman! The image and all the other elements are from the Here Comes Christmas CD.


I printed out the snowman on to cartridge paper and coloured him with Aquamarkers. The woolly look to his scarf is made by adding wiggly lines of colour in a stripe pattern and it results in a quite fluffy look.
I added the image panel to a red mat and partially covered the card blank with some of the gorgeous snowflake paper from the CD.
I printed my sentiment sheet out on to another piece of snowflake paper in a different colour and cut out the one I wanted, adding it to a mat of red card.

Have a great day and a lovely weekend.
Hugs,
Fliss xx

Who's Watching You Now?

Good morning folks, I hope you've all had a good week and aren't suffering from too much bad weather. It has rained here some of the time but the weather can't seem to make its mind up if it's going to be chilly or warm as we've had a mix of both.
This is my first post of the day to tell you about the project I have today over at That's Crafty which is rather bright and graphic in design as I've been playing with misting inks and a fab stencil. Hope you want to find out what I did and if so, please do head on over to the blog.


I'll see you again in a while as I have another post coming up a bit later on today, I know - busy, busy!

Hugs, Fliss xx

Monday, 9 September 2013

Whispering Grass

Good morning everyone, I hope you all had a lovely weekend. Mine was rather busy as I went to an open house rather posh do on Saturday with my hubby which was held by one of his clients for whom he's dealt with the renovation of a manor house. There have been huge problems and it's taken ages but the end result is really stunning and I was in raptures over some of the plaster mouldings which were amazing circular flourishes.
Yesterday we celebrated with my mother in law as it was her birthday so we had a family afternoon with tea and cake.
Today we have a new challenge for you over at Make My Monday and this week the theme has been chosen by Rosie who has challenged us to:
Create A Scene
It will be no surprise to hear that I've gone for a nature themed card again as I wanted to ink up my Inkylicious grasses stamp. I hope you like it.


As you can see it's quite a simple design and the grasses panel was made with a scrap of watercolour paper which was the exact size for the kraft card blank.
I sponged the paper with Crushed Olive Distress ink on the bottom half and Milled Lavender on the top.
I stamped the grasses on with VersaFine Spanish Moss ink and Seedless Preserves Distress ink,  Some of the stamping was second generation as I was aiming for a misty look in the background. I also added some stamping with the stamp upside down to add a bit more detail at the base.
The butterflies are from the ever useful Crafty Individuals Elements set CI-231 and were stamped with Memento Sweet Plum, VersaFine Spanish Moss and Olympia Green. I then coloured them with Aquamarkers, cut them out and added them with foam pads.

Have a great day.
Hugs, Fliss xx

Sunday, 8 September 2013

Can U Resist?

Well, can you folks lol. I hope you're enjoying the weekend so far and I'm here today with news of the new challenge today over at Fashionable Stamping Challenges with the theme chosen by yours truly with is
Can U Resist?
So it's time to try out those resist techniques and the one I have to share for my inspiration is a little bit different. It gives a very grungy result which I hope you like so please do tell me what you think.


You might need to click on the pic to see the effect properly as it's quite hard to see in the smaller photo here.
The background paper was made by stamping one of my favourite Viva Decor flourish stamps with embossing ink on thick linen textured card and heat embossing the images with clear powder.
I then rubbed green, brown and orange wax crayons over the embossed areas which picked up some but not all of the colour. I next sponged on Wild Honey and Spiced Marmalade Distress inks and you can see the resist effect in the photo. I rubbed a paper towel gently over the top to remove any excess ink.
I stamped the image from Paperbag Studios on watercolour paper with Archival coffee ink and coloured it lightly with Aquamarkers then trimmed close to the edge, leaving a narrow border.
I added the resist panel to a kraft card blank which was embossed on the right side with a Cuttlebug border embossing folder, wrapping a piece of coffee coloured lace round. I then added the image panel and some flowers, mesh leaves and ribbon to embellish the card.

The Fashionettes have some fabulous inspiration waiting for you on the catwalk and I hope you'll pop over for a look. I hope we'll see you entering the challenge too and please remember that we are a stamping challenge and that there must be stamping on your project to be eligible for the prize.
Our sponsor as always as the lovely Leo of Flonzcraft whose online store has lots of fabulous vintage images.

Have a great day.
Hugs, Fliss xx

Some challenges for my card:
Simply Create Too - Vintage
Stempelsonnen Challenge - Orange, Green, Brown
4 Krafty Girlz - Anything Goes
Happy Campers - Use A Stamp

Friday, 6 September 2013

Butterfly Watching For That's Crafty

Good morning everyone and hope you've all had a good week so far. Mine as usual has been busy with work but I have a card to share today which is my DT project for That's Crafty this week and is for my mother in law's birthday on Sunday.
Jean loves rabbits as they had them when my hubby and his brother were growing up and she often pops round to see our own 2 little grey Netherland Dwarf bunnies, Rosie and Dill, so what else could I put on her card but the 2 cute and quirky Alice Palace Designs bunnies for Crafty Individuals.


You'll find all the instructions over at the blog together with the materials list and hope you'll pay a visit as there are loads of fab tutorials to feast your eyes on.

Have a great day and a lovely weekend.
Hugs, Fliss xx

Monday, 2 September 2013

Childhood Memories

Good morning folks, I hope you all had a lovely weekend and it's Monday again so we have a new challenge for you over at Make My Monday which this week has the theme of Childhood Memories.
In my case I thought of my treasured teddies and it gave me the chance to ink up again a stamp I must have had for around 10 years and can't bear (no pun intended!) to part with. I hope you like what I made.


I think you can probably see why I love this cute ted as he looks so cuddly. I stamped him on kraft card with coffee Archival ink and added just a little colour with Luminance pencils. I find that because they're highly pigmented, they show up really well on kraft card. I trimmed the card to a panel and inked round the edges a little.
I made the background paper by using ink daubers to apply Distress inks to hammer card. I used Stormy Sky, Victorian Velvet, Wild Honey, Frayed Burlap and Milled Lavender. I inked the edges with the blue ink and added the paper to a kraft card blank.
I then die cut the pink panel using a Marianne die and as the card was quite thick I found that it didn't quite cut out all the sections but I do quite like the effect.
I finished off with braid, flowers, pearls and a button.

Have a great day.
Hugs,
Fliss xx

Friday, 30 August 2013

Fairy Time

I'm back with my second post of the day which is to tell you about the new challenge we have for you today over at Polka Doodles which has the theme of Fairy Time and we had an extra challenge between ourselves to include 2 fairies or angels on our inspiration piece.
Nikky also has a big surprise for everyone as she's offering a free Angelberry digi to anyone who emails in up until 5 September - don't miss out!
We also have 2 lovely new Design Team members with us this week so I'd like to say welcome to Rebekah and Zoe (known as Zo) here. They've both made a totally gorgeous inspiration piece for your delight.
For my challenge project I decided to make a mobile suitable for a little girl's room as it's double sided and has a different fairy on each side. All the elements came from the Bonbon Belles CD.


I chose 2 of the beautiful floral wreaths from the CD on to hammer card and cut them out. I added them to some circles of lilac pearl card which I made by cutting round a plate as my dies were too small!
I then printed out my 2 favourite fairies and had to use the pre-coloured images as I'm really short on time at the moment. Due to Nikky's fab digital colouring they look like I coloured them myself (or would if I could actually colour that well!) so sssh - don't tell Nikky!
I cut the fairies out and added them to the circles with foam tape, bending and shaping the images first.
I then glued the circles together with some chiffon ribbon between to form the hanger and added some paper roses at the top. I finished off with a scattering of bling and pearls.

Have a great day and a lovely weekend.
Hugs,
Fliss xx

Elizabeth's Garden For That's Crafty

Hello everyone, this is my first post of the day which is to tell you about my project today over at That's Crafty which is a wall hanging with a difference.
Here's a sneak peek but you'll need to hop on over to see the whole thing and how I made it:


I'll be back in a bit with post number two!
See you!
Fliss xx

Monday, 26 August 2013

Someday I'll Fly Away

Good morning folks, hoping you're all still having a good weekend if you live in the UK and I'm back today with news of the new challenge over at Make My Monday today chosen by Jan which has the theme of
Anything But A Card

I decided on another canvas although this one is a canvas board as I find them easier to work with when I want to stamp.


I was inspired to create my canvas by an article in the latest issue of Scrap 365 magazine as I love seeing new ways to use up those scraps of paper from my bits box. Here's what I used for my canvas:


I first covered the 5x7 canvas with a copy of a vintage French construction catalogue which I picked up on my recent visit to Eastbourne. I then cut strips of the decorated paper scraps (made with various techniques including stamping, stenciling and inking by pressing through my Cuttlebug) from my bits box and glued them on with Ranger Glue n Seal. I then brushed Gesso over the top, wiping with a baby wipe to soften the effect and then used the wipe to apply some Crushed Olive and Vintage Photo Distress ink.  


I stamped Addison (Paper Bag Studios) twice with Memories black ink on smooth white card and coloured the wings on one image with a red Promarker. I cut out the whole image from this one and the little boy from the other, layering them up with clear adhesive squares.


I stamped the Arty image (Kaisercraft) with Crushed Olive Distress ink randomly on the canvas and then used a jar lid and Vintage Photo to add circles. I stamped Imagine (Inkylicious) with the Memories black ink directly on the canvas and then added the little boy. I punched out a few circles from my larger grungy dot background (made by stamping with a cork) and inked the edges with Barn Door before adding them to the canvas.

The Design Team has made fabulous and varied creations to inspire you so do hop over for a peek.

Have a lovely day.
Hugs, Fliss xx

Some challenges for my canvas:
Addicted To Stamps Challenge - Shabby/Vintage
Creative Inspirations Paint - Anything Goes
Hobbycutz - Create Your Own Background (All my scraps are papers made by me)
Stamping Sensations - Wings and Things and a Touch of Vintage
Our Creative Corner - Words, Words, Words

Sunday, 25 August 2013

Sew-n-Sew At FSC

Hello everyone, I hope you're all enjoying the Bank Holiday weekend, or at least those of you who live in the UK. We seem to have typical weather for it here too as yesterday we had torrential rain, a mega thunderstorm and even hailstones!
I'm here today to tell you about the new challenge we have for you over at Fashionable Stamping Challenges which is the first one I've done in a while due to my lack of free time with my new job.
I'd also like to say a big welcome too to our fabulously creative new Design Team member Laura of Laurart who has made a wonderful project for her debut on the fashionable catwalk.
We've also had to sadly say goodbye to Silvia but we'll all be keeping up with you in blogland.
The theme for this fortnight is Sew-n-Sew and as you'll see from the fabulous Design Team inspiration, there are lots of ways to interpret this.
I decided to use sewing on my project and I'm sure you'll be able to tell it's hand sewing because the stitching is somewhat wonky!!!
Without further ado, here it is:


You'll probably need sunglasses to look at it as the colour is a bit off. The background isn't quite as bright as the photo and I've actually used irridescent paint which doesn't really show up.
I started off by painting the chunky canvas with Pebeo Studio Acrylic paint in irridescent green blue and then stamped on my new Paper Artsy flourish MN96 - thanks Sue!!! - with Palette Beaux Arts Blue ink. I didn't use an acrylic block as it was easier to stamp without although I did end up with blue fingers!
I then made the butterfly with a Sissix Bigz die that I picked up in the quilting section of the local Hobby Craft store. I die cut the shape from calico fabric and then sprayed it with yellow and orange inks. I stamped the flourish on with Palette Raw Sienna ink. I then used the die to cut the shape out with cream felt and Bondaweb and ironed the 2 pieces of fabric together with the Bondaweb in between. I stitched around the edges with some rusty coloured thread.
I added some crochet lace around the base of the canvas and added the butterfly and a paper rose which I coloured with some Squeezed Lemonade and Ripe Persimmon Distress inks. I finished off with some uplifting text which is another line from the fab Inkylicious Live Life stamp and was sponged with some toning Distress inks.

I hope you can enter the challenge which is sponsored as always by the lovely Leo of Flonzcraft who has an online store chock full of vintage loveliness and is offering a $20 voucher for the randomly drawn winner. Please also remember that we're a stamping challenge and to qualify for the prize, we must see some stamping on your entry.

Have a great day.
Hugs, Fliss xx

Some challenges for my canvas:
Crafting By Designs - Mixed Media
The Pink Elephant Monday Card Challenge - Anything But A Card
A Gem Of A Challenge - Anything With A B (butterfly, blue)
Friday, 23 August 2013

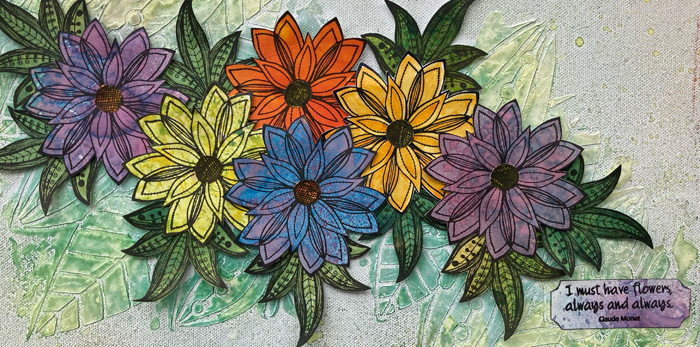
Brrrrilliant Christmas!

Good morning all, hope you've all had a good week so far and I'm here today to let you know about my post over at That's Crafty which is a Christmas card - eek!
As I said over there, I've got to start doing them now as the last minute December 1st panic is a no no this year due to my job and I don't want to end up having to buy loads and disappoint those folks who always appreciate what I make.
Here's the one for That's Crafty and hope you like it. You'll find all the details by clicking on the link and as I've said before, there are simply loads of inspirational projects with tutorials over there so it's worth hopping over and following just for those.


As you can see, a rather rustic creation and isn't that snowman just fabulous!

Have a great day and a lovely weekend.
Hugs,
Fliss xx

Monday, 19 August 2013

Little Boy Blue

Good morning all, hope you've all had a lovely weekend. Mine was rather busy as we had a family trip to Eastbourne on Saturday with my in laws for a belated birthday celebration for my father in law. He kindly took me to a collectors shop too and I managed to acquire a bit of vintage ephemera which I'll be sharing soon.
I also want to say a huge thanks to my fellow FSC DT mate Sue who was a guest designer for Paper Artsy and as part of their 10th birthday celebrations (many congratulations to Leandra and Mark) did a giveaway and to my total delight, I was one of the winners so I arrived home on Saturday to find my prize of 3 of the new stamps, some chunky chipboard and smooth stamping card had arrived! Thanks Sue! I really am thrilled to bits.
Now for the details of the new challenge today over at Make My Monday, chosen this week by Laura, which has the theme of It's Child's Play so we would like to see something for a baby or a child's birthday.
I decided on the card for a little boy which you probably guessed from the title lol and I hope you like what I've made.


I don't actually have much in the way of stamps suitable for the theme so my Polka Doodles Pretty Tuff CD came to the rescue. This little boy is so adorable I couldn't resist using him.
I'm so short on crafting time at the moment that I used one of the precoloured images. I cut this into a panel and then designed my card with papers from the CD, using one for the background and a small amount for a panel.
I made the red mats myself by simply cutting a piece of white card the right size for each panel and then sponged Fired Brick Distress ink around the edges. This trick saves using up whole pieces of coloured card or paper and is also great if you emboss the inked edge.
I finished off with one of the cute shaped sentiments from the CD.

Have a great day.
Hugs, Fliss xx

Some Challenges for my card:
Word Play Saturday - Childhood
Simply Create Too - For A Child

Friday, 16 August 2013

Have A Heart

Hello again, another post to tell you about the new challenge we have for you today over at Polka Doodles which is all about hearts as if you hadn't guessed from the title!

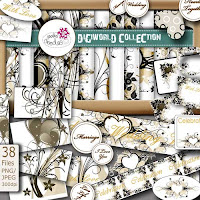
We've had an extra challenge between ourselves too as we've all used some of the fabulous Download Bundles available in the online shop.
I've used a favourite of mine as I love the colour combination of mocha and gold in this one:


As you can see I decided on a bag and matching card and started off with a plain kraft bag which I covered with one of the lovely papers. I added a border across the centre and trimmed the bag with some rather rustic braid from my stash.
I made a matching card with one of the toppers and the same border on the bag, again trimmed with the braid and finished off with a metal heart charm which was the exact same size as the heart on the topper.

I hope you can join us.
Have a great weekend.
Fliss xx

Indian Summer For That's Crafty

Hello folks and sorry if I haven't been to visit lately, work and home life have kept me extremely busy and there's no let up until next week!
This is the first post of the day to tell you about the project I have over at That's Crafty today which came about because of the chilly mornings we've had down here which made the weather seem more like September than August! Hope you like it.


There are a few more pics over at the That's Crafty blog along with my how to make and I hope you'll pop on over for a better look.

See you again later.

Fliss xx

Monday, 12 August 2013

Smile

Good morning folks and a special welcome for my new followers, so lovely to have you on board ladies and I'm so pleased you've decided to follow my art journey. I hope you all had a good weekend and managed to get some crafting done as I did, some of which I'll be sharing over the next week.
Today's piece of artwork is my inspiration for the new challenge over at Make My Monday with a theme chosen this week by Rosie who would like to see a creation with a 3D Element or Dimension.
I decided on a little wall hanging heart which I picked up at our local branch of The Range for just £1 and knew it was just made for altering.


I first added some Paper Artsy Fresco Finish paint in Vintage Lace applied with a sponge as it gives a much softer effect than using a brush.
I then stamped on at random the second largest daisy from the Crafty Individuals Elements set CI- 206 Flower Heads using Archival Olive ink. I then used second generation stamping with the same ink to add more smaller daisies in between.
When the paint was dry, I painted the larger daisies with Titanium White paint and allowed it to dry. I then knocked the colour back a little by brushing over with a wet brush. This softened the paint up for a softer look.
I then stamped several more of the daisies on to smooth white card with the olive ink and coloured them with pastel pink and yellow and soft lime Promarkers. I cut them out with decoupage scissors.


I stamped Little Lu-lu by PaperBag Studios with VersaFine Smokey Gray ink and when the ink was dry, coloured her with Promarkers. I trimmed around the image on the left side and added her to the painted heart with foam tape, trimming off the excess down the side of the heart.
I added the daisies with foam squares, layering them up a little and finished off with stamped text and some pink pearls.

Have a great day and hope you will enter the challenge, you'll see from the DT inspiration how many ways you can add dimension to your creations.

Fliss xx
Some challenges for my wall hanging wooden heart:
One Stop Craft - Pastel Colours
Brown Sugar Challenge - Anything Goes
QKR Stampede - No Squares Allowed

Friday, 9 August 2013

Nature Quilt For That's Crafty

Hello everyone, I hope you've all had a good week and are looking forward to the weekend like me. I need mine as I've been really busy this week.
I'm here to tell you about my project for today over at That's Crafty which is the cover for a little nature notebook and I'll be sharing the inside pages once I've had a chance to make them up. Hope you like what I've done so far.

Apologies for the slightly wonky pic, I had a bit of trouble with my scanner which I had to use as the light went really early today.
If you'd like to see how I made it, you'll find all the details over at the blog.

Have a great day and a lovely weekend.
Hugs, Fliss xx

Monday, 5 August 2013

Silhouettes With Make My Monday

Good morning folks, hope you all had a lovely weekend. Mine was very busy with optician visit (new contact lenses on the way) and an unexpected shoe shop visit after I wore some new shoes to work on Friday and I kid you not here, they squeaked the entire day and nearly drove me up the wall! I got them replaced and great hilarity ensued at the till as the staff worked out which refund button to use - there wasn't one for squeaking!
I then spent some time trying to get ahead on my DT work and was partly successful although I still have a long way to go yet. Here's one of my creations for this week's challenge at Make My Monday where the theme is SILHOUETTES and I admit to being a bit stuck as I knew the image I wanted to use but couldn't think what background technique to create for it. Happily my Craft Stamper came to the rescue as I tried out Kay Carley's fab technique. Mine isn't quite like hers of course but I hope you like it.


The silhouette image is one I've had for ages by A Stamp In The Hand and I stamped the poppies on thick smooth cartridge paper with VersaFine Crimson Red ink.
I then used Kay's technique (I can't really put the details here so hopefully you have the mag to refer to) with Tumbled Glass, Weathered Wood, Frayed Burlap and Bundled Sage Distress inks using a Paper Artsy flourish stamp (from HP1005). The only difference to Kay's technique being that I added extra stamping round the edges with Bundled Sage and Frayed Burlap as I wanted a little more definition. I was quite surprised how much the inks lightened up once I dried them with my heat gun so if you do try it out, don't be put off if you think it looks a bit dark.
I added faux stitching round the edges with the Tim Holtz ruler and a brown fine pen and finished off with some text from an Inkylicious stamp called Live Life which has lots of lines of text just begging to be cut up!

My DT sisters have made some fabulous cards to inspire you so do hop on over for a peek - I promise you're in for a treat.
Have a great day.
Hugs, Fliss xx

Friday, 2 August 2013

Birthday Girl

Hello again, I'm back with my second post for the day which is to tall you about the new challenge we have for you today over at Polka Doodles which is to make a card for the Birthday Girl.
I decided to make a shaped card using the decoupage kit on the Candy Doodles CD. The shape is one that's particularly appropriate for our house as my younger daughter and I love making cupcakes.


I simply printed out the template and all the decoupage elements, cut the pieces out and layered them up with foam tape. I added a ticket sentiment coloured with a pink Promarker. Very quick and easy!

Have a lovely weekend especially as the warmer weather seems to have reappeared.
Hugs, Fliss xx

Time To Dream For That's Crafty

Hello folks and a special welcome to my new followers - lovely to have you here and glad you decided to follow me on my art journey.
This is the first of 2 posts today and is to tell you about the rather bright and zingy creation I have over at That's Crafty. Here it is and I hope you like it.


It's quite simple in style as I didn't want anything to distract from my rather grungy image panel. You'll find all the details over at the That's Crafty blog if you'd like to find out how I coloured the background - it uses something you might not realise can be this useful!

I'll be back shortly with my next post so watch this space!
Have a great day.
Fliss xx

Wednesday, 31 July 2013

Hello Dolly!

Hello there, I'm here today with a little more inspiration for the current challenge theme of Paper Piecing at Make My Monday chosen by yours truly in the form of a tag using one of my favourite stamps at the moment, a Prima doll by the very talented collage artist Julie Nutting. Hope you like it.


I made the tag for this myself using the rather natty tag style packaging that comes with the doll as a pattern to cut my tag from thick white card. This is mainly because the doll is an amazing 19cm tall so needs something quite large as a base.
I coloured the tag by applying Peacock Feathers Distress ink to some crumpled wax paper, spritzing on a little water then swiping the tag over until it was covered in the slightly diluted ink. I then applied more of the ink direct from the pad with a sponge using my favourite Prima stencil - Flourish.
I stamped some of the borders from the Prima Welcome To Paris cling set with Memories black ink and added a couple of rows of faux stitching made with theTim Holtz ruler and a fine black pen.
I stamped the doll on thick smooth cartridge paper and just the frock element on some Crate Paper decorated paper from the DIY Shop paper pad with black ink. I coloured the doll parts with Aquamarkers then cut her out along with the frock and added the frock to the image with double sided tape.
I made a layered flower with some plain Prima flowers and a patterned one using the same paper die cut using a Hot Off The Press Bodacious Blooms die set. I added a small paper rose to the centre.
I assembled the tag as you see, adding some cream crochet lace, a dotty black bow and some Paper Artsy text with some hessian type wired leaves.

I hope you're now inspired to enter if you haven't done so already as it really is very easy to paper piece!

Fliss xx

Some challenges for my Tag:
Die Cuttin' Divas - Anything Goes
Eclectic Ellapu - Anything Goes

Monday, 29 July 2013

Paper Piecing Nature

Good morning folks, I hope you've all had a good weekend and better than mine as I spent Saturday morning going back and forth to the opticians after a problem on Friday which looked like a scratch on my left contact lens (meaning I could only see out of one eye all day!) turned out to be a tear which when you know I have gas permeable rather than soft lenses is not good.
In its place I have a continuous wear lens which I have for the next few days until after my check up on Saturday. I've never had soft lenses and although I could get a daily one in, I couldn't get it out again!!!
Anyway, enough waffle and on to this weeks challenge over at Make My Monday which was chosen by me and is the theme of
Paper Piecing

I'm still into doing altered vintage book pages having picked up a rather interesting book in a charity shop when we went to Bournemouth which is all about village life through the seasons.


I tore the edges of the paper making it the size to fit my kraft card blank then sponged on gesso to soften the text but allow it to show through a little.
I then stamped on a leafy sprig from my favourite Hero Arts set with Crushed Olive and Forest Moss Distress inks, smudging a little round the base for a misty effect.
I stamped the large butterfly from the set on to more book page with Memories Art Print Brown ink for my paper pieced element and cut this out. I then sponged on a little Dried Marigold and Spiced Marmalade Distress ink to add contrast colour.
I assembled the card as you see, adding some die cut meadow type flowers by Marianne Design, cut from apricot card and sponged with Spiced Marmalade.

The team mates have risen to the challenge magnificently so do hop over to be inspired.
Have a great week.
Hugs,

Fliss  xx

Some challenges for my card:
Creative Inspirations Paint - Anything Goes
Time For Scrap - Walk In The Countryside
Crafts For Eternity Challenge - Anything Goes
Sister Act Card Challenge - Anything Goes

Friday, 26 July 2013

Florence and Martha For That's Crafty

Hello folks from a very tired Fliss as I'm still struggling with traffic problems on the way to and from work at the moment for various reasons.
A quick post to tell you about my project today over at That's Crafty which is a wall hanging made from my favourite vintage family photo of my Grandmother Martha and her big sister my Great Aunt Florence (known affectionately as Auntie Flo). Sadly I don't remember my Grandmother as she died when I was only 2 years old. Although she wasn't that old by today's standards, she didn't have my mother until she was 37. It's really spooky seeing her photo too as my younger one is the image of her.
Thinking of my dear Auntie Flo brings back childhood memories of going to stay with her at her bungalow in Kempston near Bedford. The bungalow backed on to fields with cows and horses so my brother, sister and I loved visiting her.


This time for a bit of a change, I cropped the figures out of the photo and you'll find all the details of how I made my vintage piece of artwork over at the That's Crafty blog.

Hoping that you all have a lovely weekend.
Hugs, Fliss xx

PS: There will be CANDY soon so keep an eye out as I wouldn't want anyone to miss out!

Many thanks for the heads up on the challenge over at Our Creative Corner go to Alison aka Butterfly from her Words and Pictures blog as she very kindly mentioned that my wall hanging fits the current challenge theme of Captured Memories so I'd really love to enter it there.

Monday, 22 July 2013

Shabby Chic Photo Inspiration

Hello folks, before I go on to our new challenge today at Make My Monday, I need to apologise once again for my lack of visiting which is again due to my job. I had a really busy week last week and due to traffic problems (unexpected contra flow which caused an 8 mile journey to take an hour!) and a power outage at work on the day a crucial payroll had to be run, the net result was no me time!
I did have some good news on Wednesday though as my daughter Sarah got her fashion degree results and we're really proud as she got a first! We're having a celebration soon when my in laws get back from their current break on the Isle of Wight.
Now for the challenge details which this week were chosen by teamie Jan and she's provided a lovely photo as inspiration:


For my card, I chose the frame and flower elements combined with some of the colour and scallop detail.
My background panel was made by inking and spraying a square of card with Distress inks, Brilliance inks and Glimmer Mist and I then embossed it with a Crafters Companion square trellis embossing folder. I then misted on a little Dylusions White Linen ink spray to tone the colour down a little.
I printed out the hydrangea which is one of Teri of Delicious Doodles gorgeous sketch style images on to thick smooth cartridge paper and coloured it with layers of Prismacolor pencil. I tinted the flowers a very pale green as my mother in law had some of these in the garden of her old house (they made the most beautiful green dried flowers in the Autumn too). I cut the image out and added a little colour round the edges with a Sandstone Promarker.
I then die cut the frame from the remaining cartridge paper with the Marianne Design oval set and inked the edges with the VersaMagic Pixie Dust ink. I stamped the sentiment by Hobby Art with VersaFine Smokey Grey ink and die cut this with the small oval from the die set. I inked the edges as before.
I then assembled the card using some pink broderie anglaise and a deeper pink braid.

My fellow teamies as always have made some gorgeous cards to inspire you so do hop over for a peek. 
Have a great week.
Hugs,
Fliss xx

Monday, 15 July 2013

Dreaming

Hello everyone, hoping you all had a good weekend and enjoyed some of the current very warm and sunny weather.
We have a new challenge for you today over at Make My Monday with a theme chosen by Caz which is to create something with A Non Inked Stamp by which she means either a new stamp or one in your collection that has never been inked up (I'm sure we all have a few of those!) or if you're not a stamper, A New Decoupage Sheet.
I'm sure you can also guess which option I went for so here's my creation:


I recently acquired this gorgeous Windsong stamp by Paperbag Studios which has been on my wish list for ages.
I stamped the image on thick cartridge paper with Archival coffee ink and then simply trimmed out the panel with some deckle scissors to echo the torn fabric style edge.
I made a patchwork background with some scraps of paper from my bits box in warm shades of yellow and orange with a touch of lime green and sepia. I cut these into squares and added faux stitching with the TIm Holtz Idea-ology ruler and a fine brown pen.
Using another scrap of paper, I die cut most of a doily from it with a Papermania die (as part is hidden behind the image panel, it didn't need to be the whole shape) and inked the edges with some Umber ink for added contrast.
I stamped the dream text (Time To Dream by Stamp-It from Crafters Companion) with the coffee ink on a scrap of cartridge paper and trimmed around it.
I assembled the card as you see on a kraft card blank.

Have a great day.
Hugs, Fliss xx

Some challenges for my card:
Joanna Sheen Challenge - Citrus Colours

Friday, 12 July 2013

In The Country For That's Crafty

Morning folks, hoping you've all had a lovely sunny week and that you haven't been sneezing with itchy eyes like I have due to the very high pollen count. For some reason it's been the worst I've had in the last 10 years since Sunday and even my trusty homeopathic remedy is struggling to keep it at bay!
Anyway, enough of my troubles and on to my post for this week over at That's Crafty which is kind of a wish I was there - not! I wanted to do something bright and cheery with a scenic look so here's what I came up with.


I'm sure you can see the reason for my title now and I wonder if you're singing in your head like I did which is how the title came about.
If you'd like to see how I made it, you'll find all the details over at That's Crafty and it's easier than you might think as it only uses 2 stamps.

Have a great day and a lovely weekend.
Hugs, Fliss xx

Some challenges for my card:
Lady Anne's Stamp Challenge - Anything Goes

Monday, 8 July 2013

Flying High With Make My Monday

Hello there everyone, I hope you all had a wonderful weekend in the hot and sunny weather and managed to catch some of the amazing tennis. The men's final was really exciting and I, for one, found that crucial last game really nerve wracking and was sitting on the edge of my seat the whole time. I also loved the ladies doubles final as it was lovely to see one of the Chinese girls laugh when she messed up instead of swearing and making a horrible face!
Today sees a new challenge over at Make My Monday and your hostess this week is Jacqueline who has chosen the theme of BALLOONS which could be either the party or the hot air sort. I decided on the hot air sort as I wanted to give my dies an airing.
Here's what I made:


A fairly simple card this time as I wanted to balloon to stand out.
I made the background by drawing cloud shapes on post it notes and cutting them out to make masts then added them to a square of watercolour paper. I added patches of Distress inks in blue shades to a plastic clipboard, sprayed it with water and pressed on the card to colour it. I then removed the masks to reveal the clouds - you can see where some of the ink seeped round the edges as it gives a fluffy look.
I used a scrap of decorated paper from my bits box to make the balloon. It had a pattern made with a Chocolate Baroque damask background stamp and a Kaleidacolor ink pad. I die cut the balloon and decorative sections with the Paper Mania Build A Scene Hot Air Balloon set. I attached the decorative strips with clear adhesive pads and trimmed where necessary.
The sentiment is from the brand new Polka Doodles CD, Bonbon Belles, and I trimmed the ends to a v shape and coloured it with Mustard Seed Distress ink. I attached it to the card like a banner by sticking at each end only.

Have a great week.
Hugs,
Fliss xx

Some challenges for my card:
One Stop Craft - Anything Goes
Sister Act Card Challenge - Anything Goes

Friday, 5 July 2013

Vintage Lacy Background For Polka Doodles

Hi there, I'm here with the details on how I made the pretty lacy look background for my Polka Doodles challenge card this week.
As I really love stamping, what else could I do to make my background and it's really easy when you know how so now's the time to grab a cuppa and read on.

Step 1


It's best to use watercolour paper for this technique as you need something sturdy that won't buckle. Cut a piece that will fit your chosen card blank. The lovely flourish stamp I've used is my favourite from the Daisy Doodle stamp set and I've used Ranger Distress Embossing Ink as it stays wet for a long time. My paper is 8x8 and I stamped the image in the corners first then twice in between and heat embossed the images with the white detail powder. If you want to make a smaller card such as 6x6, you'll probably need to stamp just once between the corners. I've added a bit of colour from the next step so you can see the embossing.

Step 2


 Using a craft sheet (or a plastic clipboard as I do), apply a large patch of Victorian Velvet Distress ink and spray with a little water. Using a fairly large paint brush, add a wash all over the over the top of the embossing which will resist the colour.

Step 3


Deepen the colour by applying a further wash of Seedless Preserves Distress ink diluted with water spray as before and then add extra colour to the corners by picking up ink direct from the ink pad with a damp brush.

Step 4


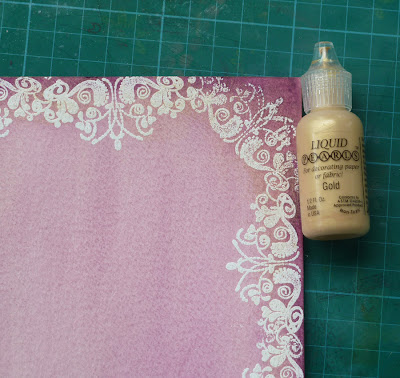
Once the paper has dried, you can then give it some shimmer by applying gold liquid pearls over the embossed area using your finger. Just dab on gently and try not to rub too much. It gives a lovely soft sheen to the embossing and softens the colour a little too.

Step 5


To finish the paper off for my card, I added a little extra embossing across the centre using the same stamp and the gold pearl as I found that the lacy effect of the paper looked better without any added embellishing and hope you agree.

Enjoy!
Fliss xx

Create Your Own Background At Polka Doodles

Hello again, I'm back already to tell you about the new challenge today over at Polka Doodles which if you haven't guessed from the title, has a theme chosen by yours truly.
I've made a very girly and lacy looking creation but it's all stamped! Hope you like it.


I'll be back later today with a tutorial on how I made the background, it won't be until I get home though as I ran out of time to do it last night and I do need my sleep at the moment.

Hugs,
Fliss xx

Birds Nest For That's Crafty

Hello there, my first post for today concerns my creation for this week over at That's Crafty which is a fairly simple to make card as yet again, I've been really short on time as I'm still trying to get sorted after starting my job last week and as I'm sure you can gather, failing miserably!


I hope you like what I've made and if you'd like to see the instructions, you'll find them over at the blog with a materials list.

Back later!
Fliss xx

Monday, 1 July 2013

Christmas In July

Hello folks, better late than never with my post for the new challenge at Make My Monday today! I was so busy over the weekend with my younger one home from uni (plus tons of her stuff and washing) plus a secret project too that I had no time to schedule my post yesterday.
This week the theme was chosen by Laura and being Christmas In July, I have to say it made me a bit challenged as well so my creation is rather simple in design.


One of those cards you can mass produce quite quickly as it's just sponged through a circular aperture in a scrap of paper and then toning ink pads used to make the pattern.
I then stamped on the Tim Holtz trees with VersaFine Spanish Moss ink and added the Hero Arts sentiment with VersaColor Raspberry.
Panel added to a kraft card blank and voila - done!

I'm still struggling to keep up with everything and am hoping for light at the end of the tunnel very soon.
Have a great week.
Hugs, Fliss xx