Monday, 28 April 2014

A Nice Cup Of Tea

Good morning everyone and welcome to my post for our new challenge over at Make My Monday today which has a theme chosen by Jacqueline who would like to see your creations involving Food and Drink.
I decided on my favourite daytime tipple, a lovely cuppa as I need about 2 mugs full to get me going in the morning!
Here's what I made although it's a little more dainty than a mug!


I turned to my Kanban damask tea and coffee stamp set and stamped the cup on blue card with VersaFine Majestic Blue ink. I then cut the cup and saucer out.
I then stamped a Hero Arts flourish image on white card with VesaColor Sky Blue ink and die cut into a frilly panel with an X Cut die.
I embossed a panel of blue card with the Cuttlebug Victoria folder and stuck this to my square card blank.
I stamped the tea text from the stamp set directly on the die cut panel and added the cup then stuck this to the card to finish.

As you see, quite a simple creation for me and I hope you like it.
Have a great week.
Hugs,
Fliss xx

Sunday, 27 April 2014

Nature's Beauty

Hello there everyone and hope you're having a lovely weekend. I'm a very happy crafter today as for the first time in I can't remember how long, I've managed to do some creating that isn't DT work - yippee!
My frame is inspired by the latest challenge at Crafty Individuals which is Nature's Beauty so how could I resist when I love nature so much. The post is a bit picture heavy to show the detail and I hope you like it.


I started off with a blank papier mache frame which I decorated using my Shabby Chic Peeloff Technique which you can find HERE. It's very easy and this time I used a combination of flourish and daisy peeloffs - the daisies were gold and the flourishes copper but I bet you'd never guess that if I hadn't told you!
For the frame, I used Wild Honey and Vintage Photo Distress inks after 2 coats of gesso as the frame was kraft coloured. After using my technique, I then stamped on a daisy from CI-206 Flower Heads with Palette Raw Sienna ink which is permanent like StazOn.I then rubbed some Creative Expressions Cast Bronze Gilding Wax.
The central panel was made by colouring a piece of thick, smooth cartridge paper with Distress Inks applied with an acrylic block - I used Crushed Olive, Wild Honey and Spiced Marmalade and smooshed the ink around on the paper whilst it was still wet.
I stamped the silhouette meadow image - CI-367 - twice with VersaFine Olympia Green ink and stamped some of the butterflies from CI-231 on scrap cartridge paper with the same green. I cut these out and added them to the panel after sticking it in the frame.
I then sanded the raised peeloff elements slightly to knock off a little of the paint and embossing for a vintage look.

 Thanks to everyone at Crafty Individuals for inspiring me.
Hugs,
Fliss xx

Friday, 25 April 2014

Botanical For That's Crafty

Hello there everyone and welcome to today's post which is to let you all know about the project I have today over at That's Crafty which is nature themed, something which is a real favourite of mine.
I chose to use Spring shades too as the weather has been mostly sunny this week and Spring has definitely been in the air.
We took a lovely walk in Arundel on Easter Monday and saw ducks with ducklings and also moorhens with tiny babies too. We also saw a moorhen of a different type with the most amazing big blue feet which looked so funny on a small water fowl too.


I hope you like what I created and as usual you'll find out how I made it if you hop on over to the blog.

Have a great day and a lovely weekend.
Hugs,
Fliss xx

Monday, 21 April 2014

Distress It!

Hello there folks and a Happy Easter to you all. I hope you had a lovely time and didn't eat too much chocolate!
I'm here now with a slightly late post for the new challenge today over at Make My Monday which was chosen by former team mate Jan and involves one of my absolute favourite techniques - Distressing.
I have a tutorial to share too, so that you can see how I turned something that has been in my stash for many years, unused as I tend to prefer stamping but this is all about how you can make a humble Peel Off look like it isn't a peel off! I think I'll be using this technique quite a lot too and you may need a cuppa before you read on although I promise it's not too long.


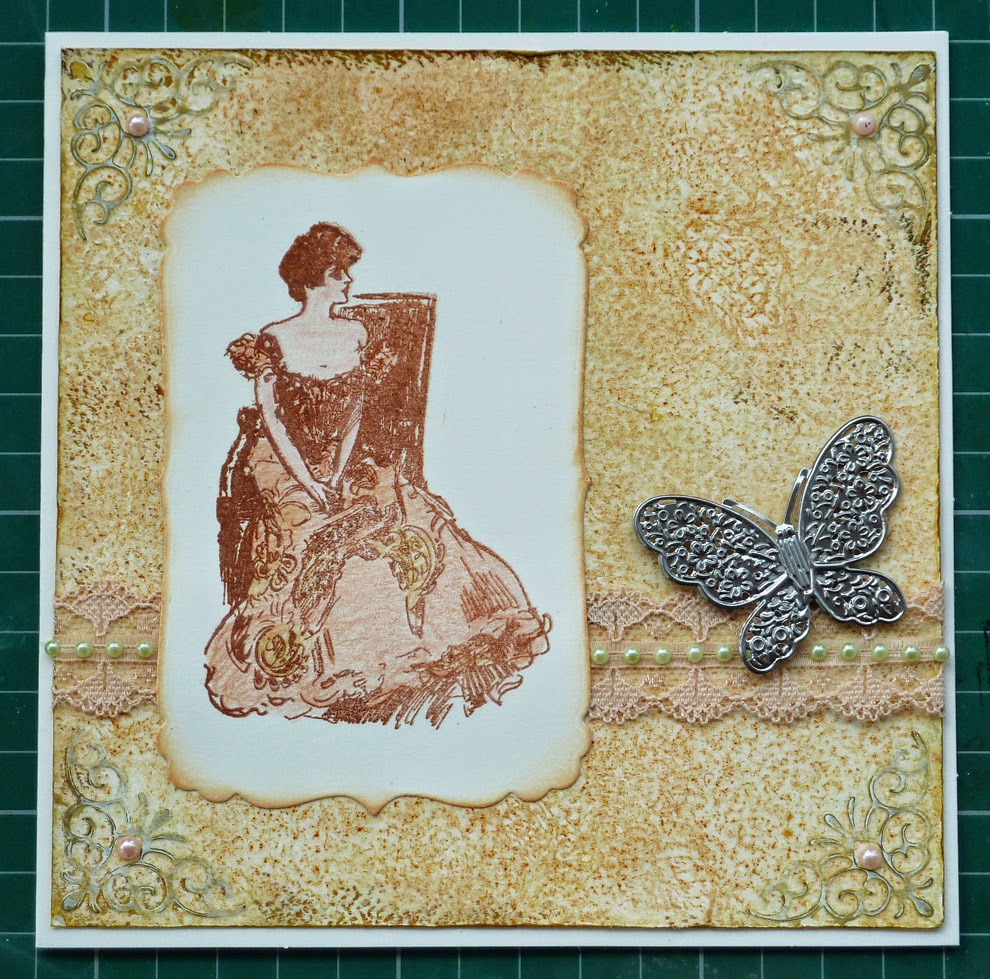
The finished card is above and you'll find the background paper steps below.

Step 1

For this you need a piece of smooth thick paper or watercolour paper cut to fit your chosen card blank and some peel offs. I chose corner ones but you could use flowers or patterned peel offs to make a frame shape.


As you can see, I placed the peel off in the corners of my paper.

 Step 2

For this step you need some gesso which I brushed roughly all over. You don't have to be precise with this as it gives a better shabby chic effect if the coverage is quite textured.


Step 3

This step takes the most time. You need some Distress inks - I used Tattered Rose, Wild Honey and Frayed Burlap. I applied the 2 lighter shades with a sponge and then added just a touch of the brown which you can see inked the rougher areas more. I then stamped a pattern design (Kaisercraft Lattice) all over with the Wild Honey to add more texture.
I heat embossed the paper with clear detail embossing powder. I distressed the edges and the peel off corners gently with an emery board and added Vintage Photo Distress ink round the edges.
If you click on the photo below, you'll see that sanding some of the paint off the peel offs gives them a rather distressed look like rusted metal.


As you can see on my card above, the addition of some pearls and lace together with the filigree butterfly and the lovely Gibson lady (Flonzcraft), the paper gives a soft vintage feel.

Hoping that you like this and please do let me know what you think.
Hugs,
Fliss xx

PS: I'd also like to enter my tutorial in the current Mixed Media Mayhem at Quirky Crafts Challenges as you can see from the card and tutorial quite a few things came into play. Hope that's OK with you ladies :)

Friday, 18 April 2014

Black and White with a Splash

Hello again and welcome to my second post of the day which is about our new challenge over at the That's Crafty Challenge Blog which this time has the theme of Black and White with a Splash (in my case a splash of red) of whichever colour takes your fancy.

Here's my inspiration which I hope you'll like.


As you can see it's hearts all the way! I made the background first by stamping the honeycomb design in opposite corners with red ink and then use the checkered stamp to add the black border.
I then die cut some hearts from black and white card and stamped one white heart with black checks and the larger with red.
I added these to my card and finished off with text stamped in black.

I used:
Kaisercraft Clear Stamps - Honeycomb, Arty, You!
Archival Jet Black Ink
VersaFine Satin Red Ink
White Stamping Card
Black Card
X Cut Nesting Dies - Homespun Heart

Good kuck to all who enter and hoping those eligible do for a prize of a £20 voucher for the online shop.

Have a great weekend.
Hugs,
Fliss xx

Smile

Good morning folks and welcome to the first post of today which is to tell you about this weeks' project for That's Crafty which is another bright and sunny creation which is really quick to make if you're short on time as I've been this week.


You'll find all the details over at the blog as usual and I hope you'll pop over to visit as the Design Team added some really beautiful projects over the last week.

I'll be back shortly as a new challenge starts at 8am today over at the That's Crafty Challenge Blog so see you in a bit.

Hugs,
Fliss xx

Monday, 14 April 2014

Mythical Creatures

Hello there, a slight case of better late than never with this post as I didn't have enough time to do it yesterday after my return from Kent as I had to get ready for today's return to work.
Our new challenge over at Make My Monday today has the theme of Mythical Creatures chosen by Rosie and I decided on a favourite undersea mythical creature of mine as you'll see from my inspiration below.


I inked up my Santoro mermaid image with VersaFine Olympia Green and stamped her on smooth cartridge paper then coloured her with Aquamarkers. I then die cut the image to a circular panel.
The background paper is the second of my papers made with my watery effect technique which I'll be sharing as a tutorial shortly as it makes 2 papers at once - always great to get 2 for the price of 1!
For the sentiment, I inked up part of a Tim Holtz stamp with the green ink and cut round it after stamping.

Have a great week and will be round to visit soon.
Hugs,
Fliss xx

Friday, 11 April 2014

The Gift Of Life

Hello peops, I'm hoping that Mr Blogger has played nice and published this post for I'm currently in Kent on a few days much needed break.
I have a project today over at That's Crafty which is another rather bright creation which I hope you like although you might need sunglasses!


You'll find all the details over at the blog as always and I hope you decide to pop over as my team mates have been sharing some amazing creativity which is well worth the trip.

Be good and see you next week!
Hugs,
Fliss xx

Monday, 7 April 2014

Easter Wishes

Hello folks, I hope you all had a good weekend with hopefully some sunshine as we did. Not that I saw much of it as I was running around trying to get things done before we go away for a few days as I'm working up to the day before and will only have time for packing the evening before we go. I can't tell you how much I'm looking forward to it!
We have a new challenge for you today over at Make My Monday which as a certain weekend is fast looming is Easter so we would like to see creations of any sort with Easter in mind.


I didn't have any stamps that fit the bill so I had to resort to the internet and found this rather sweet vintage postcard featuring some very cute bunnies so how could I resist!
It needed a simple background so I chose to echo the colours in the postcard with softer green and yellow card which I embossed with a Crafts Too folder.
I assembled the card as you see, adding some toning ribbon and flowers to finish.

Have a great day.
Hugs,
Fliss xx

Friday, 4 April 2014

Spinning Around

Hello again, I'm back with my promised news of our new challenge over at That's Crafty Challenge Blog which this time has the theme of You Spin Me Right Round so we want to see your creations using circles.
In my case, the first thing that sprang to mind rather gives my age away as it was The Windmills Of Your Mind by Noel Harrison. I've made a wall hanging piece with rather a lot of circles as you'll see.


The paper I used began with another of my first creation with the Stampendous Creative Palette a few weeks back (I still have one whole piece and some bits left!). I stamped on the paper with a fabulous background set I recently acquired designed by Nathalie Kalbach for Stampendous called Wired. I used various Distress inks (see below).
I then used the stencil that comes with the stamp set to add the orange circles and then attached the paper to some recycled board, using some orange twine to make the hanger. I then chose some chit chat stickers to spell out some creative thoughts in a circle (I used one of the shapes from my circle cutter for the placement).

I used:
Stampendous NK Studio stamp set - Wired
Distress Inks - Seedless Preserves, Stormy Sky, Ripe Persimmon
Tim Holtz Chit Chat Stickers

The randomly drawn winner will receive a £20 voucher to the online shop so don't forget you have to be in it to win it! Good luck!

Have a great weekend,
Hugs,
Fliss xx

Harmony

Hello peops, hope you've all had a good week and haven't got too covered in the Sahara dust cloud. In my case, it's mostly my car that suffered and on the way home from work yesterday we had a rather smoggy cloud in the distance.
This is my first post of the two today to let you know that I have a project at That's Crafty today that you might need sunglasses for as as you see, it's quite bright!


All of the details of how I made my little canvas are over at the blog if you would like to pop over for a peek.

I'll be back in a bit with news of our new challenge over at the That's Crafty Challenge Blog so in the meantime, be good!

Hugs,
Fliss xx

Monday, 31 March 2014

One For The Boys

Good morning all, I hope you all had a lovely weekend and managed to get outside if you had glorious sunshine as we did. We went up to Balham to help my younger daughter move to her new accommodation and I kid you not, it felt almost like summer it was so warm!
We have a new challenge for you today over at Make My Monday with a theme chosen by yours truly which because I have quite a few male cards to make is:

One For The Boys

My card today is for my brother in law's birthday and in common with most of the men in my husband's family he likes the sea so my new lighthouse scene was ideal.


I decided to make my background paper using a method that came about by accident as it makes perfect watery effect paper. I'll be doing a tutorial on this soon to show exactly what to do but I can tell you it involves Distress inks, re-inkers and my Cuttlebug. If you click on the pic, you'll get the full effect.
The image I used is by Just Inklined and I printed it out on to thick, smooth cartridge paper and coloured it with Aquamarkers then trimmed it to a panel.
I glued the background paper to my card blank then added the lighthouse panel and a computer generated sentiment.

The Design Team have made some fabulous inspiration so I hope you'll pop on over to see and hoefully too join us this week.
Have a great day.
Hugs,
Fliss xx

Friday, 28 March 2014

Dream, Hope, Create

Good morning folks and an especial welcome to my new followers and visitors today. I hope you're all having a good week and are looking forward to the weekend as I am as I'll be off to the London outskirts to help my younger daughter move to her new accommodation tomorrow.
She works for the fashion company Mother of Pearl as a print designer and if you click HERE you can see one of the prints she designed for the latest collection with had its debut at the recent London Fashion Week. I'm a very proud Mum as I'm sure you'll know!
Now on to the actual reason for the post which is to tell you about the project I have today over at That's Crafty which I hope you'll pop over and view properly.


You'll find all the details over at the blog and it would be lovely to see you over there as there are some fabulous projects from the very wonderful Design Team to feast your eyes on.

Have a great day and a lovely weekend.
Hugs,
Fliss xx

Monday, 24 March 2014

Mum's The Word

Good morning folks, I hope you all had lovely weekend. Mine was rather busy but sadly it involved an awful lot of washing! I have no idea how we managed to produce such a lot in just one week but it's all done now!
We have a new challenge for you today over at Make My Monday and with a certain day looming fast, the theme is For Mums. So it could be quite a few things such as a gift, a card etc. etc.
Sadly, my own dear Mum is no longer with us and I've made something foe my mother in law who is like a second mother to me and my card features something I know she loves.


I fell in love with this cute bunny from Just Inklined and as my mother in law loves rabbits, he's just perfect for her card.
I printed the image out on to smooth cartridge paper and then coloured it with Aquamarkers which you probably know are my favourite colouring medium at the moment.
I made a background paper by inking a square of watercolour paper with Distress inks (Shabby Shutters, Wild Honey, Crushed Olive and Dried Marigold). I then stamped a daisy from the Crafty Individuals Flower Heads Elements Set with VersaFine Spanish Moss ink all over. I then added a little more colour to some of the flowers with Tombow markers.

Have a great Day.
Hugs,
Fliss xx

Some challenges for my card:
Crafty Calendar - Animal Antics
Paper Creators Crafts - Spring Is In The Air
Come and Get It Challenges - Easter/Spring
Brown Sugar Challenge - Anything Goes
Crafts 4 Eternity - Anything Goes

Friday, 21 March 2014

Inky Antics

Hello again and welcome to my inspirational piece for the new challenge over at That's Crafty which has the theme this time of Inky Antics and boy, did I get inky mitts making it!
I've used ink for absolutely everything on my card including the background and for colouring the flower. Read on to find out how I made it.


I used my Stampendous Creative Palette again to make the background with Distress inks in various shades and misted the plate with water before pressing down the watercolour paper. The piece I used was A5 size and as my intended card blank was 7x5, I had some pieces left over to make other things with.
I stencilled the mono printed paper using a Prima 12x12 stencil and used parts of the stencil with stronger shades of Distress ink to make the pattern. You'll see the the final layer (the green flourishes) is quite transparent so that the background looks layered.
I stamped the flower and leaf stalk with black ink then cut them out and coloured them by sponging with inks. It's easier to do this when they're cut out as you can control where the ink goes a lttle better.
I trimmed the background paper to fit the kraft card blank then inked the edges deep pink. I cut 3 squares from the trimmimgs and inked the edges pink then stamped the text on a further piece with black ink and again inked the edges pink.
I assembled the card as you see, adding pearls between the diamond shapes and to the dot on the text panel.

I used:
Polka Doodles Studio 12 Clear Stamp Set - Shabby Chic Roses
Artistic Outpost Unmounted Stamp Set - Typography
Prima 12x12 Stencil - Tulips
Archival Jet Black Ink
Stampendous Creative Palette
Distress Inks - Squeezed Lemonade, Iced Spruce, Spun Sugar (all on the background), Mustard Seed, Spiced Marmalade, Worn Lipstick, Picked Raspberry, Crushed Olive, Wild Honey, Mowed Lawn
Watercolour Paper 
Pearls

Hope you can enter although please do make sure you read the rules first as I'd hate for you to be disappointed.
Good luck!
Fliss xx


Imagine

Hello there folks and a special welcome to my new followers. A real pleasure to have you on board and I really appreciate you choosing to join me on my art journey.
This is my first post of the day to let you know I have a project today over at That's Crafty which is a vintage style creation made with the help of my treasured Stampendous Creative Palette.


You'll find all the details over at the blog with a tutorial and materials list and I'd love it if you'd pop over especially if you haven't yet done so as we have loads of fab tutorials for you so it really is worth a visit.

We had an absolutely astounding number of entries for our first challenge over at the That's Crafty Challenge Blog and if you hop over later today, you'll find all the details of the second challenge along with lots of gorgeous inspiration for the theme which is one I love and I'm sure you will too.

See you a bit later on.
Hugs,
Fliss xx

Monday, 17 March 2014

Fluttering By

Hello everyone and welcome to my post for today which I've done on my brand new laptop yippee! I can't tell you how glad I am to to back up and running again and can now come round and visit really soon.
We have a new challenge for you today over at Make My Monday and the theme is one I love as it's Beautiful Butterflies so thanks go to Jan for picking this.
I have a very simple card for you as my inspiration as I wanted my favourite butterfly stamp to be the star of my creation.


I made the background strip by inking the card with Scattered Straw and Wild Honey Distress inks and then stamped on my old favourite Hero Arts Old French Writing background with black ink.
I then stamped the B Line Designs butterfly on a scrap of my background paper made by stamping Distress inks with a cork.
I cut the butterfly out and assembled the card as you see - simples!

Have a great day.
Hugs,
Fliss xx

Friday, 14 March 2014

Send A Little Happiness For That's Crafty

Hello everyone and many apologies for not visiting at the moment which is because I have very limited computer access after my laptop gave up the ghost last weekend. My new one has arrived but it will take a while to be set up so I'll be round once we've managed to do that.
Today's post is to let you know about the project I have today over at That's Crafty and is a sneak peek to hopefully tempt you to pop over to see the whole creation.


If you haven't yet seen that we have a new challenge blog, the first theme is Anything Goes and you still have a week to enter but please do read the rules before entering to avoid disappointment.

Have a good weekend and see you soon.
Hugs,
Fliss xx

Monday, 10 March 2014

Spring At Make My Monday

Hello everyone, a rather late post today to tell you about the new challenge we have for you today over at Make My Monday which is because over the weekend my laptop decided to die so I had to have all my stuff transferred to my younger one's iMac which is a right pain as it's in her room so I can't do as much as I need to at the moment.
Rosie has picked the theme this week which is Spring and a great one as it looks like it's finally appeared here at the moment.
Here's my inspiration which I hope you like.


The background paper here was made by inking the card using an acrylic block and Victorian Velvet Distress ink. I then stamped on a leafy sprig from a B Line Designs cube using Victorian Velvet and Crushed Olive just around the edges.
I stamped the Stampendous bird on smooth cartridge paper inking it with VersaFine Vintage Sepia on the bird portion and VersaFine Spanish Moss on the leaves. I coloured the bird with a touch of brown and pink Aquamarker then die cut the image to an oval and inked the edges with green.
I attached the background paper to a card blank and after checking the placement with the image panel, stamped the Flonzcraft sentiment with the sepia ink before attaching the panel to the card.

Have a great week.
Hugs, Fliss xx

Some challenges for my card:
Glitter 'n' Sparkle - Anything Goes
Craftitude Challenge - Anything Goes/Add A Little Green
STAMPlorations March Challenge - Stamps and Spring

Friday, 7 March 2014

Anything Goes At The First That's Crafty Challenge!

Hello again folks and I'm back with my second post of the day which is to let you know about the first challenge over at the That's Crafty Challenge Blog which has just gone live.
The first theme is a really easy one as Anything Goes so we're hoping for loads of entries. There's a fab prize of a £20 voucher to spend in the online shop and I can tell you you'll be spoilt for choice with all the gorgeous goodies available.
Here's my inspiration which I hope you like - it's a rather bold card which came about because I've just got my inky mitts on one of the new Julie Fei-Fan Balzer stencils which I have loads of plans for so you'll be seeing more of it over the next few weeks.


I used the rose stencil over another of my painty background papers that I made a few weeks back with the fabulous Stampendous Creative Palette which is a mono printing plate. In my first session with it, I was able to pull around half a dozen prints in blue green shades which is why they keep popping up in my artwork at the moment.
I created the stencilled roses with Chipped Sapphire Distress ink and then added stamped faux stitching round the edges.
The Stampendous image was stamped on smooth thick cartridge paper and painted with Aquamarkers. I then trimmed round the image and added to the side of the background, trimming off the excess paper.
I made her rather a snazzy retro hat by stencilling another rose on to a scrap of mono printed paper, cutting it out and adding to the background paper with double sided and foam tape for dimension.
I finished off with a sentiment panel edged with pink ink.

Materials Used:
Stampendous Cling Stamp - Glance
Kaisercraft Clear Stamp - Smile
Prima Cling Stamp Set - Stitch Stamps - Lines
Balzer Bits Stencil - Rose
Chipped Sapphire Distress Ink
Archival Jet Black Ink
Aquamarkers

I hope you can join us as we'd love to see you there.
Have a great day and a lovely weekend.
Fliss xx

Style Is Always In Fashion

Hi there and welcome to my first of 2 posts today which is to tell you about the project I have for you over at That's Crafty which features a gorgeous background stamp which I've used to make not only the background paper but decorative panels and matting layers as well - you can really get your money's worth from this one!


To find out how I made made all the layers, please do hop on over for all the details.

I'll be back a bit later on with my inspiration piece for our first challenge at the brand new That's Crafty Challenge Blog and don't miss this because there's a fab prize up for grabs if you enter.

See you later!
Fliss xx

Monday, 3 March 2014

Hello Baby!

Morning all, hope you all had a lovely weekend and managed to fit in some crafting as I did.

 I also loved watching the semi final of the last ever series of Dancing On Ice (sob!) which I really love and I don't know if you saw it but I can tell you that it wasn't just the judges with tears in their eyes after watching Hayley and Dan with their amazing flying sequence - so romantic and beautiful.

Today sees the start of a new challenge over at Make My Monday and our hostess Jacqueline has chosen the theme of Babies.
My inspiration is a little different from the usual style of baby cards as I couldn't resist using another of my recently acquired Aurora Wings images as this particular baby elf is so cute.


I printed the image on to smooth cartridge paper and no surprise here, coloured him with Aquamarkers which are my current favourite colouring medium.
I made the background paper with a heart peg stamp by Judith which I bought from Stamp Addicts a while back. I stamped it with pink, yellow, blue and lilac inks and then when it was dry sponged Colorbox parchment ink over the top to soften the colours.
I added the image panel to mats of yellow, blue and pink then embossed a pink die cut heart with a Cuttlebug heart folder. I finished off with some wording cut from a Stamp It! alphabet stamp which I stamped on blue card.

Have a great day.
Hugs,
Fliss xx

Friday, 28 February 2014

A Breath Of Spring For That's Crafty

Hello there folks and thank you for visiting me today. My post is to tell you about my project today over at That's Crafty which is another creation from my play date a couple of weeks back with the Stampendous Creative Palette.


I also have some exciting news about our new challenge blog which you can find HERE. The first challenge starts next Friday 7th March and has the theme of Anything Goes. The prize up for grabs is a voucher for the shop worth £20. So, what are you waiting for - time to get creating!


Have a great day and a lovely weekend.
Hugs,
Fliss xx

Monday, 24 February 2014

No Cute Allowed!

Hello there, a slightly late post today to let you know about the new challenge that started today over at Make My Monday which has the theme of A Grown Up Card with absolutely no cute images allowed.
Here's my inspiration for the challenge and I hope you can join us this week as the theme is quite an easy one.


For my card I've used another of my recently acquired Aurora Wings images and this one is called Autumn Rose although as you'll see, she makes a lovely Springtime rose too.
I printed her out on to thick, smooth cartridge paper and used my favourite colouring medium of Aquamarkers to give her a wash of colour. I trimmed the image to a rectangular panel and added mats of mauve and green.
My background paper is from the vintage style Madame Payraud collection by Docrafts as I thought this particular design toned well with my coloured image. I embossed one side of the paper with my favourite Cuttlebug textile folder and trimmed it to fit my square card blank.
I stamped the Kaisercraft butterfly with VersaFine Smokey Gray ink on a scrap of leftover paper from my bits box which was a similar green to the matting. I cut the image out and inked the edges lilac to tone in.
I stamped my favourite birthday sentiment by Flonzcraft with the grey ink and then inked the panel with green and lilac to match. I finished off with some lilac gems in the corner and on the butterfly's body.

Hope you have a great week.
Hugs,
Fliss xx

Some challenges for my card:
2 Sisters - Embossing
Card Makin' Mamas - Stack It Up! - 3 or more layers (I have 5 I think!)

Friday, 21 February 2014

La Vie Scientifique For That's Crafty

Good morning folks, I hope you've all had a better week than mine as my journey to work has been fraught with difficulties all week due to local flooding and burst water mains combined with roadworks! I really hope things improve soon as I'm getting very fed up with all of it!
Anyhow, enough of my troubles and on to my reason for today's post which is to tell you about the project I have over at That's Crafty which is a creation with another of the papers I made last week in my mono printing session with Stampendous Creative Palette and I've gone steampunk this week!


You'll find a pic of the whole creation over at the blog with all the materials details and how I made it and I'd love it if you came to visit.

Have a great day and a lovely weekend.
Hugs,
Fliss xx

Monday, 17 February 2014

Time For A Recipe

Hello there and hope you all had a lovely weekend. Rather mixed weather but I managed to fit in a bit of crafting, one of which is my inspiration for the new challenge today over at Make My Monday which has been chosen by Jacqueline and is a recipe:

5 Gems
4 Colours
3 Stamped Images
2 Layers
1 Word


My 4 colours are pink, lilac, green and brown.  The 3 stamped images are the lovely Le Brun by B Line Designs (my favourite stamp) and the 2 flowers which are from the Crafty Individuals flower heads set.
I found the 2 layers a bit of a challenge as I usually have more than that and I managed to get a more layered look by using square panels of background paper in a patchwork design, adding faux stitching made with the Tim Holtz ruler and a fine brown Copic Multiliner pen. I stamped my 1 word using a stamp from a Prima set on the bottom right corner panel after adding my squares to a kraft card blank.
I stamped Le Brun with Archival Coffee ink on smooth cartridge paper and coloured her with Prisma pencils. I cut out round part of the image and added her in the centre right side.
I stamped a couple of flowers with the coffee ink, coloured them with pencils and cut them out then added them to the card with some Elizabeth Craft leaf sprigs die cut from kraft card.
I finished off with a resin heart and 5 lilac gems.

I hope you can join us and do pop over to see the Design Team inspiration as I promise it's not as hard as you might think!
Have a great day.
Fliss xx

Friday, 14 February 2014

Serene In Green For That's Crafty

Hello there and welcome to today's post which is to tell you about my project for today over at That's Crafty which is my first creation with the new and fabulous Stampendous Creative Palette which is a monoprinting plate and allows you to make quite a few prints in one session.


You'll find all the details over at the blog along with a pic of all the prints I made along with the one used on my card above.

Hope you can pop over and in the meantime have a great day.

Hugs, Fliss xx

Monday, 10 February 2014

Love Is In The Air

Morning folks and hope you had a good weekend. I thought I was going to get blown away in mine as the winds were so strong it was hard to walk! I hope anyone else affected managed to survive OK.
It's time for a new challenge at Make My Monday and this week with a certain romantic day fast approaching Love Is In The Air.
As I was short of time, I had a rummage in my bits box and found something I'd started a while back but not finished. So I got cracking and finished it off. Hope you like it!


I made the card blank with the Tim Holtz cabinet card die with a piece of smooth, thick white card. I then stamped on a Hobby Craft background stamp using embossing ink and heat embossed it with clear powder.
I then inked the card with Shabby Shutters and Crushed Olive Distress inks to give the resist effect you can see.
I stamped the lovely vintage couple (Flonzcraft) with Memories Artprint Brown on white card, coloured with Promarkers and cut them out to fit on a circle of lilac card dry embossed with a Cuttlebug hearts folder.
I added crochet lace altered with Distress Stains and trimmed the image panel to fit on the side of the card. I finished off with a layered flower and some inked computer generated text .

Have a great day.
Hugs,
Fliss xx

Some challenges for my card:
Addicted To Stamps - Hearts
A Gem Of A Challenge - All You Need Is Love
Open Minded Challenges - Show Some Love

Friday, 7 February 2014

A Feathered Friend For That's Crafty

Hello there, I hope you're all managing to survive the current never ending wind and rain and my thoughts are with anyone affected by the flooding. We've had very soggy and waterlogged roads here and tons of nasty potholes everywhere but thankfully no local floods. I also now have to keep a towel in the car to stop soaking the seats having to walk to the car park in the deluge!
Enough moaning though and on to today's post which is to tell you about the project I have today over at That's Crafty which is quite a striking nature themed card created with my favourite set of bird stamps.


As usual you'll find the materials and a tutorial over at the blog and I hope you can pop on over to see how the card came about.

Have a great weekend and try to stay warm and dry - I think even the ducks would not like the current downpour!

Hugs,
Fliss xx

Monday, 3 February 2014

Floral Wall Art

Good morning folks and welcome to my first post of the month and I have to say I'm so very glad it's February as last month was so busy I had virtually no spare time and I've really missed being able to create and come visiting you all.
Over at Make My Monday we have a new challenge for you today and it's my turn to pick the theme. As I like creating something other than cards when I can, I picked Anything But A Card.


As you'll probably see, I've been playing with my much loved Inkadinkado stamping gear again to make my wall hanging.
I absolutely love the flower petals stamp set which I used to make this. The petals reminded me a little of crocuses so I had them in mind with my colour scheme. I stamped the petals using the round cog and Memento Sweet Plum ink. I stamped 2 complete circles for layering as I like the more realistic effect it gives. I used thick smooth cartridge paper for the stamping as it's fab for colouring with Aquamarkers.
I painted the petals with Straw Yellow near the base with a touch of Bamboo. I then added Vintage Pink in the centre following up with Plum Blush and the Royal Purple at the very edges of the petals. I then cut both floral circles out and layered them up with a die cut circle of pale yellow card embossed with the Cuttlebug Victoria folder. The base I used is a kraft chipboard circle with 2 holes at the top and I knotted yellow wired ribbon through to make the hanging element.

Have a great day and a lovely week and I'll be round to visit very soon.
Fliss x


Monday, 27 January 2014

Eastern Promise

Hello there folks and welcome to my post today which is for the new challenge over at Make My Monday which has a theme chosen by Suzi B - Eastern Promise.
I have to admit having struggled a bit with this one and in the end a beautiful image from Aurora Wings called Lotus Sprite came to the rescue as she has quite an Oriental look about her. I hope you like my creation.


The background paper here actually came first and was created with one of the V & A quilt inspired stamps which I thought was perfect with its' delicate bamboo design. I stamped it with VersaFine Spanish Moss ink and embossed with clear powder. I then added VersaMagic Pink Grapefruit direct to paper from the ink pad.
I then printed the image out on to smooth thick cartridge paper and coloured her with Aquamarkers, adding detail with Prisma pencils. I added a narrow green mat and a wider one of matte gold card with a touch of subtle sparkle.
I then dry embossed a panel of the same green card with the Cuttlebug bamboo folder and assembled the card as you see adding the Chinese character I found on the internet to finish.

Have a lovely day and great week.
Hugs,
Fliss xx

Friday, 24 January 2014

Cherish For That's Crafty

Hello there folks and a warm welcome to my new followers with a big thanks for choosing to follow me on my art journey.
Today's post is to share my project for That's Crafty and as usual you'll find all the details on how to make it over at the blog.


I also hope you're all OK and hopefully not as busy as me. Things have been manic here due to car problems combined with working full time with the looming tax deadline so I'm really looking forward to February when things will hopefully calm down.
My lack of visiting lately has been as a result of all this so I'm really sorry and will make up for in in February.

Hugs and best wishes,
Fliss xx

Monday, 20 January 2014

A Bit Of Krafting

Good morning everyone, I hope you've all had a lovely weekend and enjoyed some sunshine as we did - very necessary after Friday's deluge which caused huge problem down here in the South with flooding everywhere. Happily I got to work although soaked through and had to dry some of my clothes with a towel - my boots took ages to dry near the radiator too!
We have a new challenge for you today over at Make My Monday chosen by Jan this week and she has challenged us to use some kraft card on our creation. I loved this one as it's a favourite of mine and my inspiration this time is a fairly simple card.


The background kraft card was embossed on both sides with a Darice border folder, butterfly swirls.

I then stamped the Papermania Urban image with Archival coffee ink onto a piece of smooth, thick cartridge paper coloured with green and blue Distress Stains. I then added further colour to the butterflies with more Distress Stains.

I stamped the Hobby Art sentiment with the coffee ink on a further scrap of cartridge paper coloured with Distress Stains and added this as a finishing touch.

Have a great day.
Hugs,
Fliss xx


Friday, 17 January 2014

A Country Girl At Heart

Hello folks, it's time for my weekly post for That's Crafty and this time I've altered another of the lovely burlap canvasses by Sir Tim.
It's a very quick post as I'm really busy at the moment working full time to help my boss with the dreaded tax return deadline fast approaching and we still have loads to get through. I reckon I'm going to need a week of sleep when we've finished too!


You'll find all the details over at the blog as usual and I hope you'll pop on over to see how I made it. If you haven't yet looked at the blog, do hop over as there are loads of fabulous tutorials to feast your eyes on.

Have a great day.
Hugs,
Fliss xx

Monday, 13 January 2014

Watch The Birdie!

Hello there everyone and I hope you all had a good weekend. It's time for a new challenge today over at Make My Monday with the theme of Birds which is another favourite of mine so many thanks to team mate Rosie for choosing it.
I had a rummage in my bits box for some background paper to go with the image I wanted to use and I hope you like the one I decided on.


I've gone all Stampendous for the card as I just love this cute little chap that I decided to turn into a little blue tit - can you tell how much I'm longing for Spring? I stamped the collage on Ranger manila cardstock with Archival coffee ink and then coloured it with Aquamarkers. I inked round the edges and added a buff coloured matting layer.
The background paper was made with the Stampendous jumbo rosebuds stamped with VersaFine Smokey Gray ink on a piece of hammered texture card. I then rubbed dusty pink and yellow VersaColor ink cubes over the top. Because the card is textured it gives a lovely mottled effect. I then added a little extra colour to the flowers and leaves with pencils.
I assembled the elements on a kraft card blank.

I hope you can join us this week.
Have a great day,
Fliss xx

Friday, 10 January 2014

A Sunny Creation For That's Crafty

Hello there everyone, hope you've all had a good week so far and better than me too. Work is currently extremely busy with the tax return deadline looming and I'll be working full time until February as we have quite a few naughty clients still bringing their records in!
Anyhow, enough of my troubles and on to the actual reason for the post which is to tell you about the project I have today over at That's Crafty which is a bright and cheery little wall hanging decoration for my kitchen (in need of brightening up in the dreary weather).


I've been playing with my fabulous stamping gear kit again so if you'd like to see how it came about, all the details are over at the blog. Hope you can pop on over.

Have a great day and a lovely weekend.
Hugs,
Fliss xx

Monday, 6 January 2014

First Challenge Of The Year At Make My Monday

Hello folks, a slightly late post about the first 2014 challenge launched today at Make My Monday with the theme chosen by Laura which is one I love:

Embossing

I decided on a cute card this time with an until now uninked stamp which I thought I ought to give an inking as a challenge to myself. Here's what I made:


I stamped the image by Bildmalarna with my favourite Archival Coffee ink on smooth cartridge paper and coloured her with a mix of Aquamarkers, Distress Stains and Prisma pencils. I then die cut the image to an oval and inked the edges with yellow.
I covered the card blank with rosebud paper from the Polka Doodles Pretty Sweet CD and used a scrap of the same paper in blue to make a heart shape with my own paper template which I also used with kraft card, embossing this with the Cuttlebug roses folder to match all the other roses.
I embossed a scrap of lemon yellow card with the Creative Expressions Trellis folder and stamped a Crafty Individuals butterfly with the coffee ink and coloured with Aquamarkers. I assembled the card as you see, adding a sentiment by Flonzcraft to finish.

I hope you're all managing to survive the nasty weather being thrown at us yet again and that none of you have been flooded out.
Have a great week.
Hugs,
Fliss xx

Friday, 3 January 2014

Bluebird For That's Crafty

Hello there everyone and a warm welcome to my new followers. So glad you decided to come and share my arty journey.
I have a sneak peek here of my project for today over at That's Crafty and if you hop on over you can see the whole thing and how I've been playing with my new Gelatos. They're new to me and I love them so I'm sure you'll be seeing further creations with them very soon.


Have a great day and a lovely weekend and hope you're all surviving the current nasty weather.

Hugs,
Fliss xx

Wednesday, 1 January 2014

Happy New Year!

Hello everyone, I can't believe that another year has now started and popped on here to wish you all a very Happy New Year and a healthy and crafty 2014.
I also want to share with you my favourite projects from 2013 and apart from one which is my absolute favourite because I loved creating it, you'll see that the others show a rather varied style but all have some of the techniques I love so much.
You'll have to let me know what you think and see if you can guess which is the one I love the most!


I think you'll agree that they all show my love of texture not to mention my obsession with those ever versatile Distress inks which have all made an appearance here in various ways.

My main resolution for this year is to try and organise myself better so that I have some time to come and visit you all, something that has been sadly lacking lately.
I also had the very sad decision before Christmas to have to give up my Fashionable Stamping Challenges DT as I felt it really unfair on my fellow teamies not to be able to keep up with the commitments. I want to say thank you here to Shirley and everyone for being so kind and supportive of me when things have been so difficult.

Here's to 2014!
Hugs,
Fliss xx
PS: My favourite is the bird canvas as it has oodles of the texture I love and I was able to use a panel of decorated paper that I made about 10 years ago and hoarded for the right creation.