Friday, 27 February 2015

Oodles Of Doodles

Hello there, it's time for a new challenge at That's Crafty Challenge Blog and the theme for the next fortnight is something rather close to my heart as those of you who have been following my art journey for a while will remember.
Our theme is Oodles Of Doodles which I'm sure means as little or as much as you like. In my case, my inspiration for you is all doodled as I've got my zentangle hat on again!

Here's the end result and underneath you'll find the doodle that started it off - you'll be able to see that it had a very humble beginning. That's what it's all about as you have to find the courage to put pen to paper and then build on it.


I can't tell you how to do it as it's just one of those things that goes with the flow, so to speak.

To make it I used the following:

Strathmore Artist Tiles - Toned Tan
Sakura Microperm Pens

If you decide to have a go, do let me know and it's definitely good to enter as the prize for the randomly drawn winner is a £20 voucher for the online shop which is chock full of fabulous goodies.

Have a great day and a lovely weekend.
Fliss x

Monday, 23 February 2015

Tag You're It!

Hello folks, I hope you all had a good weekend and managed to fit in some crafting which is more than I did as we had family stuff going on again with birthday celebrations and so on.
It's time for a new challenge at Make My Monday and this week the theme is Tags. I had to cheat a bit with my inspiration as having had no time for crafting, I'm sharing something I made a few years back that I really like and I know I enjoyed creating at the time.


I made my own tag as I wanted an arch shape and I covered it with some decorated paper from my experimental box. It was sprayed deep red and stamped with a square design in black then some doodling with a gold leaf pen was added.
The Gibson girl was stamped with Memories Artprint Brown ink, coloured with pencils and cut out. I then cut a heart shape from card and covered it with pressed pansies.
The tag was assembled with ribbon and a butterfly from my vintage illustration book and the text was stamped with Hero Arts alphabet stamps and inked up with Antique Linen and Vintage Photo Distress inks.
The final touch was a pressed daisy in the lady's hair.

Have a great day.
Fliss xx 

Friday, 20 February 2015

Contemplating With Lynne Perrella

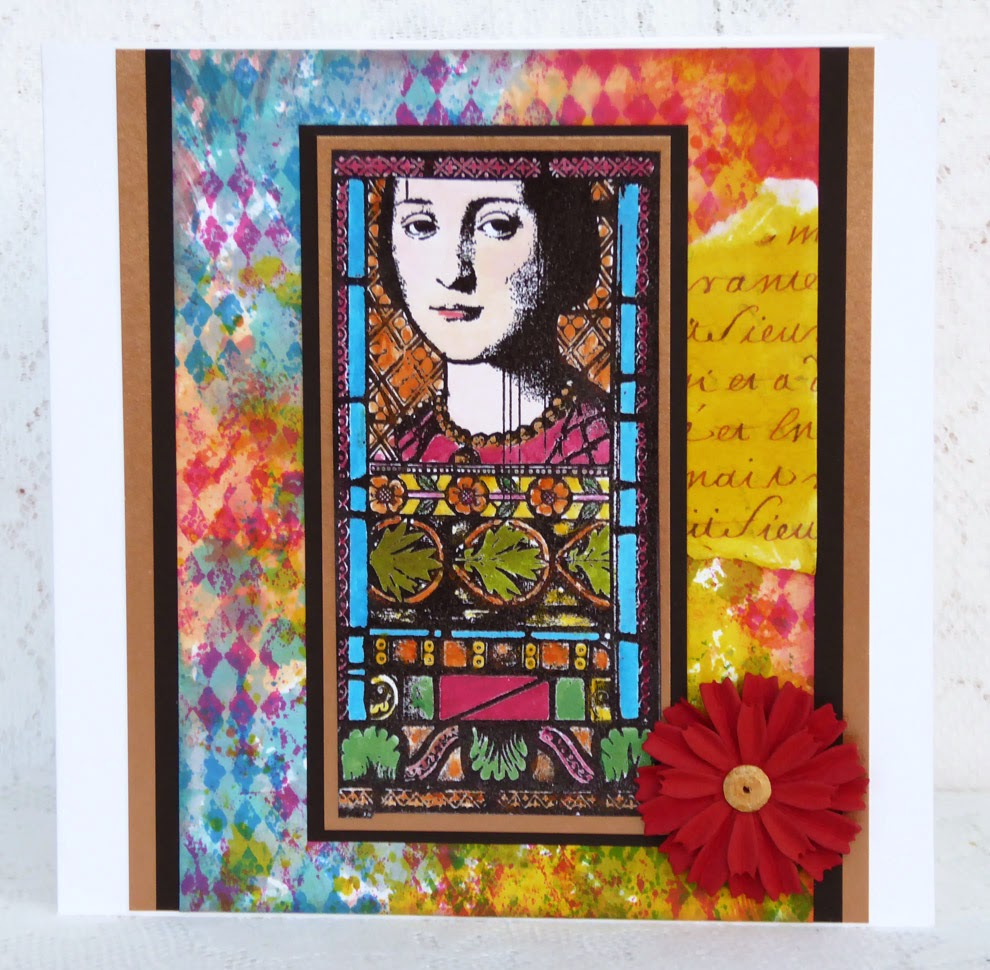
Hello there, I hope you've all had a good week. I'm here today with my weekly project for That's Crafty which is a colourful creation featuring my new and first Lynne Perrella stamps from Paper Artsy.
I was totally unable to resist these gorgeous medieval style beauties done stained glass style and I suspect they'll be making an appearance quite a lot.


You'll find all the details over at the blog and some pics to show how the background came about. Hoping you can visit.

Have a great day and a lovely weekend.
Hugs,
Fliss xx

Monday, 16 February 2015

Two Favourite Colours

Hi there, I hope you all had a lovely weekend. It was sunny yesterday and despite it being February our sunlounge was warm enough to eat lunch in and I managed to get washing out on the line too!
I did have time for some crafting too and here's something I created for our new challenge today at Make My Monday. This week Suzi has challenged us to make something with our Two Favourite Colours which I found a little difficult as I try create with as many colours as I can so in the end I picked my favourite 2 shades of Distress inks for inspiration - Crushed Olive and Victorian Velvet, otherwise known as Pink and Green!


I've also used some of my favourite stamps here too.

I made the background paper by painting watercolour paper with dusky rose and olive green acylic paints which I watered down to make a wash. I then stamped on the Stampendous Love Paris image with Archival Olive ink. I then stamped on Hero Arts Old French Writing with VersaMagic Pink Grapefruit ink.
I stamped the Rubber Stampede Tip Your Hat (she looks so French!) image with the olive ink on smooth cartridge paper. I painted the image and also the flowers on the Eiffel Tower image with Aquamarkers in shades of pink and green.
I then stamped the Kaisercraft butterfly on a scrap of pink painted watercolour paper with the olive ink and cut this out.
I assembled the card as you see, adding some pale pink lace trim and a green flower and leaves to embellish.

Have a great day and a good week.
Fliss xx

Friday, 13 February 2015

Be My Valentine

Hello again, I'm back with details of the new challenge today over at That's Crafty Challenge Blog and as it's a certain day tomorrow, our challenge theme is of course Be My Valentine.
I've actually got 2 cards to share as I've had a bit of creative trouble over the last couple of weeks and my second card is the one I actually started first and couldn't finish right away though as soon as I'd sent the other one off to Laura, inspiration struck and I finished it off.
You'll have to let me know what you think as the design is the same but the cards are not quite!


As you see, the design is simple and for this one I used the Carabelle Studio Jeu de Fleches mask with Barn Door Distress ink on smooth white card.
The heart is hand cut from some paper from my stash that I made with Gelatos then stamped with the Stampendous NK Studio Wired stamp set and added dots with a mini dot stencil.
The finishing touch was to stamp on the Kaisercraft sentiment with VersaFine Satin Red ink.

And now for my original card:


As you can see, I used the arrow stencil here too only this one was done with Studio Calico Mr Huey's Mist in a red shade. As the spray was quite wet and ended up all over the stencil, I pressed another piece of card on top and it gave a negative image.
I made the heart shape using the negative printed paper, scribbling on the design with a black Sharpie pen until I was happy with the shape. I then cut it out.
The finishing touch was the same text stamped this time with VersaFine Crimson Red ink.

It's good to enter the challenge (although you do need to be a UK resident) as the prize is a £20 voucher to the online shop and if you haven't yet seen the huge range of goodies available, it's worth a browse.
Good luck!

Have a great day and a lovely weekend.
Fliss xx

In The Tropics ( Otherwise Known as Wishful Thinking!)

Hi there, welcome to my first post of the day which is to let you know that as it's Friday (yippee!) I have a project to share over at That's Crafty blog which is of a tropical nature and quite bright and flowery as it's still very chilly and I needed some warm colour.


You'll find all the details as always over at the blog and I hope you'll come visit for a fabulous array of inspirational projects with full tutorials.

I'll see you a bit later on today as we have a new challenge for you over at That's Crafty Challenge Blog.

Fliss xx

Friday, 6 February 2015

Stars For That's Crafty

Hello there, I hope you've all had a good week. Mine has been very busy with family stuff as well as work so very little crafting was the result although I did manage a very quick to make card for my That's Crafty project today.
It's very bright as we've still got rather odd weather where I live with a bit of sunshine mixed with lots of cloud, snow, sleet and rain, sometimes all at once!


You'll find all the details over at the blog as always if you'd like to hop on over and visit for some amazing inspiration from the Design Team.

Have a great day and a lovely weekend.
Fliss x

Monday, 2 February 2015

Say It With Hearts And Flowers

Hello there, I hope you all had a lovely weekend. We actually had snow down here in the South although it was of the blink and you'll miss it sort! It was there first thing on Saturday but gone by 11am. It's still very cold though - brrrrr!
Today we have a new challenge for you over at Make My Monday and the theme chosen by Joan is rather romantic as it's Hearts and Flowers.
I've been slightly naughty with my inspiration piece as I had one of those weekends when I had quite a lot to do and I couldn't make anything work on the creative front. Then when searching for something else I came across a card I made a while back when I was a contributor to Craft Stamper magazine and as it was long before I had a blog, and fit the theme rather well, I decided to share it here. Hope you like it!


A bit of purple passion as you can see!
The background paper was made by spraying a piece of inked paper with water and scrunching it then flattening it out and rubbing a little purple ink on the raised areas. the text was then stamped on with VersaMagic Perfect Plumeria.
The Rubber Stampede image was stamped on cream card with VersaFine Imperial Purple ink and the a mat was added. The mat was made by heat embossing the edges of the card with plum and gold embossing powder.
The flower petals are Technique Tuesday and were stamped on cream card with the purple ink and cut out. The flower centre was made with a chipboard circle heat embossed with the plum embossing powder.
The card was assembled as you see, adding some plum grosgrain ribbon and a gold heart charm.

Have a great day and a lovely week.
Fliss xx

Friday, 30 January 2015

Animals at That's Crafty Challenges

Hello again, I'm back with my inspiration for our new challenge over at That's Crafty Challenges and our theme for the next fortnight is Animals (as you probably guessed from the title!).
I've chosen to use my favourite animal stamps which are Crafty Individuals gorgeous Alice Palace quirky bunnies.


I made the background paper first by applying splats of Distress Stains to watercolour paper - I used Shabby Shutters, Crushed Olive and Bundled Sage. I spread some of the colour with a finger for a shabby look. I then stamped a flourish design from Crafty Individuals CI-351 all around the edges with Bundled Sage Distress Ink and right on the edge with Pumice Stone. I think it looks a bit like leafy fronds.
I stamped the bunnies with Archival Watering Can ink on a scrap of card I made a while back which was coloured with Spun Sugar Distress Stain and a splash of Pumice Stone. I added colour to the crowns and a little to the bodies with Distress Markers. I then cut them out.
I added the background paper to a kraft card blank and stamped the text from the Stamp-It Australia Time To Dream stamp set with the grey ink  and fixed the bunnies in place with foam tape.

It's good to enter if you can as the prize is a £20 voucher to the online shop where there are oodles of fabulous goodies.

Have a great day and a lovely weekend.
Fliss xx

Totally Tropical

Hi there everyone from an exceedingly tired Fliss. I'm really glad we've almost got January out of the way as it's such a difficult month for those of us in accountancy with HMRC's pesky tax return deadline - we always seem to have clients who leave it right to the last minute - sigh!
This is my first post of two today and this one is to point you in the direction of my project today over at That's Crafty with just a sneak peek this time and you can view the whole creation over at the blog if you'd like to hop over.
It's very bright so it might cheer up anyone who has a dull day.


You'll find the ingredients and recipe at That's Crafty blog as usual and it's worth a look for the inspiration from the Design Team with some gorgeous projects all with full tutorials and unlike magazines, it's totally free!

See you again in a while.
Fliss xx

Monday, 26 January 2015

Bright and Cheery

Hello everyone, I hope you all had a lovely weekend and managed to stay warm in the rather chilly weather we're having at the moment.
It's my turn to pick the theme at Make My Monday this week and I picked Bright and Cheery Colours because I felt we could all do with a bit of cheering up in the middle of Winter!
My card is rather eye poppingly bright so you might need your sunglasses - you have been warned!


I started off with a piece of paper from my Gelli plate box which being a lovely warm shade of orange was just what I needed. I stamped it with a flourish design from CI-351 and Ripe Persimmon ink as I wanted quite a subtle effect.
I then stamped the main image together with the butterfly and flowers from Innovative Stamp Creations set on smooth watercolour paper with Archival black ink. I painted the butterfly with Peacock Feathers Distress ink and the flowers with Picked Raspberry then cut them out.
I stamped the sentiment (Flonzcraft) directly on the background paper and then added it to a white square card blank together with the remaining elements.

The Design Team have come up with some fabulous inspiration and I hope can join us.
Have a great week.
Fliss xx

Friday, 23 January 2015

Seeing Stars

Hello all and apologies for my lack of visiting, January is still in full swing with the looming tax return deadline and I can't wait for February to come! We've had internet issues at work too which seem to be due to the current very cold weather - sigh!
I totally forgot to schedule my That's Crafty post too so apologies for that to Laura. My project this week is the card I made for my younger one's birthday last weekend and has been made with my new Carabelle Studio stamps which is a range I'm totally obsessed by at the moment as they're so different.
Hope you like what I created and without further ado here it is!


You'll find all the details over at the blog as usual and it's worth a look as it's such a simple card to make even if it might not look like it.

Have a great weekend and see you soon.
Fliss xx

Monday, 19 January 2015

20th Century Style

Hello all, I'm slightly late with my post for the new challenge at Make My Monday this week as the light went before I could take my photo and then the scanner wouldn't work!
This week the theme chosen by Marina is Twentieth Century Style and for my inspiration I've gone back to the 1960s with a retro scooter which should be familiar to anyone (not me I might add!) who remembers the Mods and Rockers.


The stamp was in a retro set that came with a Get Stamping magazine a while back and I stamped it with Archival Jet Black ink and coloured the image with Promarkers. I trimmed the image to a panel and added a turquois mat.
I found the chevron paper after an internet search as I knew I wanted a chevron pattern and I didn't have anything to fit. I printed it out and cut a strip to fit the card blank.
I added the scooter panel to the card and finished off with the text from the stamp set, stamped directly on the card with the black ink.

Have a great week.
Fliss xx

Friday, 16 January 2015

Tick Tock

Hello again! Today's the day for a new challenge over at That's Crafty Challenge and for the next fortnight our theme is Tick Tock! 
I have to admit to being a bit challenged myself with this one as I didn't have that much to fit the theme so I decided to think outside the box. Hope you like what i came up with.


Do you see what I mean about thinking outside the box :D

I made the background by first spraying with Sherbert and Bookworm Mister Huey mists. I then ironed on some Bondaweb painted with gold metallic paint and then ironed on some snips of green checked chiffon ribbon.
I stamped the text from the Artistic Outpost Happiness set with Archival Fern Green Ink and stamped on part of the butterfly collage image in the corners. I stamped the butterfly part of the same image on cream card with the green ink and cut it out.
I distressed the edges of the background paper with an emery board and attached it to a card blank then added the butterfly to finish.

The challenge is open for the next 2 weeks and the prize for the randomly drawn winner is a £20 voucher for the online shop.

Have a great day and a lovely weekend.
Fliss x

A Sequence of Moments

Hi there everyone and hope you're surviving the current gales and nasty wet weather if you have that where you are. Not that I've seen much of it as I've been working full time the last couple of weeks so haven't been outside that much!
I also haven't had very much time for crafting having had to work last weekend to finish off something for my hubby. I just managed to squeeze in a bit of time to make my journal page which is my project today over at That's Crafty as I've made the decision to start a loose leaf art journal the size of my Gelli Plate so that I can hopefully make some quick background with inks and paint.
You might need your sunglasses for this as it's very bright! I thought the dark and dreary weather needed a pick me up!


You'll find the ingredients and the recipe over at the blog as usual if you'd like to see how it cam about.

I'll be back a bit later as we have a new challenge today over at the That's Crafty Challenge which goes live at 8am so will see you soon.

Fliss x

Friday, 9 January 2015

Chirpy, Chirpy, Cheep, Cheep!

Hello there, I hope you've all had a good week and better than mine which has been very tiring as I'm working full time at the moment due to being in accountancy and the tax return deadline is fast looming at the end of the month - sigh!
I have a project today over at That's Crafty which is a bird themed tag which involved some of the leftovers from my blue challenge project. Hope you like it!


You'll find all the details over at the blog as usual if you want to wing your way over and see how it came about.

Have a great day and a lovely weekend.

Fliss xx

Monday, 5 January 2015

New Beginnings At Make My Monday

Hello there, I hope you all had a good weekend and managed to be a bit creative as I did. By the time this pops up I shall be back at work, not something I'm looking forward to having being off since Christmas Eve - groan!
Today sees the first challenge of 2015 over at Make My Monday and Jacqueline has chosen New Beginnings as the theme. I've gone a bit outside the box here inspired by some quotes I saw on Pinterest and I hope you like what I came up with.


I've done a little trick you might find useful here as I didn't have a stamp with the text I wanted to use so I had to get a bit creative.
What I did was to ink up part of an A4 sheet of card using Distress inks applied to a 15cm square acrylic block. I used Crushed Olive, Squeezed Lemonade, Spun Sugar and Stormy Sky with a tiny swipe on the pink area with Picked Raspberry. I was thinking of the soft glow you sometimes get at the sun starts to rise. I dried it well with a heat gun and then ironed it flat with a dry iron.
I then typed the text in a Word document, checking the placement by first printing out on to plain paper. When I was happy with the positioning, I put my inked card in the manual feeder and printed the text onto it.
I trimmed the card to a panel to fit my square card blank and then stamped the meadow silhouette from a free Indigo Blu set which came with a magazine using Archival Jet Black ink. I stamped a tiny butterfly from the Crafty Individuals Elements Butterflies set with the same ink and coloured it with A Tombow marker.
I added the panel to a cream card blank and there it was - a clean and simple card! I didn't feel it needed anything else and hope you agree.

Have a great day and a good week.
Fliss xx

Some challenges for my card:
Quirky Crafts Challenge - Clean and Simple (hope it's CAS enough ladies)
Natalie and Amy  All Things New
Crafter's Cafe  New
Pink Gem  Something New
Crafty Calendar  What's New

Friday, 2 January 2015

Blue Is The Colour

Hello and welcome to my second post of the day and Happy New Year if you missed the last one.

Today sees the start of our first challenge over at That's Crafty Challenge Blog and for the next fortnight our theme is Blue Is The Colour as you probably guessed from my title :)

Here's my inspiration which is a little bird themed wall hanging creation. Hope you like it. You'll have to excuse the pics too as my camera made some of the blue look decidedly purple!


The first step is to cut some strips of smooth paper or you could use scraps if you have some as I did. As the paper was smooth, it took the inks very well. I used a mix of Color Box Chalk Inks and VersaMagic Chalk Inks. I then added a dot pattern to some with the Crafters Workshop Mini Halftone Borders stencil and stamped the others with the Kaisercraft Script and Diamonds stamps in contrasting darker shades.


I then cut a piece of the smooth paper to 3x5 inches and then applied cobalt and white Brusho Crystals to the 3x5 Gelli Plate which I had sprizted with water. I picked up the colour with the paper, dried it off and stamped on the birds with Archival Cobalt ink. I was just able to stamp 2 birds so look out for the second which will be making an appearance very soon!


I cut a panel of the smooth paper to fit across an A5 piece of thick chipboard and colour with light blue ink. Stamp on diamonds with a slightly darker shade.
Cut pieces of the stamped and stencilled strips to fit at the top and bottom of the chipboard (you'll have some left over for another project) and glue these on. Glue on the central panel and add the cut out bird on the right side. Stamp the bird text with the cobalt ink on the left side.
Add some ribbon to finish.

There's a great prize of a £20 voucher for the online shop for the randomly drawn winner but don't forget to check the rules.
Good luck!
Fliss xx

Don't Worry, Be Happy

Happy New Year everyone and welcome to my first post of 2015 which is to let you know that I have a project today over at That's Crafty to share.
This time it's a decorative panel with a decidedly retro feel which I hope you like.


You find a list of ingredients together with the recipe (I am called The Stampers Chef after all :D ) over at the blog if you'd like to see how it came about.

I'll be back in a while for my second post of the day as we have the first challenge of the year over at the That's Crafty Challenge Blog.
See you soon!
Fliss xx

Tuesday, 30 December 2014

2014 In Review

Hello and welcome to my last post of the year as I've decided to join in with Debby of A Scrap Journey's sharing your favourite 5 projects of the year.
Thanks too go to Mynn for pointing me in the direction of her Blog Highlights of 2014 Link Party which I'm also joining in with :) 
Before we get to my selections I hope you all had a really lovely Christmas and managed to grab a few sale bargains as I did. We had 15 for Christmas evening which went very well as we acquired a roulette wheel a couple of years ago and a good time was had by all!
Now for my choices of my 2014 favourites which wasn't as hard as I thought it would be, although restricting it to 5 was a bit tricky I have to say :)

My first choice is actually the one I made the most recently and is a mixed media wall hanging which I made as a DT contribution for That's Crafty. I love the pink and green colour combination as it's so Springlike and it has loads of texture and of course, butterflies which I'm sure you know how much I love.


Next up is a little mixed media arch on a favourite theme of mine - steampunk. It also has lots of texture and I love the arch shape.


Now I have some cards to share. The first I love because of the bright red and yellow combined with the black and white. I particularly like the layout of this one and the the washi tape which is stamped using a fab Kaisercraft set.


This card uses my favourite means of making background paper - Distress inks and of course, stamping! For this one I created a sort of frame effect with the Crafty Individuals flower stamp. I've used a favourite Paperbag Studios image too as she reminds me of my younger daughter at the same age.


Last up is a clean and simple design which is my favourite of the Christmas cards I made this year. It also uses my newest favourite stamps which are Dina Wakely's scribbly birds.


I hope you like my choices and here's to a very creative 2015!


Happy New Year everyone.
Hugs,
Fliss xx

Wednesday, 24 December 2014

Merry Christmas Everyone!

Hello everyone, just popping on to wish you all a Merry Christmas and all the best for the New Year too.
I've been a bit of a bad visitor in the last few months due to being very busy at work and then having very traumatic things happen as well which have turned 2014 into the worst year for ages. I'm hoping that 2015 will be kinder.
In the meantime, I have a card to share to wish you a great festive season and I hope you all have a lovely time.


Another outing for my favourite Christmas set from Mr Holtz and the trees were stamped several times without re-inking with Memories Creamy Coffee chalk ink on a die cut oval.
The deer was stamped with VersaFine Majestic blue and cut out. I covered the card blank with some Bo Bunny paper free in a magazine and addd the elements you can see together with a stamped sentiment also free in a mag.

See you next year!
Hugs,
Fliss xx

Some challenges for my card:
Cards Und More - All About Christmas
Deep Ocean Challenge - Christmas Is All Around
Holly Jolly Christmas - Anything Christmas Goes
Just Inspirational Challenges - Christmas

Friday, 19 December 2014

Longing For Spring

Hello everyone, I hope you're all nearly ready for the big day. I still have some things to do and am hoping to get it done over the weekend so fingers crossed!
I'm sharing a mixed media piece over at That's Crafty today which I hope will bring a breath of Spring to the current dismal and chilly weather. Hope you like it.


You'll find a detailed tutorial over at the blog with lots of step by step pics if you'd like to see how my creation came about.

Have a great day and a lovely weekend.
Hugs,
Fliss xx

Tuesday, 16 December 2014

A Child Is Born

Hello all, I'm a day late with my inspiration for the current challenge at Make My Monday with a theme chosen by Jacqueline this week which is NATIVITY.
It had me a tad stumped I confess as I don't really have anything that would fit the theme so a Google search finally turned up a vintage postcard which I used for my card. Here's the result and hope you like it as this time there's no inking involved - very unusual for me as you know!


I've used papers from a Bo Bunny set which was a magazine freebie as I like the rich red as a contrast to the colours on the image. The only other addition was the embossed gold card I found lurking in my craft stash and I punched out a star to embellish as it made me think of the 3 wise men.

Hope you can join us and have a great week whatever you're doing.
Hugs,
Fliss xx

Friday, 12 December 2014

Anything Goes At That's Crafty!

I'm back again with the details and my inspiration for our new challenge at That's Crafty Challenge Blog and this time the theme is Anything Goes!


As you can see, it's butterflies all the way today! I've made my card with my newest Carabelle Studio stamp which is perfect for a bit of decoupage.
Ingredients:
Carabelle Studio - Libellules et Papillons
Carabelle Studio - Texture Etoiles
Distress Inks - Barn Door, Mustard Seed, Ripe Persimmon, Peacock Feathers, Mowed Lawn
Archival Jet Black Ink
Dymo Machine & Tape
Ink Applicators

Recipe:
Colour a piece of paper with ink applicators and the red and yellow Distress inks. Stamp with the star background and the red ink.
Stamp the collage image roughly in the centre with the black ink and stamp again on plain paper, first re-inking.
Paint the butterflies on the plain paper stamped image with the red, orange, blue and green inks and cut out the images. In the case of the dragonflies, you only need the wings.
Attach the background paper to a card blank then add the cut out images over the top of those on the paper.
I made the text panel with the Dymo machine and added it to the card.

Hope you can enter and this time you have 3 weeks to join in as That's Crafty is on the move!

Have a great weekend,
Fliss xx

Some Sparkle

Hello everyone, hope you've all had a good week and are surviving the now rather chilly weather we now have.
I'm really looking forward to the weekend as my hubby and I are off out tomorrow. We're having dinner at a lovely house owned by one of his clients followed by a show involving 2 opera singers. We went to Glyndbourne a couple of years ago with one of his other clients and really loved it.
I have a project to share today over at That's Crafty as I've got my creative mitts on one of Sir Tim's fabulous layered dies. Hope you like this.


As you can see the die is amazing as it comes with its own texture fade folder which gives it a very realistic look. You'll find all the details over at the blog with the recipe and ingredients for my creation.
I'll be back a bit later on with details of our new That's Crafty Challenge too which goes live at 8am and I know you'll love the theme this time.

Fliss x

Monday, 8 December 2014

A Little Angel

Hello everyone, I hope you had a better weekend than me as I had to work to finish something off so I'm not a happy bunny at the moment!
I did manage to finish off my card for our new challenge today over at Make My Monday so it wasn't all bad news :)
This week our theme is ANGELS so I decided to ink up for the first time a lovely vintage style stamp by Crafty Individuals. Hope you like my inspiration.


I stamped the angel collage with Memories Creamy Coffee chalk ink and coloured her with pastel shades of Aquamarkers. I then trimmed the image to a panel by hand and added it to a mat I created by swiping silver Encore Metallic ink round the edges and heat embossing with Winter Wonderland embossing powder.
I made the blue background paper by dry embossing paper with a Darice snowflake flourish folder round the corners and then inked it with Tumbled Glass Distress ink. I added this to a mat made in the same way as that for the collage panel.
I assembled the elements onto a card blank and stamped the Christmas greeting directly on the paper with the coffee ink.

Hope you can join us.
See you again soon,
Fliss xx

Friday, 5 December 2014

Christmas In Blueprint

Hello everyone, hope you've had a good week and better then mine as I've been extremely busy with work all week even though I've supposed to have had a couple of days off too! No rest for the wicked it seems :)
I have a project to share over at That's Crafty today featuring a creation made with one of Sir Tim's beautiful blueprint images. It's the first set I've got my inky mitts on and I love it so much I may have to indulge myself with more!


It actually looks much better in real life as i struggled to get a good photo with the light being so bad at the moment - nasty dull and cloudy weather which my camera doesn't like.
You'll find all the details over at the blog as usual and I'd love you to visit if you can.

Have a great day and a lovely weekend.
Hugs, Fliss xx

Monday, 1 December 2014

A Season Of Mists And Sprays

Hello folks, sorry about my title but I couldn't resist because today sees the start of a new challenge at Make My Monday and Laura's choice of theme is Sprays and Mists :)
My inspiration is a little late because after I made my background paper a few days ago. Mr Mojo decided to go on a long walk and I've only just managed to get something put together.


The background paper didn't come about in the usual way that using mists would as being a rather messy crafter (you should see my lovely blue fingers!), I tend to get it everywhere!
What I did was to spray on to a craft sheet rather than a piece of paper. I used Sticky Fingers Aqua and Delphinium Summer inks. Once I had sprayed on the inks, I then pressed an A5 piece of cartridge paper into the ink to pick up the colour. Because I did it this way, I was able to colour a couple of pieces of paper with the one spraying session. I simply misted the leftover ink with water and ended up with the paler version I used here.
I stamped on some snowflakes from the Tim Holtz reindeer flight set and heat embossed them with white detail powder. I then cut a piece to fit my card blank and sprayed on some Dylusions White Linen to make the paper look even more snowy.
I then die cut an oval panel of cartridge paper with an X Cut nesting die and stamped on the trees from the set with VersaFine Deep Lagoon ink - I only inked the stamp once and then repeatedly stamped to add depth. I then inked around the edge with VersaColor Lapis Lazuli.
I stamped the deer from the set with Memories Creamy Coffee chalk ink and cut the image out. I stamped the sentiment with the same ink and hand cut this to a panel.
I distressed the edges of the background paper before adding it to the card blank and assembled the remaining elements as you see.


Have a great week and stay warm!
Fliss xx

Some challenges for my card:
Incy Wincy - Christmas - No Red or Green
Challenge Up Your Life - Turquoise and Brown
Stamping Sensations - Simply Christmas
Opus Gluei - Let It Snow, Let It Snow, Let It Snow
Glitter & Sparkle - Use Some Snow

Friday, 28 November 2014

Peek A Boo!

Hello again, I'm back as promised with the details of the new challenge over at the That's Crafty Challenge Blog which has the theme this time of Face which I took to mean that you can make anything you like which has a face on it.
Here's my inspiration and hope you like it:


Ingredients:
Stampendous Cling Stamp - Blossom Beauty
Crafty Individuals Elements Stamp Set - Flower Heads
Kaisercraft Single Clear Stamp - Vintage Fence and Butterflies
Brusho Crystals
Distress Inks
Archival Ink - Watering Can and Fern Green
Stamping Paper
Circle die or cutter
Grey board

I used the vintage fence stamp to make what I think looks very like a shabby brick wall and stamped it with the grey Archival ink. I die cut a circle in the upper half.


I coloured this with a mix of Distress inks and Brusho crystals which I made into paints. I then stamped quite a lot of flowers with the fern green ink and painted them with Brusho crystals. The crystals are fab as you can mix them to make even more colours.
I then cut them out - I recommend doing this whist listening to the radio or TV as it takes a while!
I stamped the face on a scrap of stamping paper and coloured her.
I then checked the placement and glued the face panel to a square of grey board and glued the brick wall panel over the top.
I then arranged the cut out flowers around the face to make her look as if she's peeping through a hole in the wall.
I finished off with the secret garden text and a painted butterfly (my favourite by Kaisercraft).

I hope you can join in as there's a fab prize of a £20 voucher for the online shop for UK residents.
Have a great day and a lovely weekend,

Fliss xx

Bird On A Bough For That's Crafty

Hello all, a quick post to let you know that I have a project today over at That's Crafty using another of Dina Wakley's gorgeous scribbly birds and this time it's a little decorative panel which I hope you like.


If you'd like to see how I made it, you can find all the details over at the blog as usual.

See you again soon with news of our new challenge over at the That's Crafty Challenge Blog.

Fliss x

Monday, 24 November 2014

Black and White With A Hint Of Red

Hello folks and hope you had a good weekend. I had a bit of a difficult time on Friday as I managed to end up totally contact lens less after a complete disaster first thing when trying to put them in! I can't really explain what happened - it was just extreme clumsiness after a week of sleeping badly.

As I'm blind as a bat without I had to phone in to work and say I couldn't go in (owing to the fact that even if I'd got there I'd have to work with my face 6 inches from the computer screen :)

Needless to say, I had a horrible day as I couldn't see to do much at all. I did see the optician on Saturday and she's rescued me with some permanent soft lenses until my new gas permeables get fitted. This was just a well as we had booked to see The Imitation Game that evening and I was able to go. If you haven't seen it, I can highly recommend it although I might be slightly biased as I adore Benedict Cumberbatch - such an amazing actor!!!

Anyhow, enough waffle and on to the reason for today's post which is to let you know that we have a new challenge today over at Make My Monday chosen by the lovely Suzi B who has picked Black and White with a Hint of Red.


Quite clean and simple for me although that could just be the abundance of white!
I stamped the cute penguin by Stampendous with Archival Jet Black ink and coloured his scarf with a red Aquamarker. I then trimmed the image to a panel and added a red mat.
I dry embossed the card blank itself with a Darice snowflake flourish folder. I then stamped the sentiment (Lindsay Mason) with the black ink, adding a red mat as before.
I assembled the card as you see, adding 2 glittery trees die cut with a Crafters Companion Die'sire tree die set.

Have a great day and a lovely week.
Hugs,
Fliss xx

Some challenges I'd like to enter:
Come and Get It - Winter
Allsorts Challenge - No Designer Papers Allowed
Fantasy Stampers Challenge - Cute Christmas
Animal Friends Challenge - It's Cold
Card and Scrap Challenge - Chistmas Card or Box
Christmas Cards All Year Round - No Patterned Paper
Dies R Us Challenge - Christmas
Scribbles Designs Challenge - Penguin Paradise
The East Wind Challenge - Baby It's Cold Outside

Friday, 21 November 2014

Scribbly Red Robin For That's Crafty

Hi all, just a quick post today to let you know that it's my day for a project at That's Crafty and this week I have a clean and simple Christmas card to share that could easily be made in bulk, something essential for the festive season.
Here it is and hope you like it:


He's a really cute fellow don't you think?

Have a great day and a lovely weekend.
Hugs,

Fliss xx

Monday, 17 November 2014

Glitter and Sparkle

Hello all, I hope you had a lovely weekend and managed to fit in a bit of crafting as I did as I'm slowly getting there with my festive heap of creations so fingers crossed I manage to get there in the end!
Today see the start of a new challenge at Make My Monday and this week, we'd like to see your creations with a bit of glittery sparkle.
What more could I do but add another festive bit of inspiration :)


My lovely snowman is from a Polka Doodles CD, Here Comes Christmas, and he's my favourite from there. I coloured him with Aquamarkers, trimmed him to a panel and distressed the edges.
The background paper is Dovecraft and I glued it to a kraft card blank. I then added a panel of red glitter card and a computer generated strip of text.
I added a frayed piece of hessian (burlap) and glued the snowman panel over the top.

Have a great week.
Fliss x

Some challenges for my card:
Card Mania - Use a Digi (My snowman)
Dream Valley Challenges - Anything Goes
Get Creative Challenges - Anything Goes + Optional Glitter (My card has some)

Friday, 14 November 2014

Vintage Style

Hello again, I'm back as promised with the details of our new challenge over at That's Crafty Challenge Blog which for the next fortnight has a theme close to my heart, VINTAGE.
Here's my inspiration which I hope you like.


Ingredients
Carabelle Studio Cling Stamp - Un Ange a Aimer
Crafty Individuals Flourish Stamp - CI-173
Cuttlebug Anna Griffin Embossing Folder -Floribunda
Stampendous Frantage Embossing Enamel - Aged Bronze
Archival Coffee Ink
Distress Inks - Antique Linen, Tattered Rose, Vintage Photo, Gathered Twigs, Tumbled Glass, Peacock Feathers, Fired Brick
Embossing Ink
Aquamarkers
Smooth Stamping Card
Kraft Card
X Cut Nesting Dies - Ovals - Large, Doorplate - Large
Doily

Recipe
1. Make the background paper. Cut a piece of stamping card to fit your card blank - mine is 8x8 because the angel is quite a tall stamp (almost 15cm including the wings). Ink up with Antique Linen and Tattered Rose DIs.
2. Use the flourish stamp and embossing ink to stamp a design in each corner of the inked paper and heat emboss with the Frantage enamel. Add the brown inks around the edges and on the embossed corners.
3. Stamp the flourish design over the paper with Tattered Rose and VIntage Photio without using an acrylic block. Do this repeatedly until you're happy with the effect which will be shabby chic like vintage wallpaper.
4. Stamp the angel and wings on stamping card with the Archival ink and colour with the Distress inks and Aquamarkers as desired. Cut the images out.
5. Dry emboss a panel of stamping card and one of kraft card with the embossing folder. Ink the stamping card panel with the pink and brown DIs. Inks a doily with the Vintage Photo.
6. Stamp the sentiment with the coffee ink and die cut with the smallest oval die. Die cut the second smallest doorplate from a scrap of card and stamp and heat emboss the flourish design with the aged bronze Frantage. Ink with the pink and brown DIs and glue on the sentiment oval.
7. Distress the edges of the background paper before gluing to the card and then glue on the remaining elements as shown.

Don't forget that the prize for entering is a £20 voucher for the online shop though please chack the rules first. Good luck!

Have a great weekend,
Fliss xx

Stag Night

Hi everyone, a bit of a pun for my post title as it's the name of the stamp I used for my masculine Christmas card for That's Crafty today by IndigoBlu which is great for the men in your life for either the festive season or a winter birthday.
Here it is and hope you like it. All details over at the blog as usual if you're interested in how I made it.


He's a rather handsome fellow don't you think?

Thanks for looking and back a bit later with the details of our new challenge today over at That's Crafty Challenge Blog.

Hugs, Fliss xx

Monday, 10 November 2014

Berries and Foliage At Make My Monday

Hello everyone and first up today is an apology for my lack of visiting lately which is because life has got in the way of everything with lots of family stuff going on and work has been exceedingly busy too making me rather exhausted.

I'm slightly late with my post for the new challenge today over at Make My Monday which has a theme chosen by Jacqueline, perfect for adding to your festive heap, BERRIES AND FOLIAGE


  • I decided on holly for my card as it happily has both berries and foliage, starting off by making the background paper which I coloured with Gamboge and Olive Green Brusho Crystals then swiped with Brilliance Galaxy Gold ink for some added shimmer.
  • I then inked up my old Papermania holly stamp with Brilliance Pearlescent Olive ink, adding a little Pearlescent Ivy round the edges of the leaves and inking the berries with Pearlescent Poppy using a sponge then stamped on the coloured paper, re-inking as I went.
  • I stamped the sentiment on deep cream card with Olympia Green VersaFine ink, then die cut with an X Cut die and added to a gold mat. I stamped the holly on stamping card with the same ink, swiped on colour with Peeled Paint Distress ink and coloured the berries with a marker and a Spica pen.
  • I embossed the side of a square kraft card blank with athe Cuttlebug holly sprig folder and assembled the card as you see, adding the cut out single holly sprig to finish.
Have a good week and see you soon.
Fliss xx

Some challenges for my card:
Crafty Calendar - It's All About Christmas
A Crafty Mess - Anything Goes
Alphabet Challenge - T For Traditional Christmas
Christmas Stampin' All Year Long - Anything Goes

Friday, 7 November 2014

2 For 1 For That's Crafty

Hello everyone from an exceedingly windy and wet South of England. I thought I was going to get swept away as the wind is so strong at the moment so not good when you have to drive along the coast to work like me!
It's my That's Crafty project day today and this week I'm sharing something rather bright which actually made 2 projects for the price of one simply by ......... (I'm a tease I know but you'll have to pop on over to see how I did this!)
Here's a sneak peek to entice you - or I hope so at least :)


Thanks for looking and I hope you have a great day and a lovely weekend.

Hugs,
Fliss xx

Monday, 3 November 2014

Vintage Style

Hello there, I hope you all had a lovely weekend and enjoyed some sunny weather as we had a really warm Saturday with 22 degrees on the 1st November! Apparently cold weather is on the way though but I actually don't mind as long as it's not wet!
Over at Make My Monday we have a new challenge today with a theme chosen by yours truly and one which is close to my heart too, you've guessed it - VINTAGE


 I've inked up what I think must be my favourite image, the lovely Le Brun by B Line Designs which I found out a few months ago is based on a self portrait by a French lady artist of the same name. Her art is truly beautiful and so inspirational. I stamped the image on smooth cartridge paper with Memories Creamy Coffee chalk ink and coloured her with Prisma pencils then trimmed around the image on 2 sides. I added her to a shaped kraft card panel.
I then made a background paper by inking smooth card with Spun Sugar, Tattered Rose, Victorian Velvet and Vintage Photo Distress inks applied with an ink applicator. I stamped on a Stacy Stamps lace background design with the coffee ink, not using an acrylic block for a vintage shabby effect. I then cut an aperture in the paper with an X Cut die and will be saving the panel to use on another project.


I then die cut a trellis from kraft card with a Cheery Lynn die and made a background panel to sit behind it with antique cream card embossed with an X Cut rose folder.
I assembled the card with the embossed panel and die cut trellis sitting behind the aperture and added the image panel on the side, decorating with pearls. The finishing touch is a German gold scrap butterfly that has been in my craft stash for quite a while.
I left off a sentiment for the moment as I like to have a few cards that can be made suitable for several occasions.

Have a great day and a lovely week.
Fliss xx

PS: There will be candy soon as today is my birthday and I want to thank everyone who has been so kind in my recent difficult times.